DESCRIPTION
The radio and display receiver assembly sends sound signals to the speakers.
WIRING DIAGRAM 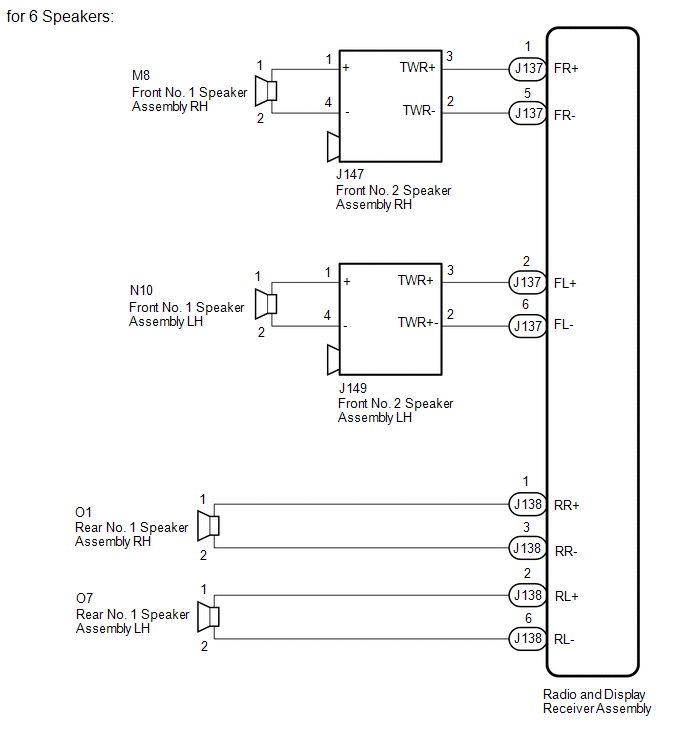 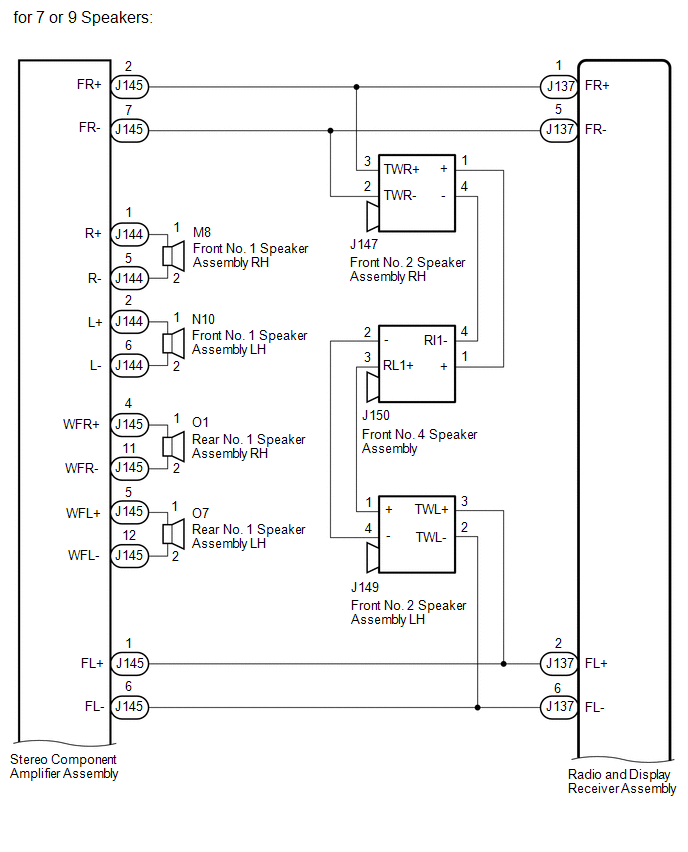 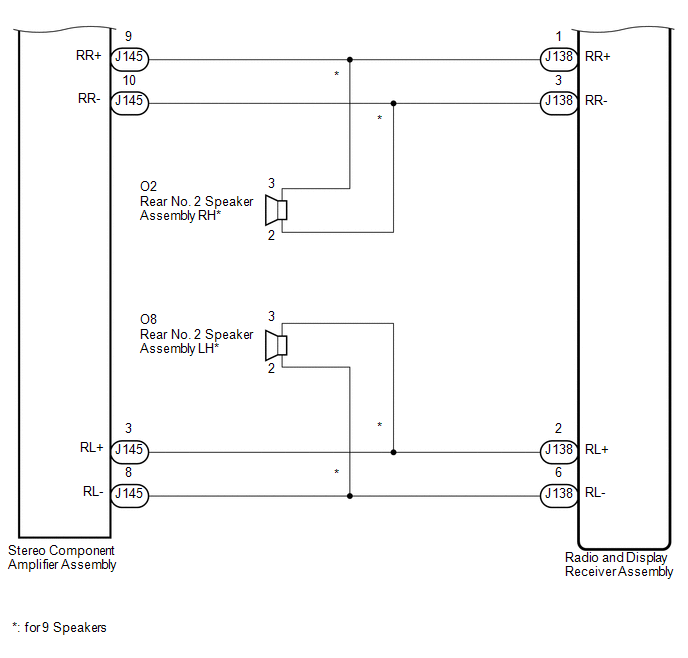
PROCEDURE
CHECK VEHICLE CONDITION
(a) Check the vehicle condition. Result
Result | Proceed to |
for 6 speakers |
A |
for 7 or 9 Speakers |
B |
| B |
 |
GO TO STEP 6 |
| A |
 |
|
CHECK HARNESS AND CONNECTOR (SPEAKER CIRCUIT)
- *1: for RH Side
- *2: for LH Side
(a) Disconnect the J137 and J138 radio and display receiver assembly connectors.
(b) Disconnect the M8*1 and/or N10*2 front No. 1 speaker assembly connector.
(c) Disconnect the J147*1 and/or J149*2 front No. 2 speaker assembly connector.
(d) Disconnect the O1*1 and/or O7*2 rear No. 1 speaker assembly connector.
(e) Measure the resistance according to the value(s) in the table below.
Standard Resistance:
for RH side
Tester Connection | Condition | Specified Condition |
J137-1 (FR+) - J147-3 (TWR+) |
Always |
Below 1 Ω |
J137-5 (FR-) - J147-2 (TWR-) |
Always |
Below 1 Ω |
J147-1 (+) - M8-1 |
Always |
Below 1 Ω |
J147-4 (-) - M8-2 |
Always |
Below 1 Ω |
J138-1 (RR+) - O1-1 |
Always |
Below 1 Ω |
J138-3 (RR-) - O1-2 |
Always |
Below 1 Ω |
J137-1 (FR+) - Body ground |
Always |
10 kΩ or higher |
J137-5 (FR-) - Body ground |
Always |
10 kΩ or higher |
J147-1 (+) - Body ground |
Always |
10 kΩ or higher |
J147-4 (-) - Body ground |
Always |
10 kΩ or higher |
J138-1 (RR+) - Body ground |
Always |
10 kΩ or higher |
J138-3 (RR-) - Body ground |
Always |
10 kΩ or higher |
for LH side
Tester Connection | Condition | Specified Condition |
J137-2 (FL+) - J149-3 (TWL+) |
Always |
Below 1 Ω |
J137-6 (FL-) - J149-2 (TWL-) |
Always |
Below 1 Ω |
J149-1 (+) - N10-1 |
Always |
Below 1 Ω |
J149-4 (-) - N10-2 |
Always |
Below 1 Ω |
J138-2 (RL+) - O7-1 |
Always |
Below 1 Ω |
J138-6 (RL-) - O7-2 |
Always |
Below 1 Ω |
J137-2 (FL+) - Body ground |
Always |
10 kΩ or higher |
J137-6 (FL-) - Body ground |
Always |
10 kΩ or higher |
J149-1 (+) - Body ground |
Always |
10 kΩ or higher |
J149-4 (-) - Body ground |
Always |
10 kΩ or higher |
J138-2 (RL+) - Body ground |
Always |
10 kΩ or higher |
J138-6 (RL-) - Body ground |
Always |
10 kΩ or higher |
| NG |
|
REPAIR OR REPLACE HARNESS OR CONNECTOR |
| OK |
|
|
INSPECT FRONT NO. 1 SPEAKER ASSEMBLY
(a) Remove the front No. 1 speaker assembly (See page  ).
(b) Inspect the front No. 1 speaker assembly (See page ).
| NG |
|
REPLACE FRONT NO. 1 SPEAKER ASSEMBLY |
| OK |
|
|
CHECK FRONT NO. 2 SPEAKER ASSEMBLY
(a) Replace the front No. 2 speaker assembly with a known good one (See page ).
(b) Check that the malfunction disappears.
NOTICE:
- Connect all the connectors to the front No. 2 speaker assemblies that were disconnected.
- Connect all the connectors to the front No. 2 speaker assemblies that were disconnected.
- Perform the above inspection on both LH and RH sides.
OK:
Malfunction disappears.
| OK |
|
END (FRONT NO. 2 SPEAKER ASSEMBLY IS DEFECTIVE) |
| NG |
|
|
INSPECT REAR NO. 1 SPEAKER ASSEMBLY
(a) Remove the rear No. 1 speaker assembly (See page ).
(b) Inspect the rear No. 1 speaker assembly (See page ). Result
Result | Proceed to |
OK (for Column Shift Type) |
A |
OK (for Floor Shift Type) |
B |
NG |
C |
| A |
|
REPLACE RADIO AND DISPLAY RECEIVER ASSEMBLY |
| B |
|
REPLACE RADIO AND DISPLAY RECEIVER ASSEMBLY |
| C |
|
REPLACE REAR NO. 1 SPEAKER ASSEMBLY |
CHECK HARNESS AND CONNECTOR (SPEAKER CIRCUIT)
- *1: for RH Side
- *2: for LH Side
- *3: for 9 Speakers
(a) Disconnect the J137 and J138 radio and display receiver assembly connectors.
(b) Disconnect the M8*1 and/or N10*2 front No. 1 speaker assembly connector.
(c) Disconnect the J147*1 and/or J149*2 front No. 2 speaker assembly connector.
(d) Disconnect the J150 front No. 4 speaker assembly connector.
(e) Disconnect the O1*1 and/or O7*2 rear No. 1 speaker assembly connector.
(f) Disconnect the O2*1 and/or O8*2 rear No. 2 speaker assembly connector*3.
(g) Disconnect the J144 and J145 stereo component amplifier assembly connectors.
(h) Measure the resistance according to the value(s) in the table below.
Standard Resistance:
for RH side
Tester Connection | Condition | Specified Condition |
J137-1 (FR+) - J147-3 (TWR+) |
Always |
Below 1 Ω |
J137-5 (FR-) - J147-2 (TWR-) |
Always |
Below 1 Ω |
J137-1 (FR+) - J145-2 (FR+) |
Always |
Below 1 Ω |
J137-5 (FR-) - J145-7 (FR-) |
Always |
Below 1 Ω |
J147-1 (+) - J150-1 (+) |
Always |
Below 1 Ω |
J147-4 (-) - J150-4 (RI1-) |
Always |
Below 1 Ω |
J144-1 (R+) - M8-1 |
Always |
Below 1 Ω |
J144-5 (R-) - M8-2 |
Always |
Below 1 Ω |
J138-1 (RR+) - J145-9 (RR+) |
Always |
Below 1 Ω |
J138-3 (RR-) - J145-10 (RR-) |
Always |
Below 1 Ω |
J138-1 (RR+) - O2-3* |
Always |
Below 1 Ω |
J138-3 (RR-) - O2-2* |
Always |
Below 1 Ω |
J145-4 (WFR+) - O1-1 |
Always |
Below 1 Ω |
J145-11 (WFR-) - O1-2 |
Always |
Below 1 Ω |
J137-1 (FR+) - Body ground |
Always |
10 kΩ or higher |
J137-5 (FR-) - Body ground |
Always |
10 kΩ or higher |
J147-1 (+) - Body ground |
Always |
10 kΩ or higher |
J147-4 (-) - Body ground |
Always |
10 kΩ or higher |
J144-1 (R+) - Body ground |
Always |
10 kΩ or higher |
J144-5 (R-) - Body ground |
Always |
10 kΩ or higher |
J138-1 (RR+) - Body ground |
Always |
10 kΩ or higher |
J138-3 (RR-) - Body ground |
Always |
10 kΩ or higher |
J145-4 (WFR+) - Body ground |
Always |
10 kΩ or higher |
J145-11 (WFR-) - Body ground |
Always |
10 kΩ or higher |
for LH side
Tester Connection | Condition | Specified Condition |
J137-2 (FL+) - J149-3 (TWL+) |
Always |
Below 1 Ω |
J137-6 (FL-) - J149-2 (TWL-) |
Always |
Below 1 Ω |
J137-2 (FL+) - J145-1 (FL+) |
Always |
Below 1 Ω |
J137-6 (FL-) - J145-6 (FL-) |
Always |
Below 1 Ω |
J149-1 (+) - J150-3 (RI1+) |
Always |
Below 1 Ω |
J149-4 (-) - J150-2 (-) |
Always |
Below 1 Ω |
J144-2 (L+) - N10-1 |
Always |
Below 1 Ω |
J144-6 (L-) - N10-2 |
Always |
Below 1 Ω |
J138-2 (RL+) - J145-3 (RL+) |
Always |
Below 1 Ω |
J138-6 (RL-) - J145-8 (RL-) |
Always |
Below 1 Ω |
J138-2 (RL+) - O8-3* |
Always |
Below 1 Ω |
J138-6 (RL-) - O8-2* |
Always |
Below 1 Ω |
J145-5 (WFL+) - O7-1 |
Always |
Below 1 Ω |
J145-12 (WFL-) - O7-2 |
Always |
Below 1 Ω |
J137-2 (FL+) - Body ground |
Always |
10 kΩ or higher |
J137-6 (FL-) - Body ground |
Always |
10 kΩ or higher |
J149-1 (+) - Body ground |
Always |
10 kΩ or higher |
J149-4 (-) - Body ground |
Always |
10 kΩ or higher |
J144-2 (L+) - Body ground |
Always |
10 kΩ or higher |
J144-6 (L-) - Body ground |
Always |
10 kΩ or higher |
J138-2 (RL+) - Body ground |
Always |
10 kΩ or higher |
J138-6 (RL-) - Body ground |
Always |
10 kΩ or higher |
J145-5 (WFL+) - Body ground |
Always |
10 kΩ or higher |
J145-12 (WFL-) - Body ground |
Always |
10 kΩ or higher |
| NG |
|
REPAIR OR REPLACE HARNESS OR CONNECTOR |
| OK |
|
|
INSPECT FRONT NO. 1 SPEAKER ASSEMBLY
(a) Remove the front No. 1 speaker assembly.
- for Double Cab: See page
- for CrewMax: See page
(b) Inspect the front No. 1 speaker assembly.
- for Double Cab: See page
- for CrewMax: See page
Result
Result | Proceed to |
OK |
A |
NG (for Double Cab) |
B |
NG (for CrewMax) |
C |
| B |
|
REPLACE FRONT NO. 1 SPEAKER ASSEMBLY |
| C |
|
REPLACE FRONT NO. 1 SPEAKER ASSEMBLY |
| A |
|
|
CHECK FRONT NO. 2 SPEAKER ASSEMBLY
(a) Replace the front No. 2 speaker assembly with a known good one.
- for Double Cab: See page
- for CrewMax: See page
(b) Check that the malfunction disappears.
NOTICE:
- Connect all the connectors to the front No. 2 speaker assemblies that were disconnected.
- Connect all the connectors to the front No. 2 speaker assemblies that were disconnected.
- Perform the above inspection on both LH and RH sides.
OK:
Malfunction disappears.
| OK |
|
END (FRONT NO. 2 SPEAKER ASSEMBLY IS DEFECTIVE) |
| NG |
|
|
CHECK FRONT NO. 4 SPEAKER ASSEMBLY
(a) Replace the front No. 4 speaker assembly.
- for Double Cab: See page
- for CrewMax: See page
(b) Check that the malfunction disappears.
OK:
Malfunction disappears.
| OK |
|
END (FRONT NO. 4 SPEAKER ASSEMBLY IS DEFECTIVE) |
| NG |
|
|
INSPECT REAR NO. 1 SPEAKER ASSEMBLY
(a) Remove the rear No. 1 speaker assembly.
- for Double Cab: See page
- for CrewMax: See page
(b) Inspect the rear No. 1 speaker assembly.
- for Double Cab: See page
- for CrewMax: See page
Result
Result | Proceed to |
OK (for CrewMax) |
A |
OK (for Double Cab) |
B |
NG (for Double Cab) |
C |
NG (for CrewMax) |
D |
| B |
|
GO TO STEP 12 |
| C |
|
REPLACE REAR NO. 1 SPEAKER ASSEMBLY |
| D |
|
REPLACE REAR NO. 1 SPEAKER ASSEMBLY |
| A |
|
|
CHECK REAR NO. 2 SPEAKER ASSEMBLY
(a) Replace the rear No. 2 speaker assembly with a known good one (See page ).
(b) Check that the malfunction disappears.
NOTICE:
- Connect all the connectors to the rear No. 2 speaker assemblies that were disconnected.
- Connect all the connectors to the rear No. 2 speaker assemblies that were disconnected.
- Perform the above inspection on both LH and RH sides.
OK:
Malfunction disappears.
| OK |
|
END (REAR NO. 2 SPEAKER ASSEMBLY IS DEFECTIVE) |
| NG |
|
|
INSPECT STEREO COMPONENT AMPLIFIER ASSEMBLY
(a) Replace the stereo component amplifier assembly with a known good one (See page ).
(b) Check that the malfunction disappears.
OK:
Malfunction disappears. Result
Result | Proceed to |
OK |
A |
NG (for Column Shift Type) |
B |
NG (for Floor Shift Type) |
C |
| A |
|
END (STEREO COMPONENT AMPLIFIER ASSEMBLY IS DEFECTIVE) |
| B |
|
REPLACE RADIO AND DISPLAY RECEIVER ASSEMBLY |
| C |
|
REPLACE RADIO AND DISPLAY RECEIVER ASSEMBLY |
|