Overhaul - Inspection, Assembly and Installation of Connecting Rod and Piston Group
INSPECTION
PROCEDURE
1. Carefully inspect all parts. If grooves, recesses or wear marks are visible on the parts, they must be replaced. Check the pistons as follows:
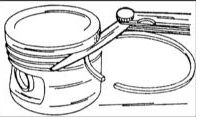
2. Measure the piston ring side clearance in the grooves by installing the rings one at a time into their respective grooves. Use a feeler gauge to measure the clearance between the ring face and the piston groove surface. If the ring side clearance exceeds 0.12 mm, the rings or pistons are worn. The nominal value is 0.02–0.07 mm.
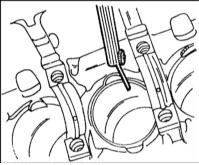
3. Insert the piston rings one by one into the cylinders from the underside of the cylinder block. Using an inverted piston, push the rings approximately 15 mm down. Both ends of the ring must be aligned to measure the ring end gap.
4. Nominal values are given in the Specifications. The wear limit also differs for different piston rings.
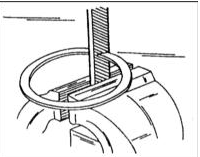
5. If the end gap is too small (for example, on a new ring), file the ring ends by clamping a file in a vise. If the end gap is too large, replace the corresponding ring.
6. Check the piston pins and connecting rod bushings for wear and scoring. If even one connecting rod is unserviceable, replace the entire set.
7. Connecting rod bearing nuts must be replaced.
8. Check the connecting rods for bending and twisting using a special fixture.
9. Check the connecting rod bolts for damage and replace if necessary. Stretch-type bolts are used here and must be replaced with the same type. Assembly of Connecting Rod and Piston Group
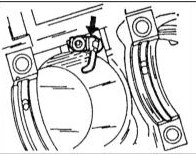
10. If the piston cooling oil nozzle was removed, install it together with the safety valve (27 N·m). The nozzles are located in the lower part of the cylinders.
11. If pistons are being replaced, make sure that all pistons are of the same type.
12. Heat the pistons to 60°C (place them in hot water). Make sure a suitable tool is available to press against the inside of the piston pin.
13. Press the pins by hand into the heated pistons and connecting rods.
14. When assembling the pistons and connecting rods, observe the following requirement:
– The arrow on the piston crown (or the arrow drawn or stamped on the new piston) must point toward the front of the engine. – The cast projections on the connecting rod and rod cap must face the pulley. – The cylinder number markings on the connecting rods and rod caps must match.
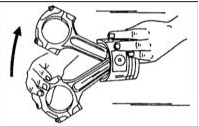
15. Check that after assembly the piston can swing freely on the connecting rod when moved in the direction of the arrow.
16. Using piston ring pliers, install the rings into the grooves one at a time. The two compression rings can be confused, so check their cross-section before installation. In addition, both compression rings are marked on one side with the word "Top" or "Oben", and this marking must face up after installation.
17. Install the three-piece oil control ring, evenly spacing the ring end gaps. Installation of the connecting rod and piston assembly
18. Thoroughly lubricate the cylinders.
19. Arrange all connecting rods according to their cylinder numbers. The cast projections on the connecting rods and rod caps must face the crankshaft pulley.
20. The arrows on the piston crowns must point toward the front of the engine.
21. Position the piston ring end gaps evenly around the piston circumference, i.e. 120° apart.
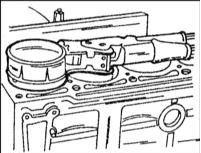
22. Position the piston ring compressor strap as shown in the illustration and press the piston rings into the grooves. Make sure they are fully compressed.
23. Install short lengths of rubber or plastic hose over the connecting rod studs to protect the cylinder bores from scratches.
24. Rotate the crankshaft so that the two crankpins are at TDC.
25. Insert the connecting rod into the cylinder from the top. Lay the engine on its side so that the connecting rods can be brought to the crankpins without scratching the cylinder bores or the crankpin journals. The connecting rod bearing shell must already be in the connecting rod with its tang seated in the recess.
26. Push the piston in until the rings enter the cylinder one after another and the connecting rod big end seats on the crankpin. Do not scratch the crankpin journal.
27. Place the bearing shell for the second bearing in the cap, thoroughly lubricate the shell, install the cap onto the connecting rod studs and tap lightly. Remove the rubber hose sections beforehand. Be sure to observe
CAUTION
make sure the cast projections on the connecting rod and the connecting rod bearing cap are aligned, otherwise a mistake may be made at the last moment.28. Lubricate the contact surfaces of the connecting rod bearing cap nuts with oil.
29. Tighten the connecting rod bearing cap nuts alternately to a torque of 30 N·m, then turn them an additional 90°, i.e. a quarter turn.
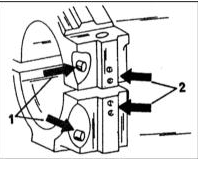
30. After tightening the connecting rod bearings, inspect each bearing again. Experience shows that connecting rod bearing defects sometimes appear after repair, when the bearing cap and connecting rod are not perfectly aligned. Number 1 in the illustration indicates both of the cast projections mentioned above, and number 2 indicates the markings on the connecting rod cap and connecting rod, in this case for the second cylinder. These marks must be aligned opposite each other on all connecting rods. This check must be performed before closing the crankcase.
31. After installing the connecting rods, turn the crankshaft several times by hand to check for binding. If there is binding, check again that the pistons are in the correct position, i.e. the arrows on the crowns must point forward (toward the pulley).
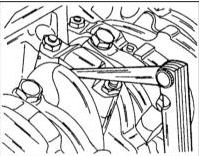
32. Using a feeler gauge, check the connecting rod side clearance to the crankshaft web. Push the connecting rod bearing to the right to measure the clearance with the feeler gauge. This is the connecting rod bearing axial clearance, which must not exceed 0.37 mm. Install the oil pan. The tightening torque of the mounting bolts differs for each bolt.
33. From the front of the engine, loosen the crankshaft pulley (vibration damper) bolts while holding the flywheel.
34. On vehicles with automatic transmission, remove the drive plate using the method described above.
35. Remove the cylinder head together with the intake manifold and exhaust manifold. Some components are removed while removing the engine (depending on engine type).
36. Remove the pulley from the coolant pump and the timing belt lower cover.
37. Mark the direction of rotation of the timing belt on its outer side with paint.
38. After loosening the belt tensioner nut, remove the timing belt from the drive and tensioner sprockets. Do not turn the camshaft(s) after this.
39. Remove the oil pan.
40. Remove the oil pump.
41. If necessary, remove only the crankshaft; the pistons and connecting rods can be left in the cylinder block. Otherwise, remove the pistons and connecting rods. If the pistons and connecting rods remain in the block, mark the connecting rod bearing caps in order, remove them and store them together with the bearing shells. Remember that damaged stretch bolts must always be replaced.
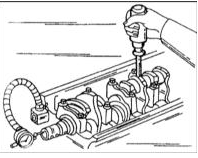
42. Mount a dial indicator on a stand against the front of the cylinder block, or attach it with a magnetic base to the cylinder block, with the probe resting on the crankshaft. Using a screwdriver, push the crankshaft to one side, set the dial indicator to zero, then push the crankshaft to the other side. The dial indicator will show the crankshaft axial clearance; record this value. If it exceeds 0.25 mm, this must be taken into account during assembly. The center main bearing shells are fitted with thrust half-rings that determine the axial clearance.
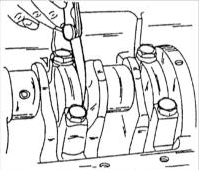
43. If a dial indicator is not available, the clearance can be measured at the center bearing between the bearing flange and the crankshaft surface using a blade-type feeler gauge. For the check with a feeler gauge (no thicker than 0.25 mm), the crankshaft must be pushed to one side.
44. Remove the bolts securing the front seal flange on the front of the engine and remove the flange with its gasket.
45. Remove the engine intermediate plate. Remove the rear seal flange bolts and remove the flange with the seal. The intermediate plate is located by locating sleeves.
46. Gradually loosen the crankshaft main bearing cap bolts in a crisscross pattern and remove the caps in sequence. Make sure the bearing cap numbers are clearly visible. Main bearing cap No. 1 is located on the pulley side.
47. Remove the bearing shells from the main journals and connecting rods and store them together with their corresponding bearing caps. Note that some shells have oil grooves and others do not.
48. Carefully remove the crankshaft from the cylinder block.
49. Remove the remaining bearing shells from the cylinder block and store them together with the other shells and bearing caps. These shells have oil channels and must be reinstalled in the cylinder block during assembly.
50. Remove the lower thrust washers from the center main bearing. Mark them on the side face.
Test yourself
A quick Audi A3 quiz: every answer comes with an explanation and a link to the manual page.