Removal and Installation of Cylinder Head on Diesel Engine
 Cylinder Head. Diesel Engine 1 – cylinder head gasket. Pay attention
CAUTION
to the marking. 2 – bolt, 20 N·m 3 – cylinder head. Not to be machined. 4 – lug 5 – cylinder head bolt. Must be replaced. Tighten bolts in the sequence shown for the 4-cylinder petrol engine 6 – oil separator 7 – cylinder head cover. Gasket is vulcanised. If damaged, replace the complete cylinder head cover. 8 – cover 9 – oil filler cap cover. Replace seal if leaking. 10 – to intake hose 11 – clamp 12 – pressure regulating valve 13 – seal. Replace if damaged. 14 – collar nut, 10 N·m. Lubricate contact surface if nut does not reach stop 15 – upper sealing washer. Replace if damaged. 16 – lower sealing cone 17 – fuel lines. Fuel lines must be replaced as a set. Do not change the shape of fuel lines. Tightening torque 25 N·m. 18 – vacuum pump. For brake booster. 19 – bolt, 20 N·m 20 – seal. Must be replaced.REMOVAL
CAUTION
Operations and instructions applying to all engines are given in the section for 4-cylinder petrol engines. This subsection describes only the differences relating to the diesel engine.PROCEDURE
1. Remove the V-ribbed belt, refer to Removal and Installation of V-Ribbed Belt.
2. Disconnect the electrical wires from the shut-off device and the spark plugs.
3. Clean the fuel line connections at the injection pump with cold cleaner and disconnect them. Cover the openings with caps.
CAUTION
Wipe up spilled engine oil with a rag. Disconnect the oil supply and return lines at the turbocharger. Cover the lines with polyethylene and rubber rings to prevent dirt ingress.4. Disconnect the oil supply line to the turbocharger at the clips and at the oil filter bracket.
5. Unscrew the mounting bolts and remove the coolant pipe bracket. Remove the pipe.
CAUTION
Wipe up spilled diesel fuel with a rag. Disconnect the fuel hoses (arrows) from the injection pump. Spread the clamps with pliers, e.g. HAZET 798–5. Cover the lines with polyethylene and rubber rings to protect against dirt.6. Disconnect connector –2– of the pressure/temperature sensor at the intake pipe.
7. Disconnect the air supply pipe –1– from the cylinder head.
8. Remove the upper timing belt cover.
9. Unscrew the two timing belt cover bolts at the rear on both sides of the cylinder head.
10. Turn the engine to TDC and remove the timing belt from the camshaft sprocket, refer to Setting No. 1 Piston to TDC.
11. Remove the camshaft timing belt sprocket, refer to Removal and Installation of Timing Belt.
12. Fully unscrew the tensioner roller nut.
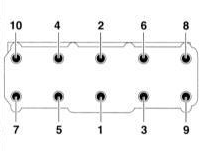
13. The diesel engine cylinder head bolts have internal splines. A special key is therefore required to loosen them, e.g. HAZET 990 Sig–
12. Loosen the bolts in the reverse order of their numbering, i.e. from 10 to
1.
14. With the help of assistants, remove the cylinder head sideways from the timing belt guard and at the same time remove the tensioner roller.
INSTALLATION
PROCEDURE
1. Diesel engine cylinder heads are not to be machined.
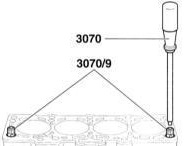
2. To center the cylinder head, screw guide pins AUDI–3070/ into the outer cylinder head bolt holes using screwdriver 3070.
9. Note: If the specified pins are not available, old cylinder head bolts with the heads cut off may be used instead. To unscrew pins obtained this way, it is recommended to cut a screwdriver slot in their end.
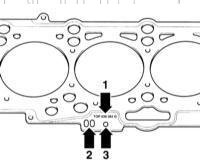
3. Depending on the piston protrusion, different cylinder head gaskets are fitted. When replacing the gasket, pay attention to its marking.
CAUTION
to its marking and use a new gasket only with the same marking. Arrow –1–: spare part number, arrow –2–: control code (CAUTION
disregard), arrow –3–: = marking (holes).4. If new pistons are installed, check the piston protrusion and select the new gasket accordingly (shop work).
5. With the help of an assistant, insert the cylinder head into the timing belt cover and at the same time install the tensioner pulley.
CAUTION
When installing the cylinder head, do not bend the rear tabs of the gasket with the exhaust manifold heat shield.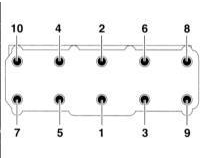
6. Tighten the cylinder head bolts in four stages, in sequence from 1 to
10. Tightening torques are given in the Specifications.
Test yourself
A quick Audi A3 quiz: every answer comes with an explanation and a link to the manual page.