Lubrication System - Removal and Installation of Oil Pan / Replacing Oil Pan Gasket
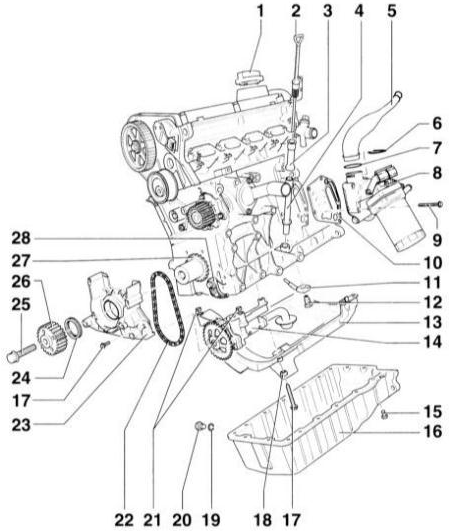 Oil pan, oil pump, oil filter The design is the same for all 4-cylinder engines. The illustration shows engine 1.8 L without turbocharger. On diesel engines, unlike the illustration, a vertical oil filter is installed. 1 – cover Replace the seal if damaged. 2 – oil level indicator 3 – funnel Remove for draining oil. 4 – guide tube 5 – connecting tube For suction hose, only for engines 1.8 L. 6 – clamp 7 – O-ring Replace if damaged. 8 – oil filter housing with oil cooler and oil filter Observe
CAUTION
according to the installation instructions marked on the filter. Hand-tighten 9 – bolt, 25 N·m 10 – seal with baffle plate. Replace, observing the installation position. 11 – pressure relief valve, 27 N·m Opening pressure: 2.5 – 3.2 bar. 12 – oil spray nozzle for piston cooling. 13 – baffle plate 14 – oil pump with sprocket 15 – bolt, 15 N·m Loosen with a crank wrench, e.g. AUDI–3185 or HAZET 2528–10. 16 – oil pan. Note: The oil pan has no sealing gasket. Apply liquid silicone sealant "K 176 404 A2" for sealing. 17 – bolt, 15 N·m 18 – spacer sleeve 19 – O-ring. Always replace. 20 – oil drain plug, 30 N·m 21 – guide sleeve. For centering the oil pump/cylinder block. 22 – oil pump chain drive. Mark the direction of rotation before removal. 23 – front sealing flange 24 – O-ring 25 – center bolt. Always replace. Torque 90 N·m + 90° (1/4 turn). Use special tool AUDI–3099 to hold the crankshaft. The tool is attached to the timing belt pulley with two intermediate washers. 26 – crankshaft timing belt gear. Can only be installed in one position. 27 – sprocket, oil pump drive. 28 – chain tensioner unit with guide rail, 25 N·m If the spring is broken, replace the tensioner as a set.
REMOVAL
CAUTION
Raising and placing the vehicle on stands is hazardous. Therefore, before performing this operation, read the subsection Jacking Up the Vehicle.PROCEDURE
1. Raise and support the vehicle on stands. Drain the engine oil, refer to the subsection Engine Oil and Oil Filter Replacement.
CAUTION
Protect the environment. Never dispose of used oil by pouring it out or placing it with household waste. Oil sales outlets accept the corresponding quantity of used oil free of charge. Therefore, when buying oil, keep the receipt and the oil canister so that you can return the used oil later!2. Install the oil drain plug with a new O-ring.
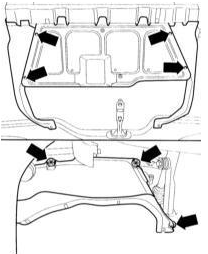
3. Remove the mounting bolts and remove the lower and side engine compartment covers on the right and left (arrows). The illustration shows the gasoline engine version. On diesel engines, remove the lower engine compartment cover.
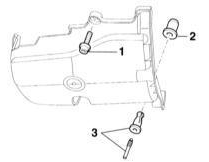
4. Diesel engine: Remove the oil pan noise insulation cover. To do this, remove bolt –1–. Press out the rivet pin –3– with a wire. Remove the rivet. The rubber bushing –2– must remain in the cylinder block.
5. Remove the oil pan mounting bolts using a crowfoot wrench, e.g., HAZET 2528–10, and remove the oil pan. If necessary, use a rubber mallet to separate the oil pan. INSTALLATION
6. Thoroughly remove all sealant residue from the cylinder block using a scraper.
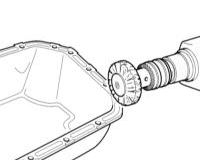
7. Remove sealant residue from the oil pan using a rotating wire brush, e.g., on a power hand tool.
CAUTION
Wear protective goggles. There is a risk of injury from residues of the sealant being removed.8. Clean the sealing surfaces. They must be free of oil and grease.
9. For more accurate positioning of the oil pan, screw two M6 guide pins into the cylinder block flange.
10. Check the expiry date of the AUDI–D176404 A2 sealant before use. Cut the tip of the tube so that an opening of 3 mm diameter is formed.
CAUTION
The oil pan must be installed within 5 min after applying silicone sealant. After installing the oil pan, the sealant must cure for at least 30 min. Only after this may oil be filled into the engine.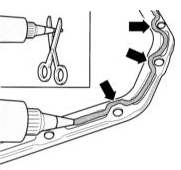
11. Apply silicone sealant to the clean sealing surfaces. The sealant bead must be 2 – 3 mm thick and must run along the inside edge at the bolt holes.
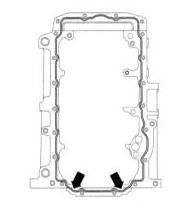
12. The illustration shows the position of the sealant bead on the cylinder block. Apply sealant only to the oil pan sealing surface. Apply sealant especially carefully at the transition to the rear flange.
CAUTION
The sealant bead must not be too thick. Otherwise, excess sealant will enter the oil circuit and clog the strainer in the oil pump suction pipe.13. Immediately install the oil pan and press it evenly against the cylinder block. Tighten to 5 N·m.
14. Tighten the 3 engine-to-transmission connecting bolts in the area of the oil pan to 45 N·m.
CAUTION
When installing the oil pan on a removed engine, position the oil pan so that on the transmission side it is flush with the cylinder block.15. Tighten the cylinder block mounting bolts in a crosswise sequence to 10 N·m, then tighten all bolts in two stages to 15 N·m.
16. Diesel engine: Install the oil pan noise insulation cover on the engine and secure it. To do this, remove the pin from the rivet. Insert the rivet and secure it by pressing in the pin. Tighten bolt –1– to 20 N·m.
17. Fill the engine with oil. Refer to the subsection Engine Oil and Oil Filter Replacement.
18. Install and secure the lower and side left and right engine compartment covers.
Test yourself
A quick Audi A3 quiz: every answer comes with an explanation and a link to the manual page.