Luggage compartment
Loading the luggage compartment
Luggage must be loaded correctly in the vehicle.
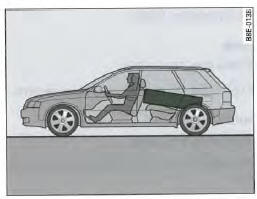
Fig. 98 Place heavy objects as far forward as possible in the passenger compartment.
To maintain the vehicle's good handling characteristics, please observe the following:
- Distribute the load as evenly as possible.
- Place heavy objects as far forward as possible in the passenger compartment => fig. 98.
- Secure the luggage with the cargo net* or non-elastic lashing straps to the tie-down eyelets.
CAUTION!
- Objects not secured in the luggage compartment may suddenly shift and change the handling characteristics of your vehicle.
- Objects not secured in the passenger compartment may, during sudden manoeuvres or in an accident, be thrown forward in the vehicle and injure passengers.
- Always stow objects in the luggage compartment and use suitable straps, especially designed for heavy objects.
- When transporting heavy objects, be aware that a change in the centre of gravity can alter the handling characteristics of the vehicle.
- Observe the instructions provided in => “Driving safely”.
 Warning!
Objects rubbing against the rear window may damage the defroster wires.
Note
Adjust the tyre inflation pressure to the vehicle load.
Refer to the sticker on the door pillar => fig. 227.
Tie-down eyelets
Four tie-down eyelets are provided in the luggage compartment for securing transported objects.
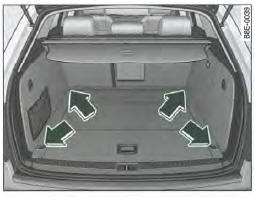
Fig. 99 Location of the tie-down eyelets in the luggage compartment
- Secure transported objects to these eyelets => fig. 99 -arrows-.
- Observe the safety instructions
Cargo net/storage net
The cargo net prevents light objects from shifting in the luggage compartment and can also be used as a storage net.
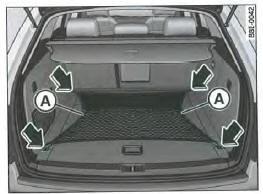
Fig. 100 Cargo net extended
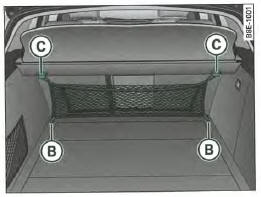
Fig. 101 Storage net hooked in place
Cargo net
- Hook the cargo net to the four tie-down eyelets -arrows- => fig. 100.
Storage net
- Hook the storage net hooks to the tie-down eyelets (B) => fig. 101.
- Pull the net upward and hook the eyelets (A) => fig. 100 to the hooks (C) => fig. 101.
The storage net can also be attached at the bottom to the tie-down eyelets on the floor at the rear skirt, and at the top to the eyelets on the left and right side trim.
CAUTION!
For reasons of strength, the storage net must only be used for objects weighing a maximum of 5 kg. It is not suitable for securing heavier objects - Risk of injury!
Lashing strap
Luggage can be secured with the strap on the right side trim in the luggage compartment.
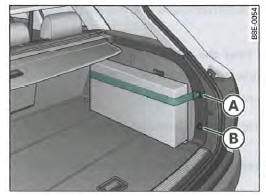
Fig. 102 Lashing strap on the right luggage compartment trim
- Hook the strap to the attachment point (A) OR (B) => fig. 102.
Depending on the height of the transported objects, you can hook the strap to the lower or upper attachment point.
If you are transporting small objects, you can also hook the strap to the centre. However, this is only possible when the strap is hooked to attachment point (B).
CAUTION!
For reasons of strength, the lashing strap must only be used for objects weighing a maximum of 5 kg. It is not suitable for securing heavier objects - Risk of injury!
Load cover
The load cover conceals the contents of the luggage compartment.
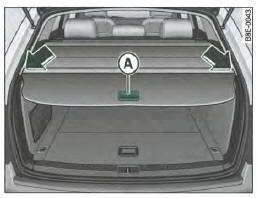
Fig. 103 Tailgate open with load cover extended
Extending the load cover
- Using the handle (A) => fig. 103, pull the load cover evenly toward the rear of the vehicle.
- Hook the ends of the cross bar into the right and left openings in the side trim => fig. 103 -arrow-.
Retracting the load cover
- Release the cross bar from the openings in the side trim.
- Allow the load cover to retract slowly.
Removing and refitting the load cover
CAUTION!
The load cover is not a loading surface. Objects placed on the load cover pose a serious hazard to all vehicle occupants in the event of hard braking or an accident.
Risk of accident!
Load separation net
The partition net prevents objects not secured in the luggage compartment from being thrown into the passenger compartment (e.g. during braking).
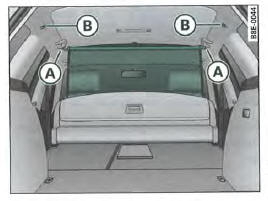
Fig. 104 Partition net attachment eyelets
Fitting the partition net
- Pull the partition net fully upward.
- Hook the cross bar to the attachment eyelets (B) => fig. 104.
Fitting the partition net when the rear seat backrest is folded down.
- Fold down the backrest
- Pull the partition net upward.
- Hook the cross bar to the attachment eyelets (A) => fig. 104.
Retracting the partition net
- Unhook the cross bar from the attachment eyelets.
- Allow the net to retract slowly.
Removing and refitting the partition net
Removing and refitting the load cover/partition net
The load cover/partition net can only be removed and refitted when the seat backrests have been folded forward.
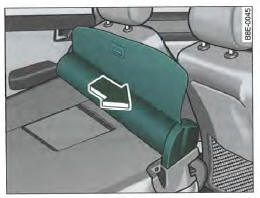
Fig. 105 Removing and refitting the load cover/partition net
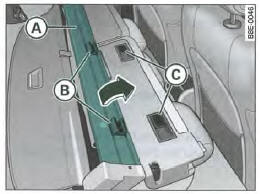
Fig. 106 Installing the luggage compartment cover/divider net
Removing the luggage compartment cover/divider net
- Open the right rear door.
- Fold the rear seat backrest forward.
- Pull the divider net in the direction of the arrow => , fig. 105 and disengage it from its rails.
Installing the luggage compartment cover/divider net
- Open the right rear door.
- Fold the rear seat backrest forward.
- Position the divider net (A) on the backrest so that the attachments (B) are in front of the rails (C).
- Slide the luggage compartment cover/divider net toward the left side of the vehicle until it stops.
Retaining hooks
The retaining hooks are used to secure light luggage.
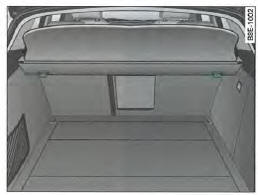
Fig. 107 Retaining hooks on the luggage compartment cover
The storage net can be hooked onto the outer hooks.
If the storage net is not hooked on, you can use the three hooks to secure bags, etc.
CAUTION!
For reasons of strength, the hooks must not be used for objects weighing more than 5 kg. They are not suitable for securing heavier objects - Risk of injury!
Protective tray
Use the protective tray to transport dirty or wet objects.
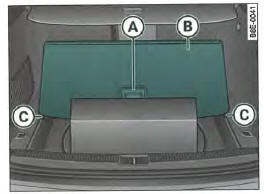
Fig. 108 Loading floor raised
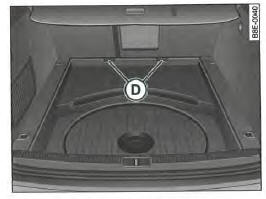
Fig. 109 Loading floor enlarged
Raising the loading floor
- Open the tailgate.
- Lift the luggage compartment cover (B) using the handle (A) => fig. 108 and align the outer edges in the recesses (C).
- Place the objects in the protective tray.
Folding down the loading floor
- Open the tailgate.
- Fold the loading floor down using the handle (A) => fig. 108 until it reaches the rear seat backrest.
Removing the loading floor
- Open the tailgate.
- Fold the loading floor down using the handle (A) => fig. 108 until it reaches the rear seat backrest.
- Pull the complete loading floor out of the retainers (D) => fig. 109 toward the rear of the vehicle.
You can also store small objects under the cover (B) => fig. 108.
You can enlarge the storage area of the protective tray by folding the entire loading floor forward or removing it.
 Warning!
When the loading floor is raised, you may only transport objects that do not exceed the maximum loading height (2/3 of the raised loading floor) and whose weight does not exceed approx. 7.5 kg.
Note
We recommend securing objects with a tie-down strap to the left and right eyelets.
Side storage compartment
The CD-ROM drive for the navigation system* is located in the left side storage compartment of the luggage compartment.
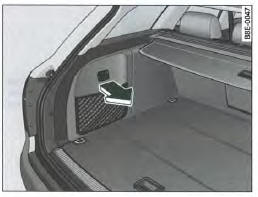
Fig. 110 Luggage compartment: side trim with closed storage compartment
To open it, pull the handle toward you => fig. 110.
CD-ROM drive for navigation system * The CD-ROM drive for the Audi navigation system is located in this compartment in the luggage compartment. Its use is described in a separate Owner's Manual."
Enlarging the luggage compartment
To enlarge the luggage compartment, you can fold one or both rear seat backrests forward.

Fig. 111 Backrest release lever
To fold a rear seat backrest forward
- Push the release lever (A) => fig. 111 in the direction of the arrow.
- Fold the backrest forward.
To raise a rear seat backrest
Raise the rear seat backrest until it locks into place correctly. The backrest is correctly locked when the red marker on the pin (B) is no longer visible.
CAUTION!
- The backrest must be correctly locked so that the rear center seat belt can perform its protective function.
- The backrest must be correctly locked so that objects in the luggage compartment cannot slide forward in the event of sudden braking.
 Warning!
When raising the rear seat backrest, make sure the side seat belts are correctly positioned in the belt guide so that they are not trapped in the backrest locking mechanism and are not damaged.
Ski sleeve
The ski sleeve allows you to transport long objects (for example skis) inside the passenger compartment while protecting them from dirt and damage.
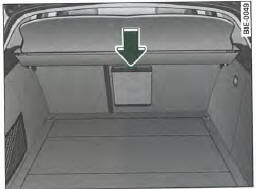
Fig. 112 Partial rear view of the rear seats: ski sleeve cover
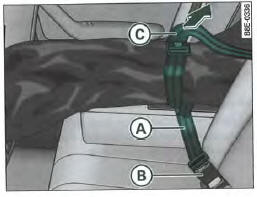
Fig. 113 Attaching the ski sleeve to the rear center seat belt lock housing
Loading
- Open the tailgate.
- Press the release button of the ski sleeve cover, fig. 112 -arrow- and fold the cover downward.
- Fold the rear center armrest forward.
- Press the release button of the ski sleeve cover inside the passenger compartment and fold the cover outward.
- Remove and unfold the ski sleeve.
- Slide the objects to be transported from the luggage compartment into the ski sleeve.
Bracket
Insert the tongue of the ski sleeve strap (A) => page 110, fig. 113 into the rear center seat belt lock housing (B).
Tighten the strap by pulling its free end (C).
Storage
- Close the ski sleeve cover in the luggage compartment.
- Fold the ski sleeve carefully.
- Close the cover in the passenger compartment.
CAUTION!
Once loaded, the ski sleeve must be secured with the strap.
Note
Do not fold the ski sleeve while it is still wet.
Test yourself
A quick Audi A4 quiz: every answer comes with an explanation and a link to the manual page.