Engine. Assembly
Special Service Tools / General Equipment
 |
100-002 (TOOL-4201-C) Dial Indicator Holding Fixture |
 |
300-OTC1819E Floor Crane 2200 lb, Folding |
 |
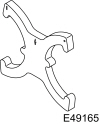
303-103 (T74P-6375-A) Flywheel Holding Tool T74P-77000-A TKIT-2009TS-F |
 |
303-1097 Locking Tool, Variable Camshaft Timing Oil Control Valve TKIT-2010B-FLM TKIT-2010B-RYAD |
 |
303-1502 Engine Lifting Device TKIT-2012A-FL TKIT-2012A-RYAD |
 |
303-1532 Installer, Camshaft Seal TKIT-2010B-FLM TKIT-2010B-RYAD |
 |
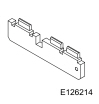
303-1550 Alignment Tool, Crankshaft Damper TKIT-2012A-FL TKIT-2012A-RYAD |
 |
303-1552 Camshaft Timing Tool TKIT-2012A-FL TKIT-2012A-RYAD |
 |
303-1567 Size, Teflon Seal TKIT-2010C-FLM |
 |
303-175 (T82L-6316-A) Installer, Crankshaft Damper TKIT-1982-F |
 |
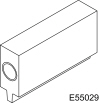
303-335 (T88T-6701-A) Installer, Front Cover Seal TKIT-1988-FLM TKIT-1988-F |
 |
303-393-02 Adapter, 303-393 TKIT-2012A-FL TKIT-2012A-RHD |
 |
303-393A Flywheel Locking Tool TKIT-2012A-FL TKIT-2012A-RHD |
 |
303-420 (T92P-6701-BH) Installer, Front Crankshaft Seal TKIT-1992-FLMH/LMH TKIT-1992-LMH/MH |
 |
303-748 Crankshaft Locking Tool TKIT-2010B-FLM TKIT-2010B-RHD |
 |
310-205 Fuel Injector Brush |
 |
310-207 Installer, Fuel Injector Seal Assembly TKIT-2009A-FLM |
| Feeler gauge | |
| M6 Press | |
| Hose Clamp Removal/Installation Tool | |
| Piston Ring Compressor | |
Materials
| Name | Specification |
|---|---|
| Motorcraft® Threadlocker 262 TA-26 |
WSK-M2G351-A6 |
| Motorcraft® High Performance Engine RTV Silicone TA-357 |
ALL-M4G323-A6 |
| Flange Sealant CU7Z-19B508-A |
WSS-M2G348-A11 |
| Motorcraft® Metal Surface Preparation Wipes ZC-31-B |
- |
| Engine Oil — SAE 5W-20 — Semi-Synthetic Engine Oil XO-5W20-Q1SP |
WSS-M2C945-B1 |
| Motorcraft® Orange Concentrated Antifreeze/Coolant WSS-M97B44-D |
WSS-M97B44-D |
| Flange Sealant - Anaerobic Loctite® 51031 |
WSS-M2G348-A7 |
| Motorcraft® Brake Parts Cleaner PM-4-A, PM-4-B |
- |
NOTICE: Cleanliness is extremely important when repairing the engine. Any foreign material, including material created during the cleaning of gasket surfaces, that enters the oil passages, coolant passages or oil pan may cause engine failure.
- Install the engine piston oil cooler valves and tighten the bolts.
Torque: 80 lb-in (9 N·m)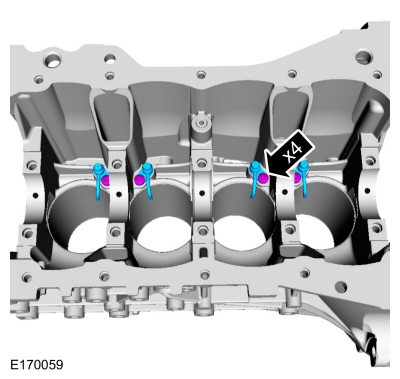
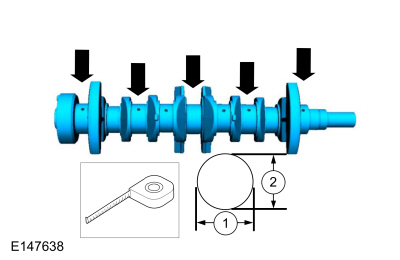
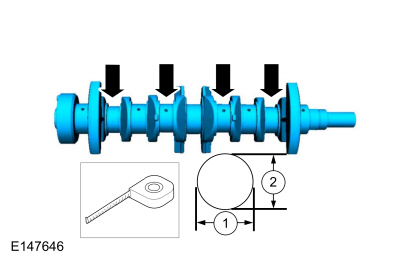
- Measure the length in two directions.
- Record the smallest value for each crankshaft main journal.
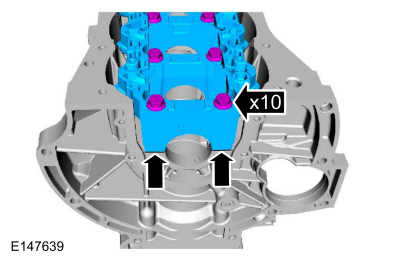
- Install the main bearing beam flush with the block and hand-tighten the bolts.
- Tighten the main bearing beam bolts in the sequence shown in 4 steps.
Torque:
Step 1: 22 lb-ft (30 N·m)
Step 2: 37 lb-ft (50 N·m)
Step 3: 45°
Step 4: 45°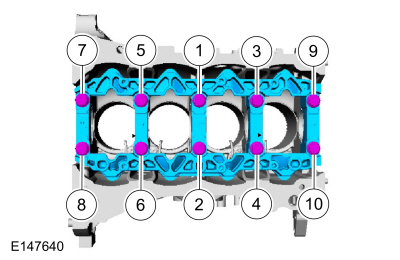
- Measure the length at five locations.
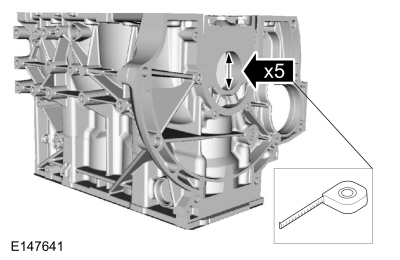
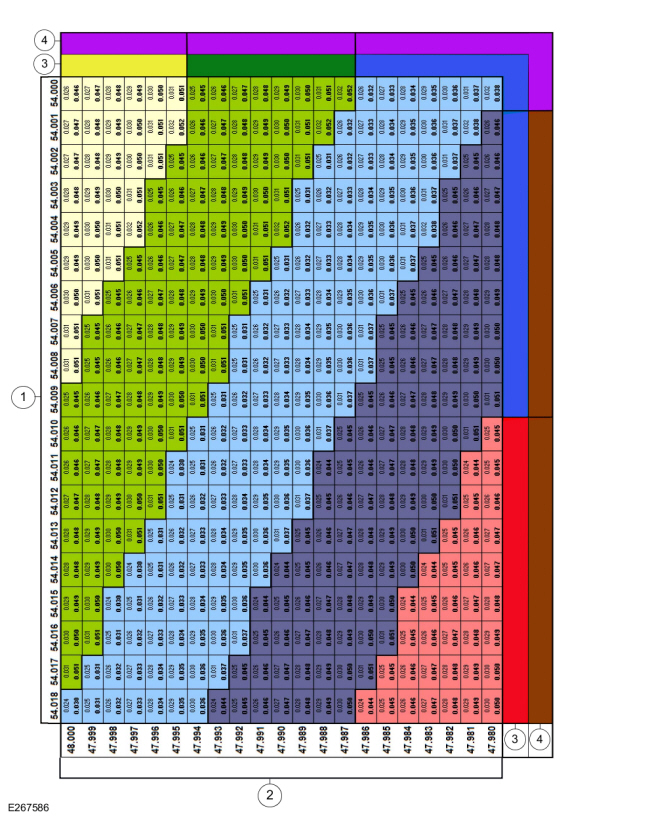
- Using the chart, select the correct class of main bearings.
- Cylinder Block Bore Diameter
- Crankshaft Journal Diameter
- Upper bearing color code
- Lower bearing color code
NOTICE: The connecting rod cap must be installed in the same orientation as marked during disassembly, otherwise engine damage may occur.
Using new original bolts, install the connecting rod caps and bolts in 3 steps.
Torque:
Step 1: 159 lb-in (18 N·m)
Step 2: 45°
Step 3: 45°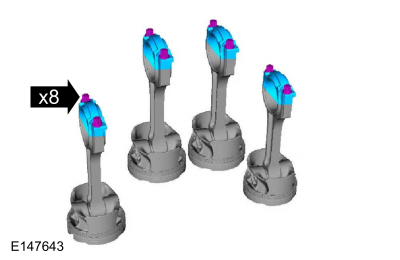
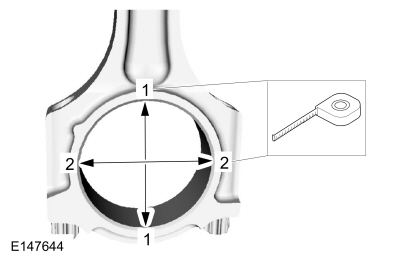
- Measure the length or distance in two directions.
- Record the smallest value for each connecting rod.
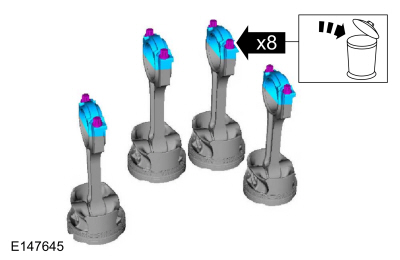
- Remove the connecting rod bolts and caps. Discard the bolts.
- Measure the length in two directions.
- Record the smallest value for each connecting rod journal.
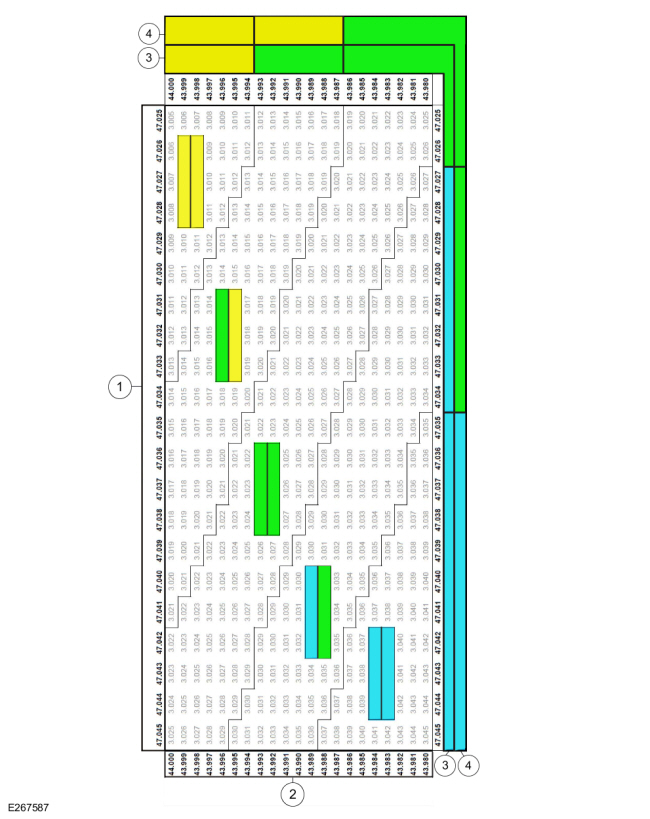
- Using the chart, select the connecting rod bearings of the correct size for each crankshaft connecting rod journal.
- Connecting rod bore diameter
- Crankshaft connecting rod journal diameter
- Upper bearing color code
- Lower bearing color code
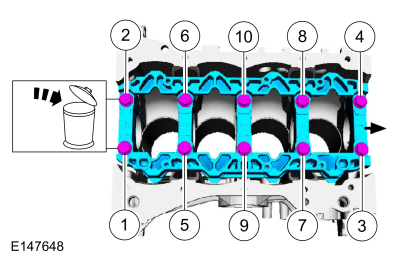
- Remove the bolts and main bearing beam. Discard the bolts.
- Lubricate with clean engine oil and install the crankshaft main bearings.
Material: Engine Oil - SAE 5W-20 - Synthetic Engine Oil / XO-5W20-Q1SP (WSS-M2C945-B1)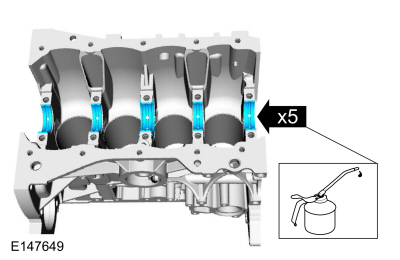
- Lubricate with clean engine oil and install the main bearing beam bearings.
Material: Engine Oil - SAE 5W-20 - Synthetic Engine Oil / XO-5W20-Q1SP (WSS-M2C945-B1)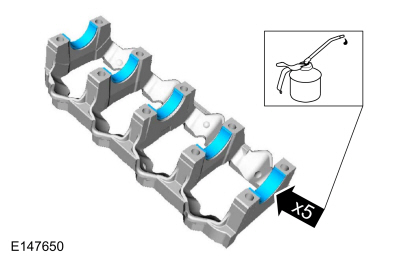
- Lubricate with clean engine oil and install the crankshaft.
Material: Engine Oil — SAE 5W-20 — synthetic engine oil / XO-5W20-Q1SP (WSS-M2C945-B1)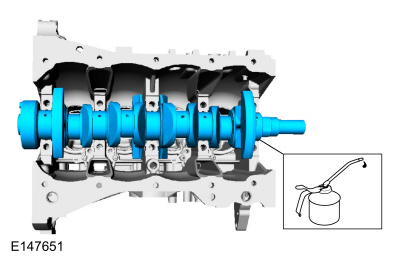
- Lubricate with clean engine oil and install the main bearing beam bearings.
Material: Engine Oil - SAE 5W-20 - Synthetic Engine Oil / XO-5W20-Q1SP (WSS-M2C945-B1)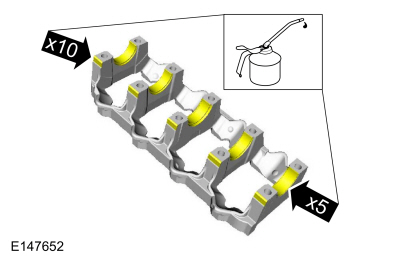
- Install flush.
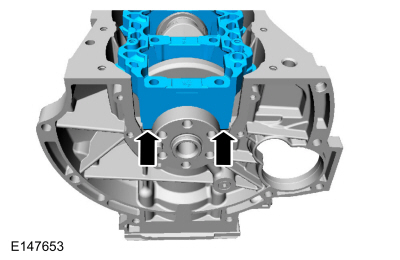
- Install the main bearing caps and bolts and tighten the bolts in the sequence shown in 4 steps.
Material: Engine Oil — SAE 5W-20 — synthetic engine oil / XO-5W20-Q1SP (WSS-M2C945-B1)
Torque:
Step 1: 22 lb-ft (30 N·m)
Step 2: 37 lb-ft (50 N·m)
Step 3: 45°
Step 4: 45°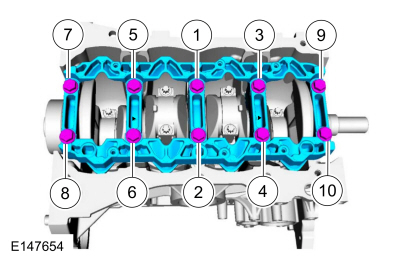
- Position the crankshaft toward the rear of the cylinder block.
- Zero the dial indicator using the holder.
Use Special Service Tool: 100-002 (TOOL-4201-C) Dial indicator holding fixture.
- Move the crankshaft toward the front of the cylinder block. Mark and record the crankshaft end play.
- Crankshaft end play must be 0.12-0.43 mm (0.008-0.017 in). If crankshaft end play is outside the specified range, install new components as necessary.
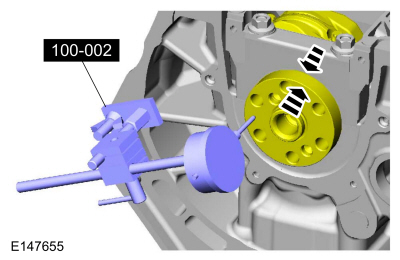
- Arrows point to the front of the engine.
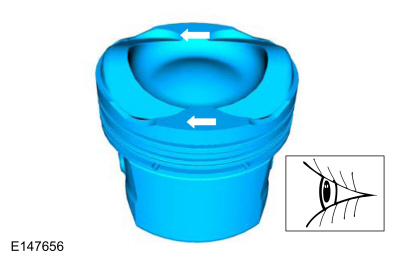
- Lubricate with clean engine oil and install the connecting rod bearings.
Material: Engine Oil — SAE 5W-20 — synthetic engine oil / XO-5W20-Q1SP (WSS-M2C945-B1)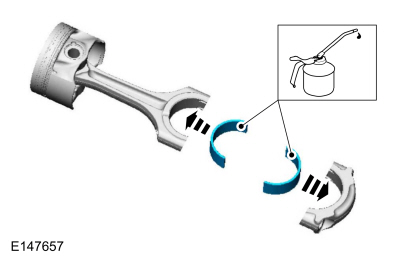
- Top compression ring gap location.
- Bottom compression ring gap location.
- Upper oil control ring rail gap location.
- Expander ring gap location.
- Lower oil control ring rail gap location.
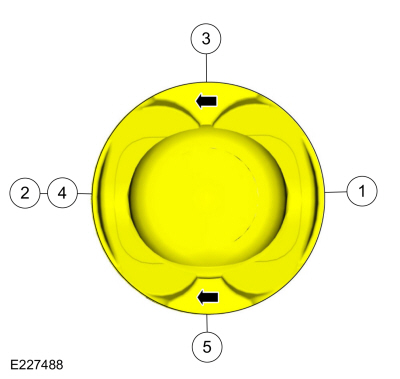
- Using the piston ring compressor, lubricate with clean engine oil and install the pistons.
Use general equipment: Piston Ring Compressor.
Material: Engine Oil — SAE 5W-20 — synthetic engine oil / XO-5W20-Q1SP (WSS-M2C945-B1)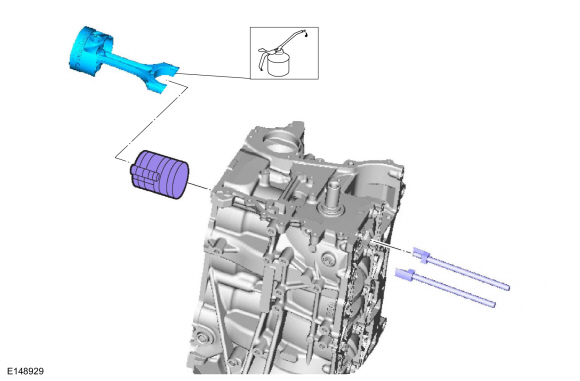
NOTICE: The connecting rod cap must be installed in the same orientation as marked during disassembly, otherwise engine damage may occur.
Install the connecting rod caps and connecting rod bolts for cylinders 1 and 4 first and tighten. Then rotate the crankshaft 180 degrees and install the connecting rod caps and connecting rod bolts for cylinders 2 and 3 and tighten.
Torque:
Step 1: 159 lb-in (18 N·m)
Step 2: 45°
Step 3: 45°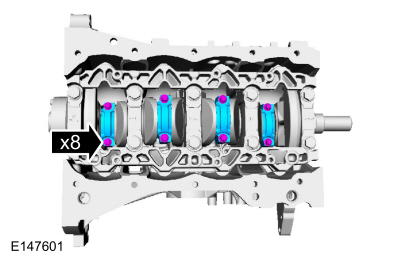
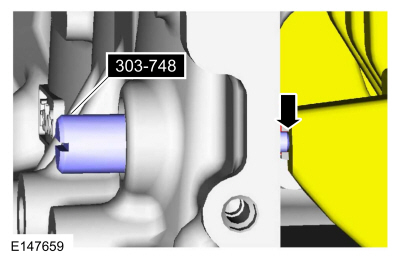
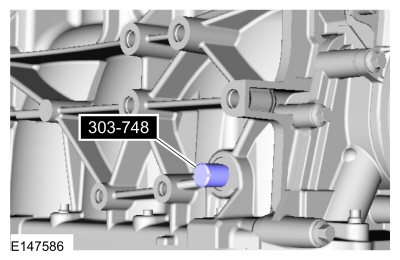
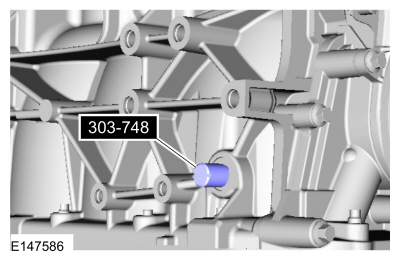
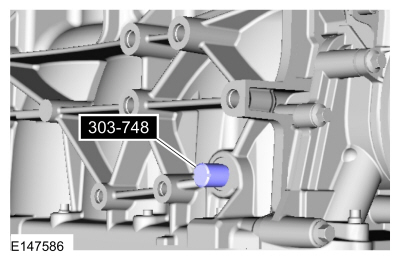
- Install the special service tool: 303-748 Crankshaft Locking Tool.
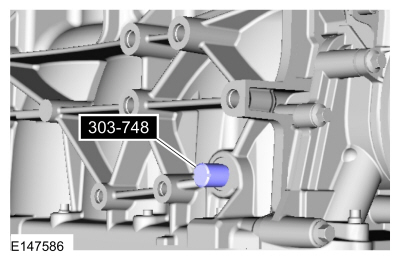
- Slowly rotate the crankshaft clockwise until the crankshaft balance weight is opposite the crankshaft locking pin. The engine is now at TDC.
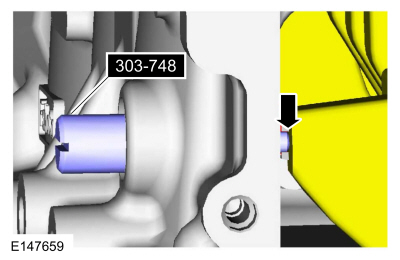
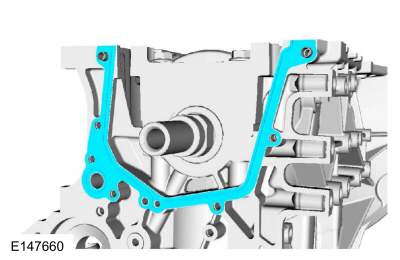
- Install a new oil pump gasket.
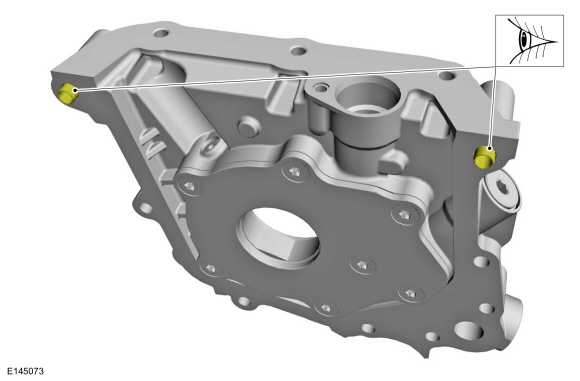
- Inspect the oil pump locating dowels for damage and correct installation.
- Prime the oil pump. Add 2 tablespoons of clean engine oil to the oil pump and rotate the oil pump by hand.
- Install the oil pump and perform the following steps. Hand-tighten the bolts.
- Hand-tighten the 2 M6 x 55 mm bolts.
- Hand-tighten the 3 M6 x 35 mm bolts.
- Hand-tighten the 3 M6 x 25 mm bolts.
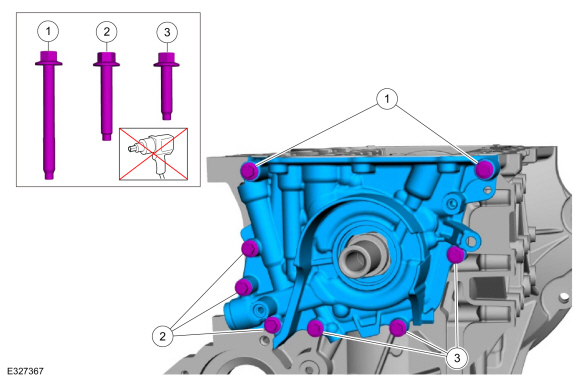
- Tighten the oil pump bolts in the sequence shown in 2 stages.
Torque:
Stage 1: Tighten bolts 1, 2, 3 and 6: 18 lb-in (2 N·m)
Stage 2: Tighten bolts 1 through 8: 97 lb-in (11 N·m)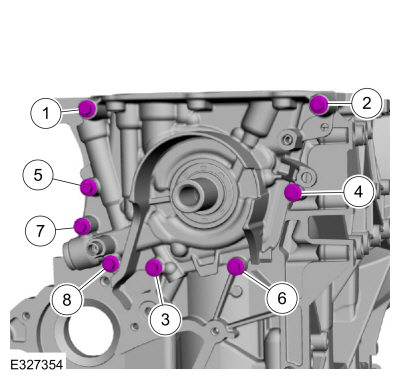
- Install the oil pan baffle and bolts.
Torque: 84 lb-in (9.5 N·m)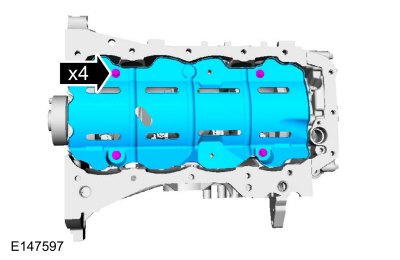
- Align the rear crankshaft oil seal and the centering sleeve on the crankshaft, and slide the rear crankshaft oil seal off the centering sleeve onto the crankshaft without stopping until the rear crankshaft oil seal contacts the cylinder block.
Torque:
Stage 1: 35 lb-in (4 N·m)
Stage 2: 89 lb-in (10 N·m)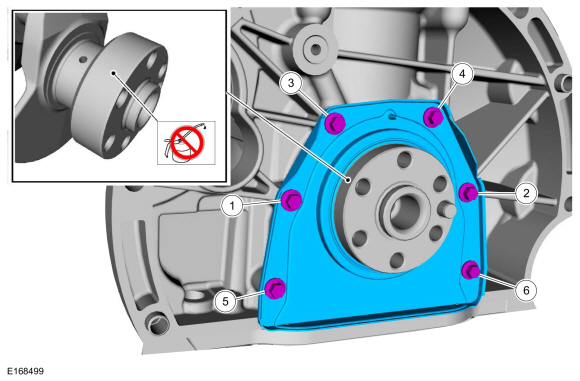
- Inspect the oil pump screen and the suction tube O-ring.
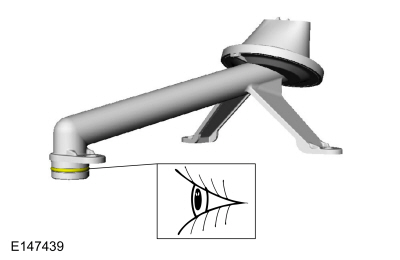
- Install the oil pump screen, suction tube and bolts.
Torque: 84 lb-in (9.5 N·m)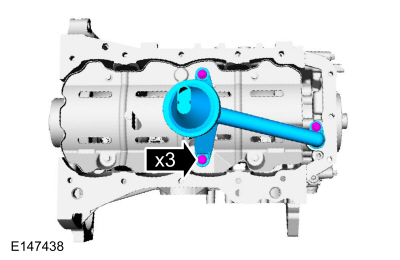
- Clean and prepare the RTV sealing surface.
Refer to: RTV Sealing Surface Cleaning and Preparation (303-00 Engine System — General Information, General Procedures).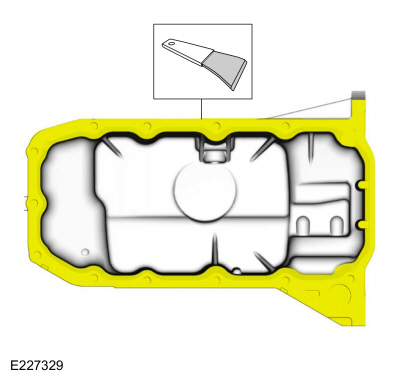
- Clean and prepare the RTV sealing surface.
Refer to: RTV Sealing Surface Cleaning and Preparation (303-00 Engine System — General Information, General Procedures).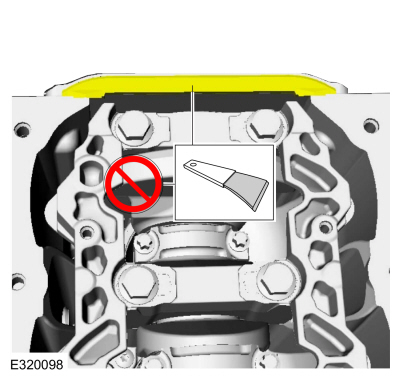
- Clean and prepare the RTV sealing surface.
Refer to: RTV Sealing Surface Cleaning and Preparation (303-00 Engine System — General Information, General Procedures).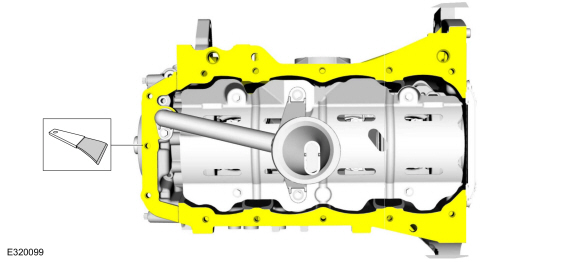
- Install the following components:
- Two M8x20 studs.
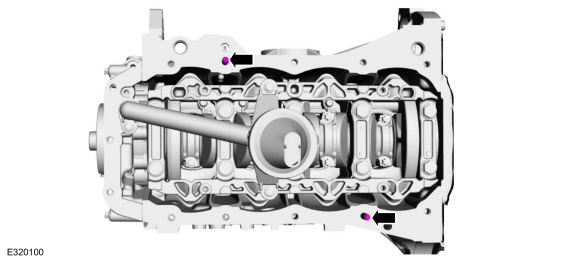
- Apply a 3.5 mm (0.137 in) bead of silicone sealant.
Material: Motorcraft® High Performance Engine RTV Silicone / TA-357 (WSE-M4G323-A6)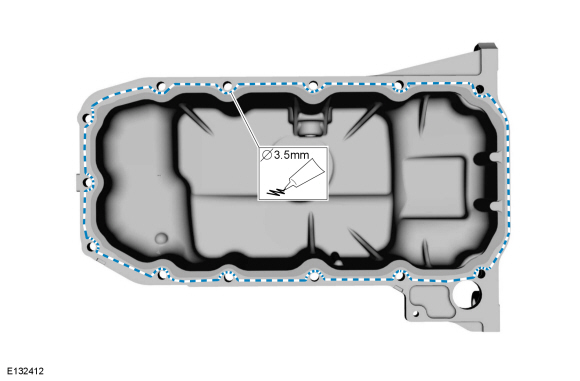
- Install the oil pan and remove the two M8x20 studs.
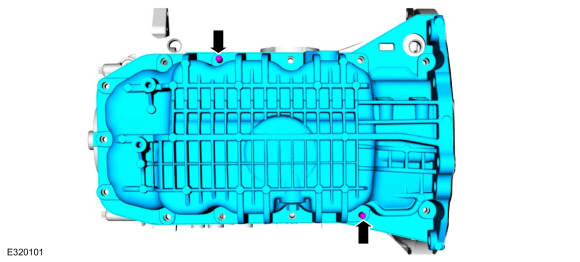
- Hand-tighten the oil pan bolts.
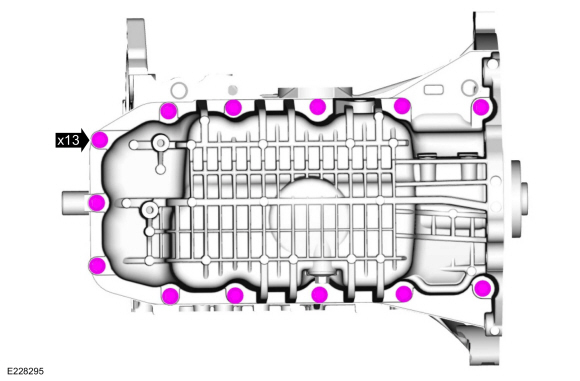
- Tighten the bolts in the specified sequence.
Torque: 168 lb-in (19 N·m)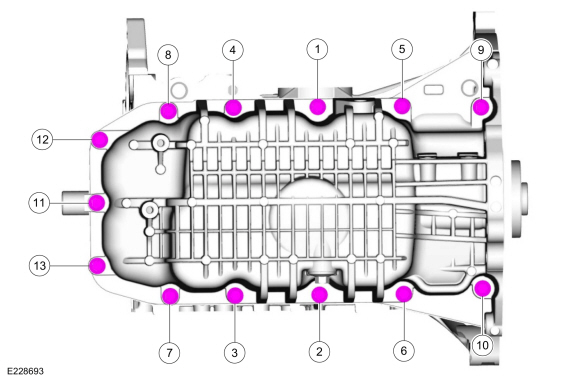
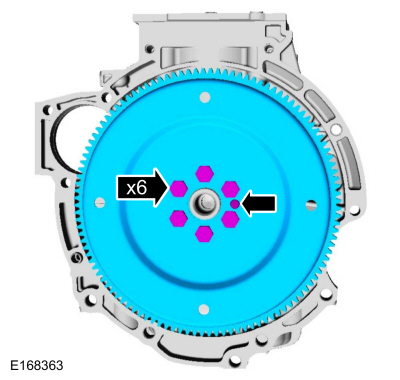
- Install the flexplate and bolts, hand-tightening them.
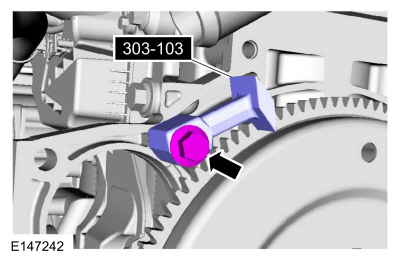
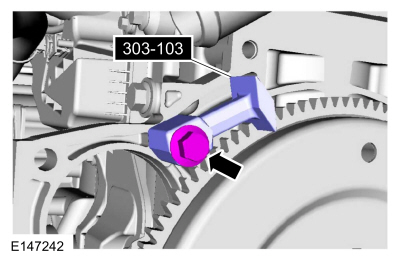
- Install the special service tool: 303-103 (T74P-6375-A) Flywheel Holding Tool.
- Tighten the flexplate bolts in the sequence shown, in 4 steps.
Torque:
Step 1: 133 lb-in (15 N·m)
Step 2: 18 lb-ft (25 N·m)
Step 3: 22 lb-ft (30 N·m)
Step 4: 90°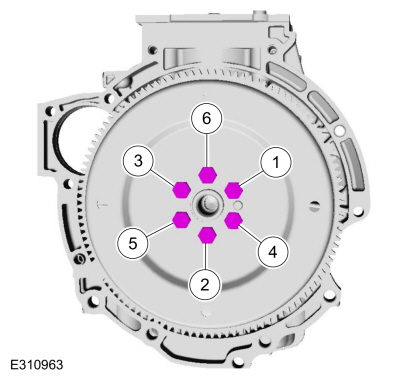
- Remove the special service tool: 303-103 (T74P-6375-A) Flywheel Holding Tool.
- Make sure the crankshaft counterweight is seated against the Crankshaft Locking Tool.
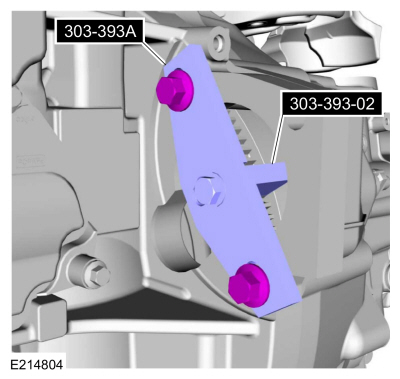
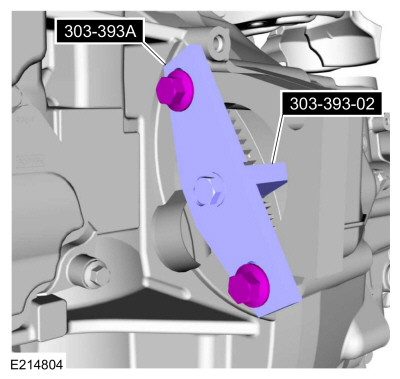
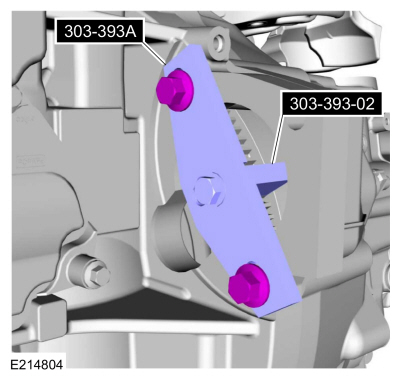
- Install the special service tools: 303-393-02 Adapter for 303-393, and 303-393A Locking Tool, Flywheel.
NOTICE: Do not use metal scrapers, wire brushes, discs or other abrasive means to clean the sealing surfaces. These tools cause scratches and gouges that create leak paths. Use a plastic scraper to remove all traces of the cylinder head gasket.
Make sure the mating surfaces are clean and free of foreign material.
Material: Motorcraft® Metal Surface Preparation Wipes / ZC-31-B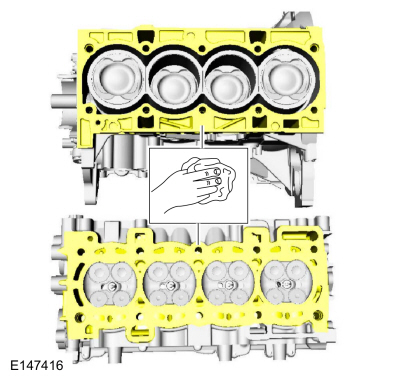
- Install the dowels.
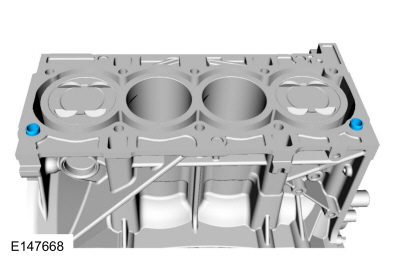
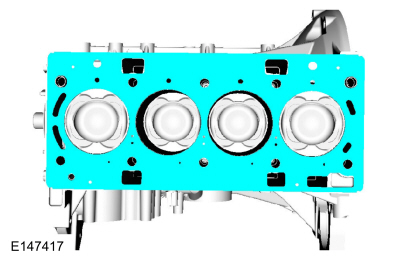
- Install a new cylinder head gasket.
- Install the cylinder head and bolts, hand-tightening them, then tighten the bolts in the sequence specified in 5 steps.
Torque:
Step 1: 44 lb-in (5 N·m)
Step 2: 133 lb-in (15 N·m)
Step 3: 26 lb-ft (35 N·m)
Step 4: 90°
Step 5: 90°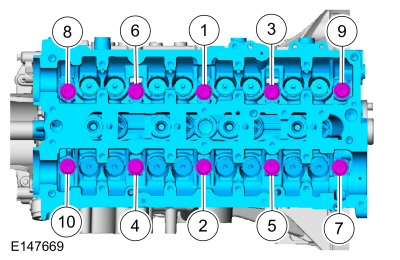
- Lubricate with clean engine oil and install the valve lifters.
Material: Engine Oil - SAE 5W-20 - Synthetic Engine Oil / XO-5W20-Q1SP (WSS-M2C945-B1)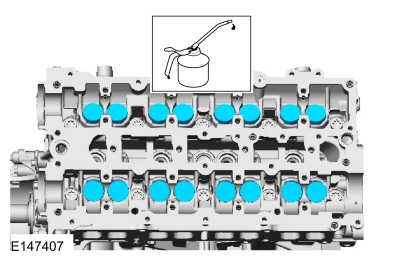
NOTICE: If any new parts (cylinder head, valves, tappets, camshafts) are installed, the valve clearance must be checked. Follow the following 12 steps precisely, otherwise serious engine damage may occur. If original parts are installed, it is not necessary to check the valve clearance, so proceed to step 65.
Paint a mark on the crankshaft at the 12 o'clock position.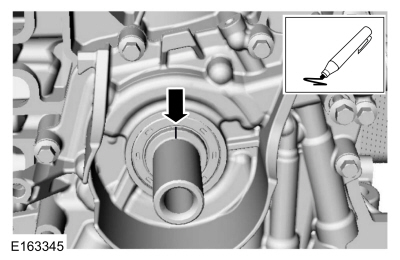
- Remove the special service tools: 303-393A Flywheel Locking Tool, 303-393-02 Adapter, 303-393.
- Remove the special service tool: 303-748 Crankshaft Locking Tool.
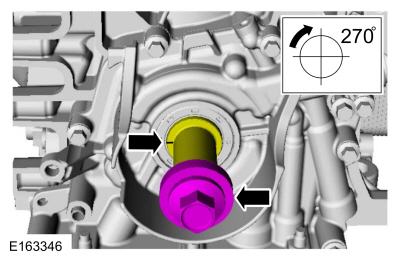
- Using the crankshaft bolt and washer, rotate the crankshaft clockwise 270 degrees until the paint mark is at the 9 o'clock position.
NOTICE: Failure to follow the camshaft tightening procedure may damage the camshafts.
NOTICE: Make sure the camshafts and camshaft bearing caps are installed in their original positions, otherwise the engine may be damaged.
Tighten the bolts evenly, one-half turn at a time, until the camshaft bearing caps and the VCT bridge are seated on the cylinder head.
Material: Engine Oil — SAE 5W-20 — synthetic engine oil / XO-5W20-Q1SP (WSS-M2C945-B1)
Torque:
Step 1: Tighten bolts 1 through 16 to: 62 lb-in (7 N·m)
Step 2: Tighten bolts 17 through 20 to: 89 lb-in (10 N·m)
Step 3: Tighten bolts 1 through 16 an additional: 45°
Step 4: Tighten bolts 17 and 18 an additional: 70°
Step 5: Tighten bolts 19 and 20 an additional: 53°
- Using the camshaft flats, rotate the camshaft to position the cam lobe on the base circle so that the lobe points away from the tappet.
- Using a feeler gauge, measure the clearance of each valve and record its position.
Use general equipment: Feeler Gauge
- Repeat to measure all cam/tappet clearances.
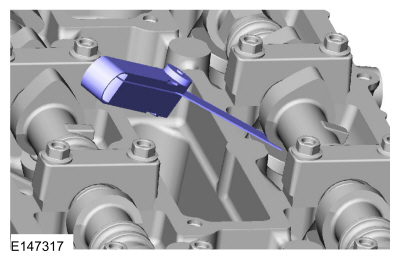
NOTICE: Failure to follow the camshaft loosening procedure may damage the camshafts.
Loosen the camshaft bearing caps sequentially, 2 turns at a time, until all tension is released from the camshaft bearing caps in the sequence shown.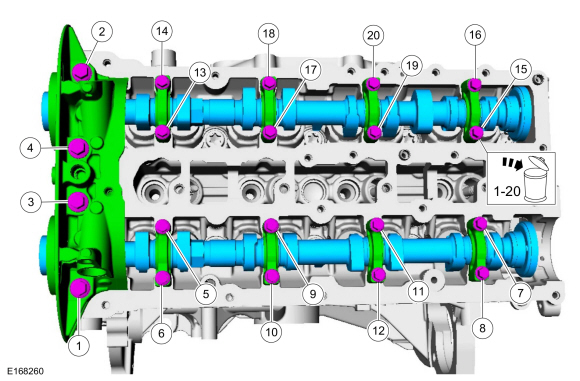
- Install the special service tool: 303-748 Crankshaft Locking Tool.
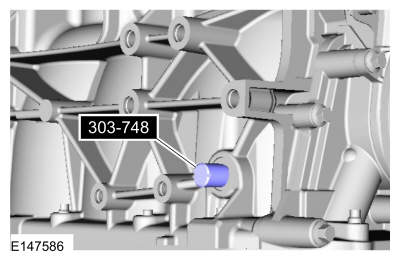
- Rotate the crankshaft clockwise 90 degrees until the crankshaft contacts the timing pin, TDC crankshaft 303-748.
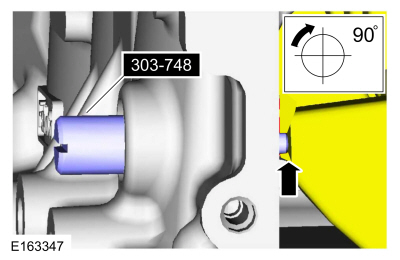
- If necessary, replace all lifters with the lifters selected during the valve clearance check.
Material: Engine Oil — SAE 5W-20 — synthetic engine oil / XO-5W20-Q1SP (WSS-M2C945-B1)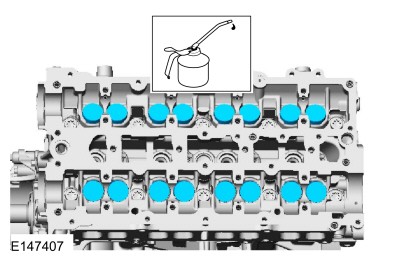
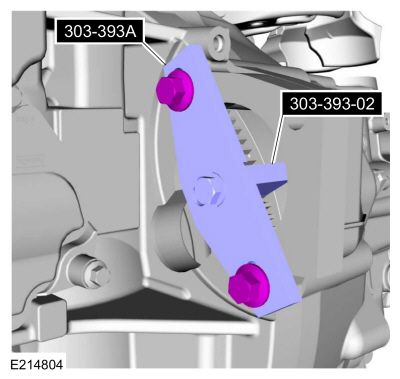
- Install the special service tools: 303-393A Flywheel Locking Tool, 303-393-02 Adapter, 303-393.
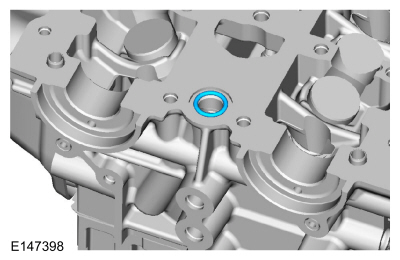
- Install a new O-ring.
- Install the crankcase ventilation drain tube.
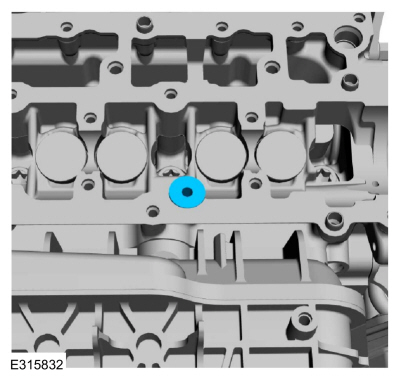
- Apply a 2.0 mm bead of flange sealant.
Material: Flange Sealant / CU7Z-19B508-A (WSS-M2G348-A11)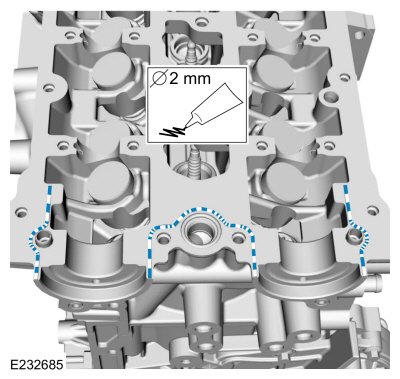
NOTICE: Failure to follow the camshaft tightening procedure may damage the camshafts.
NOTICE: Make sure the camshafts and camshaft bearing caps are installed in their original positions, otherwise the engine may be damaged.
Tighten the bolts evenly, one-half turn at a time, until the camshaft bearing caps and the VCT bridge are seated on the cylinder head.
Torque:
Step 1: Tighten bolts 1 through 16 to: 62 lb-in (7 N·m)
Step 2: Tighten bolts 17 through 20 to: 89 lb-in (10 N·m)
Step 3: Tighten bolts 1 through 16 an additional: 45°
Step 4: Tighten bolts 17 and 18 an additional: 70°
Step 5: Tighten bolts 19 and 20 an additional: 53°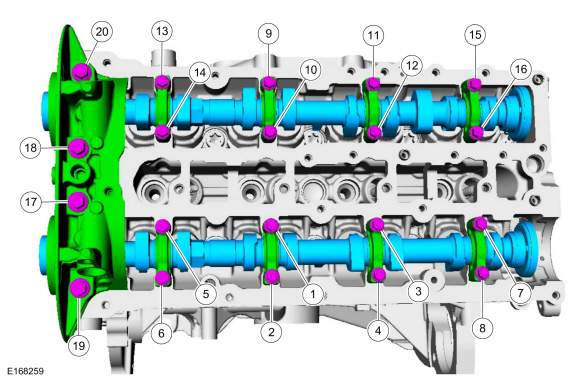
- Using the special service tool, lubricate with clean engine oil and install the camshaft seals.
Use special service tool: 303-1532 Installer, Camshaft Seal.
Material: Engine Oil — SAE 5W-20 — synthetic engine oil / XO-5W20-Q1SP (WSS-M2C945-B1)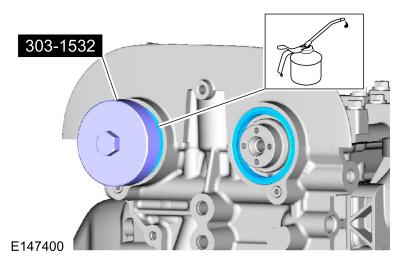
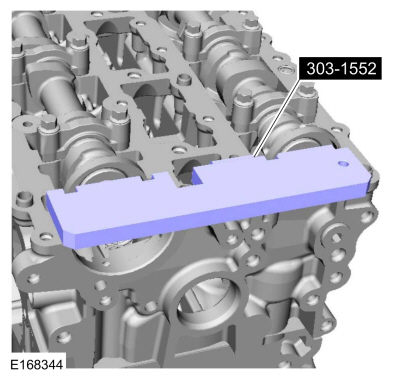
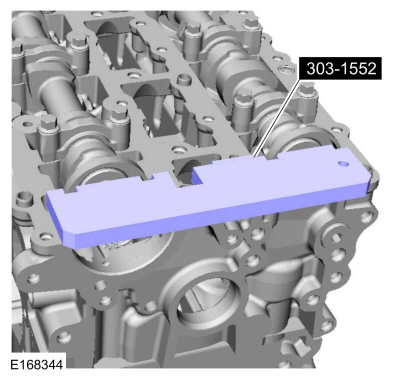
- Install the special service tool: 303-1552 Camshaft Alignment Tool.
- Position the VCT units at the 12 o'clock position.
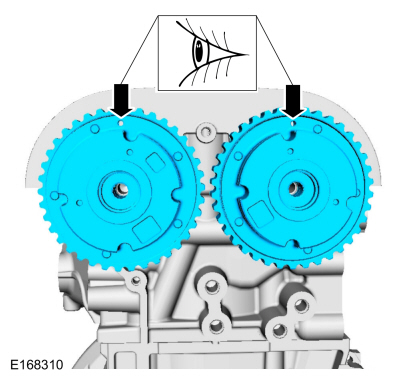
- Install the new VCT block bolts.
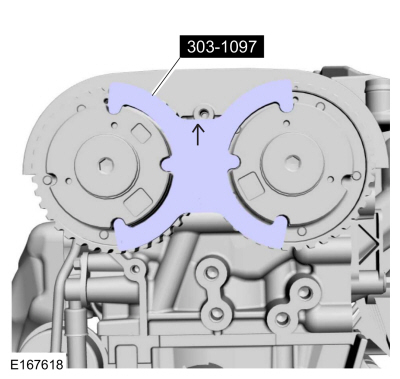
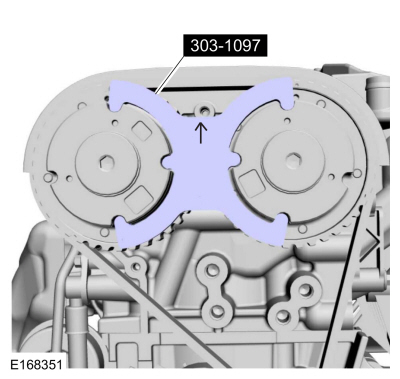
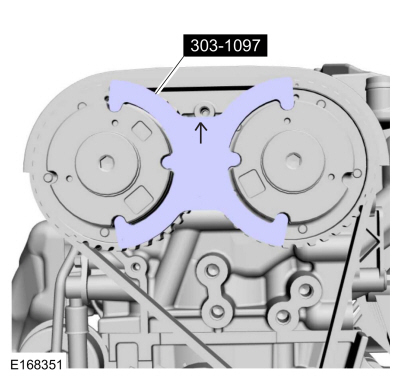
Install special service tool: 303-1097 Locking Tool, Variable Cam Timing Oil Control Valve.
Torque: 18 lb-ft (25 N·m)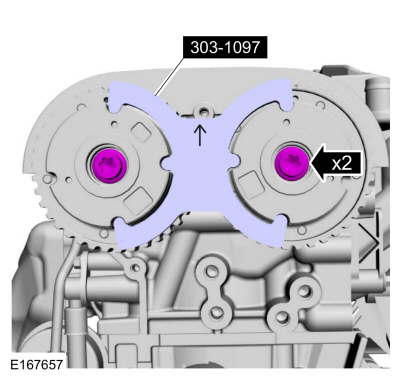
- Remove the special service tool: 303-1097 Locking Tool, Variable Camshaft Timing Oil Control Valve.
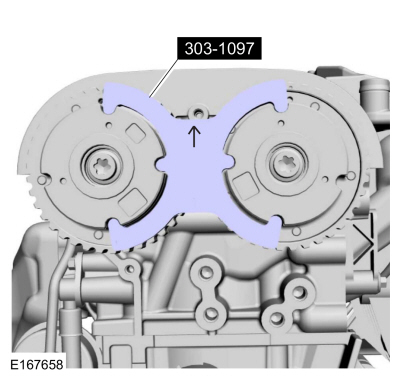
- Remove the special service tool: 303-1552 Camshaft Alignment Tool.
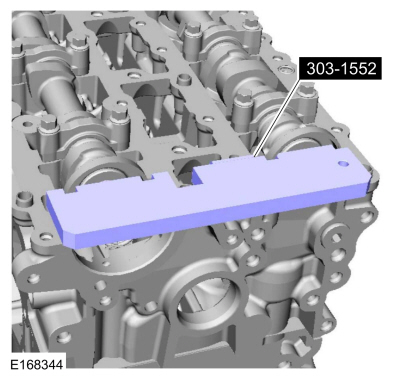
- Tighten an additional:
Torque: 75°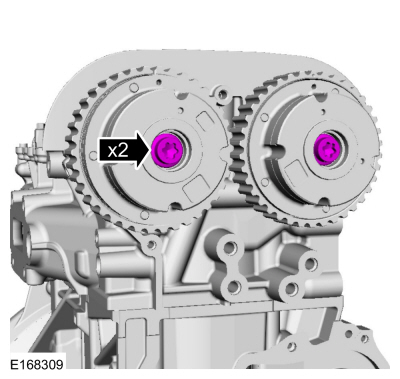
- Install the special service tool: 303-1552 Camshaft Alignment Tool.
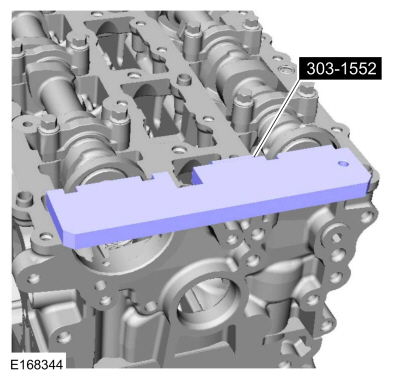
- If the special tools cannot be installed, repeat the adjustment following the previous steps.
Install the special service tool: 303-1097 Locking Tool, Variable Cam Timing Oil Control Unit.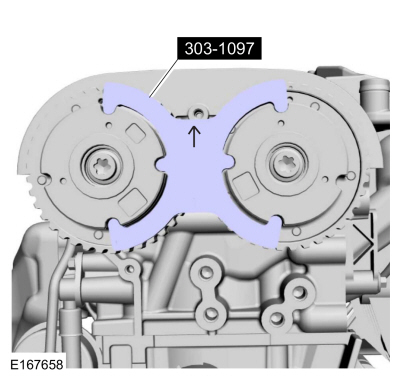
- Remove the special service tool: 303-1097 Locking Tool, Variable Camshaft Timing Oil Control Valve.
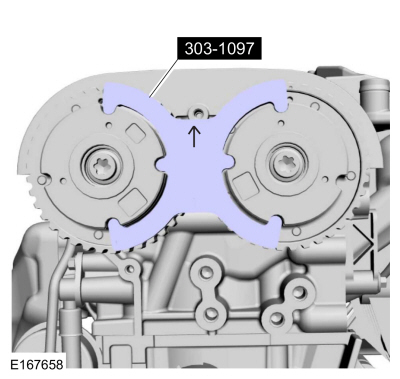
- Remove the special service tool: 303-1552 Camshaft Alignment Tool.
- Install the VCT covers.
Torque: 142 lb-in (16 N·m)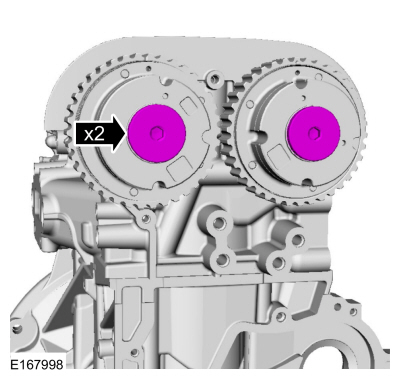
- Install the special service tool: 303-1097 Locking Tool, Variable Camshaft Timing Oil Control Valve.
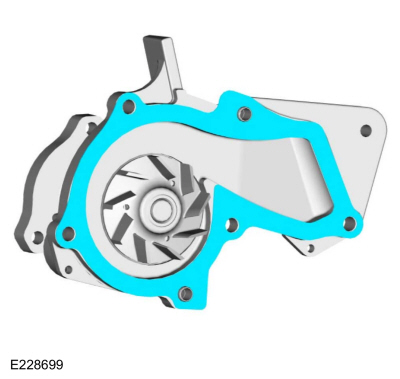
- Install a new coolant pump gasket.
- Install the coolant pump and new bolts and tighten in the specified sequence in 2 steps.
Torque:
Step 1: 53 lb-in (6 N·m)
Step 2: 89 lb-in (10 N·m)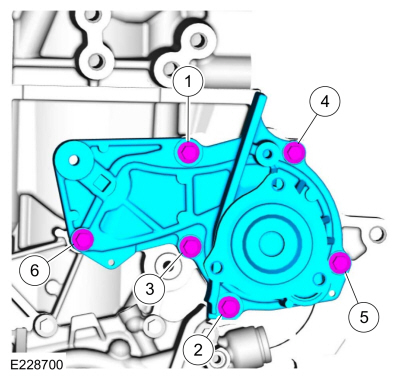
- Install the timing belt tensioner and bolt.
Torque: 18 lb-ft (25 N·m)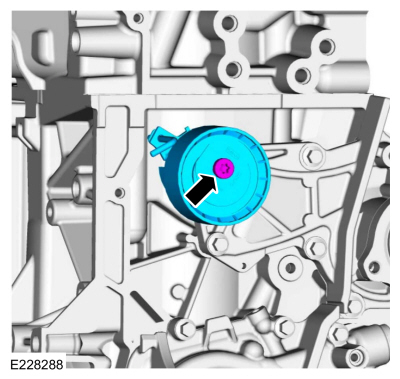
- Lubricate the crankshaft front oil seal lip with clean engine oil.
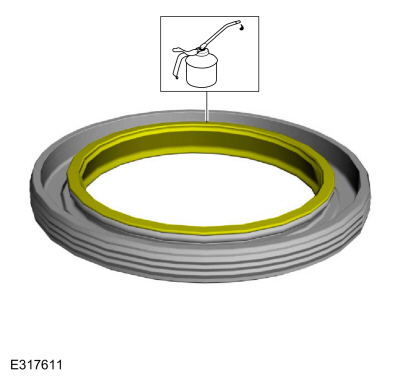
View - English

Slightly tilting the seal, carefully place the seal lip against the crankshaft sealing surface. Apply lateral pressure and work the seal lip around the remaining circumference.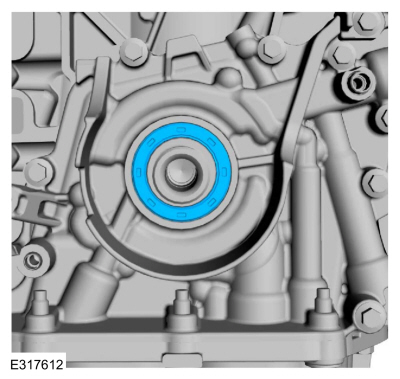
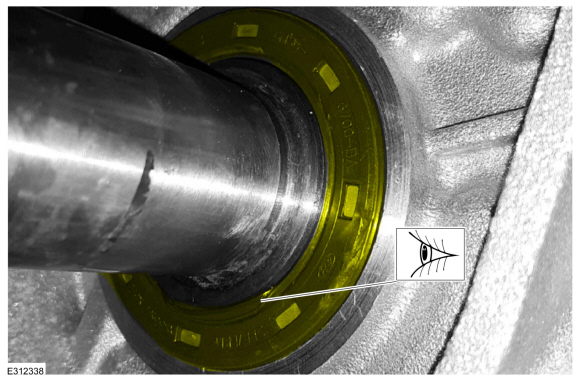
- Inspect the crankshaft front oil seal.
NOTICE: If the crankshaft front oil seal rolls over during positioning, do not use the special installation tool, otherwise oil leakage will occur.
If any part of the inner lip of the front crankshaft seal is rolled over, remove and reposition the seal. Also make sure the seal spring is correctly positioned on the seal.
- Using the special tools, install a new crankshaft front oil seal.
Use the special service tools: 303-175 (T82L-6316-A) Installer, crankshaft damper, 303-335 (T88T-6701-A) Installer, front cover seal, and 303-420 (T92P-6701-BH) Installer, crankshaft front oil seal.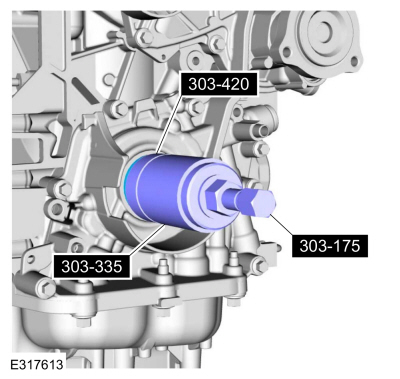
- Install the timing belt sprocket.
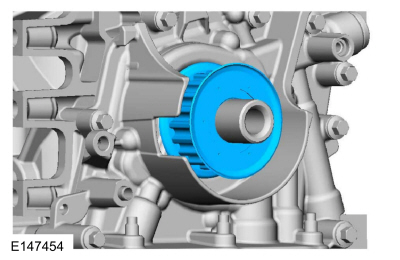
- Install the timing belt in the following sequence.
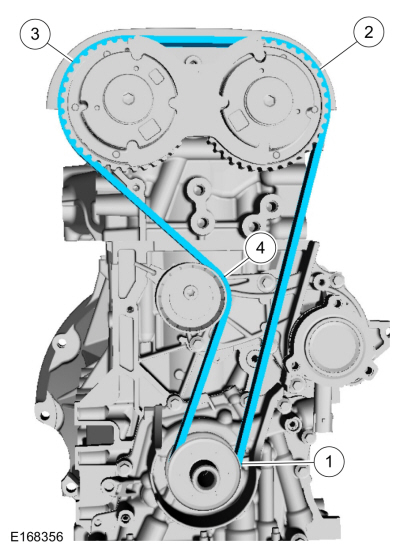
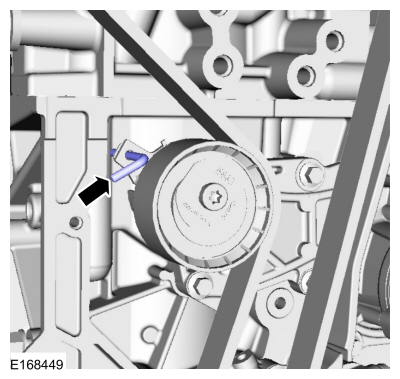
- Remove the retaining pin.
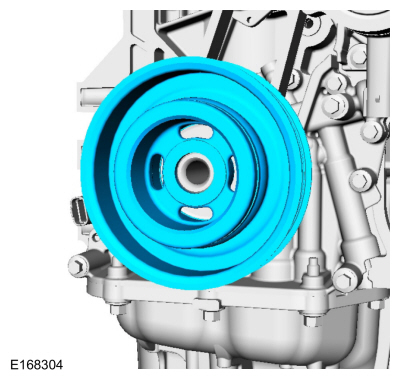
- Install the crankshaft pulley.
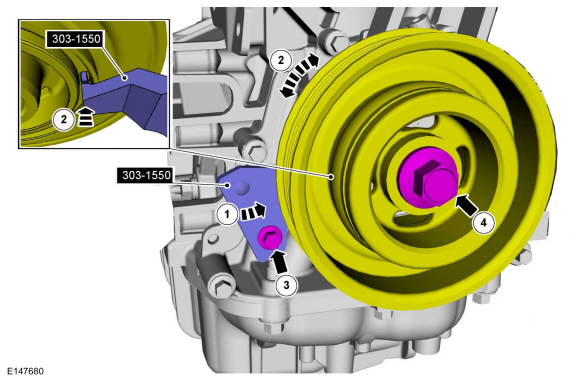
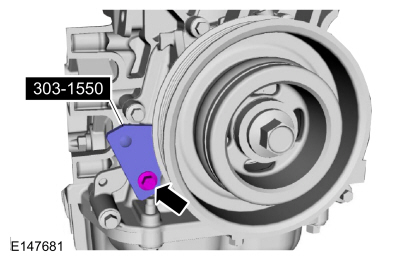
- Install the special service tool: 303-1550 Alignment Tool, Crankshaft Damper.
- Rotate the crankshaft pulley to align the special tool:
Use the special service tool: 303-1550 Alignment Tool, Crankshaft Damper.
- At this stage, finger-tighten.
- Using a new bolt, hand-tighten it at this stage.
- Tighten the crankshaft pulley bolt in 4 stages.
Torque:
Stage 1: 74 lb-ft (100 N·m)
Stage 2: 90°
Stage 3: Wait 2 s
Stage 4: 15°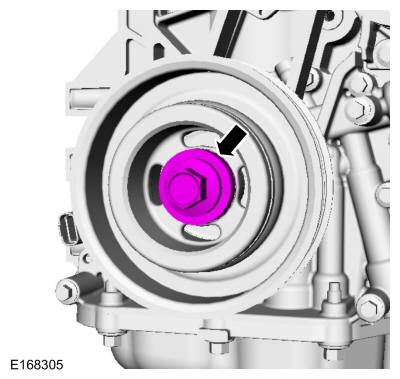
- Remove the special service tool: 303-1550 Alignment Tool, Crankshaft Damper.
- Remove the special service tool: 303-748 Crankshaft Locking Tool.
- Remove the special service tool: 303-1097 Locking Tool, Variable Camshaft Timing Oil Control Valve.
- Remove the special service tools: 303-393-02 Adapter for 303-393, and 303-393A Locking Tool, Flywheel.
- Rotate approximately 1 3/4 turns.
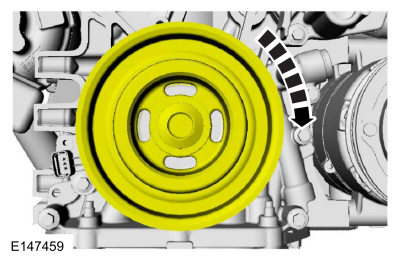
- Install the special service tool: 303-748 Crankshaft Locking Tool.
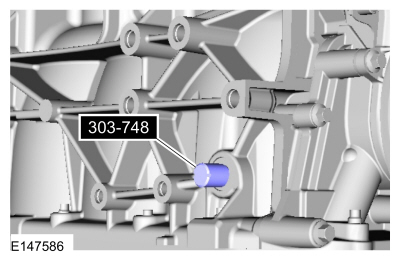
- Slowly rotate the crankshaft clockwise until the crankshaft balance weight is opposite the crankshaft locking pin. The engine is now at TDC.
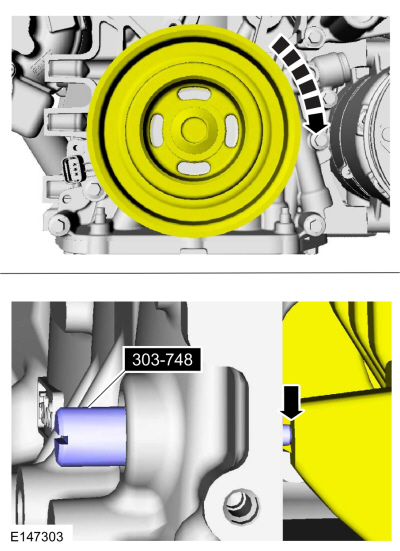
- If the special tool cannot be installed, repeat the adjustment according to the previous steps.
Install the special service tool: 303-1097 Locking Tool, Variable Camshaft Timing Oil Control Valve.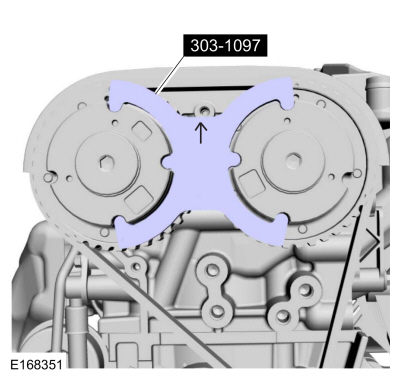
- Remove the special service tool: 303-1097 Locking Tool, Variable Camshaft Timing Oil Control Valve.
- Remove the special service tool: 303-748 Crankshaft Locking Tool.
- Install the engine plug bolt.
Torque: 177 lb-in (20 N·m)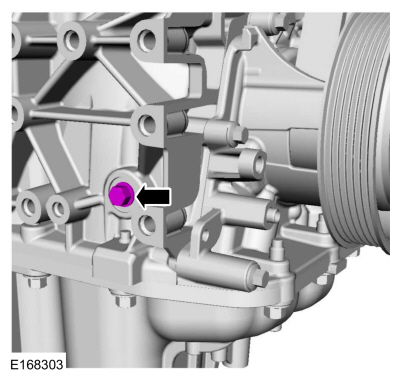
- Install the CKP sensor and bolt.
Torque: 89 lb-in (10 N·m)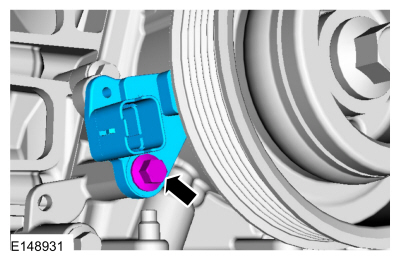
- Install the engine mount bracket and bolts.
Torque: 41 lb-ft (55 N·m)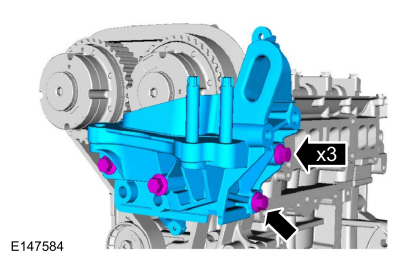
- Install the engine front cover.
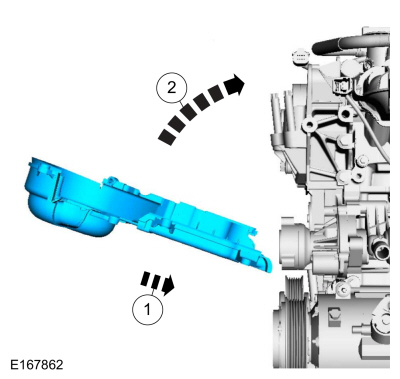
- Install the front engine cover bolts.
Torque: 89 lb-in (10 N·m)
- Install the front engine cover bolt.
Torque: 89 lb-in (10 N·m)
- Install the engine mount stud, hand-tightening it.
- Install the coolant pump pulley and bolts.
Torque: 18 lb-ft (24 N·m)
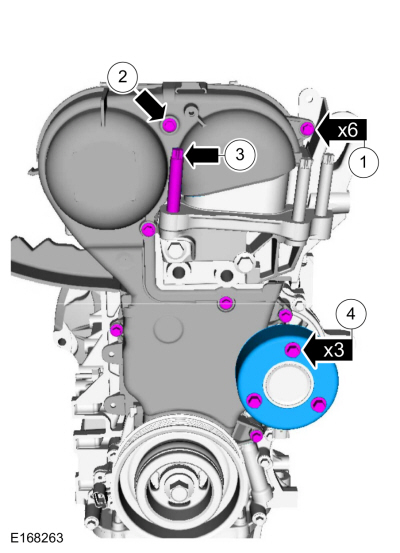
- Install the front engine cover bolts.
- Install the cover to the front engine cover and install the stud.
Torque: 89 lb-in (10 N·m)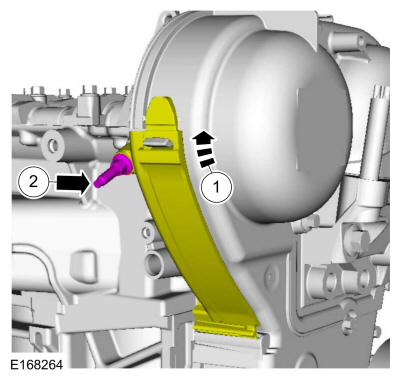
- If equipped, install the block heater and nut.
Torque: 27 lb-in (3 N·m)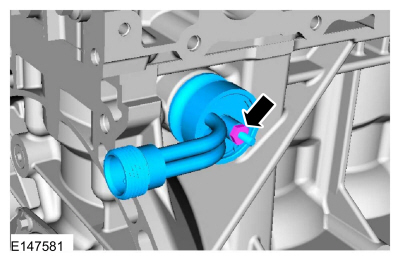
- Install the TC mounting studs and gasket.
Torque: 89 lb-in (10 N·m)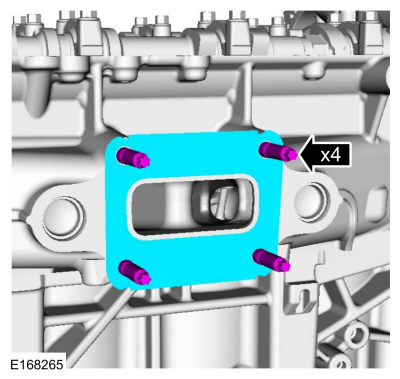
NOTICE: Do not use a wire brush; damage to the sealing area will cause leaks.
- Carefully use a nylon brush to remove the old O-ring residue, and use brake cleaner to flush the O-ring residue from the turbocharger O-ring bore. Inspect the area for deep scratches and pitting.
- Install the new TC oil feed pipe assembly, including the new bolt, new sealing washers and new O-rings. Lubricate the new O-rings with clean engine oil.
Material: Motorcraft® Metal Brake Parts Cleaner / PM-4-A, PM-4-B
Torque: 19 lb-ft (26 N·m)
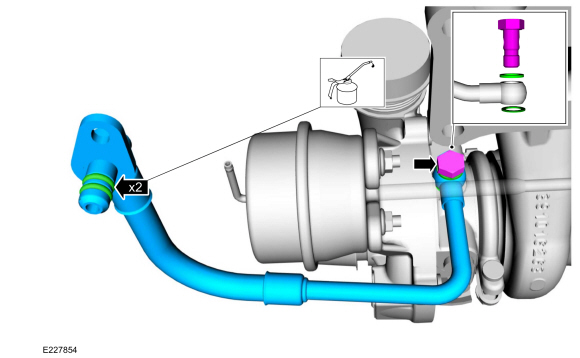
- Tighten in the sequence shown in the illustration.
Install the TC and nuts in the sequence shown in 3 steps.
Torque:
Step 1: 62 lb-in (7 N·m)
Step 2: 124 lb-in (14 N·m)
Step 3: 17 lb-ft (23 N·m)
- Install the TC oil feed pipe bracket.
Torque: 89 lb-in (10 N·m)
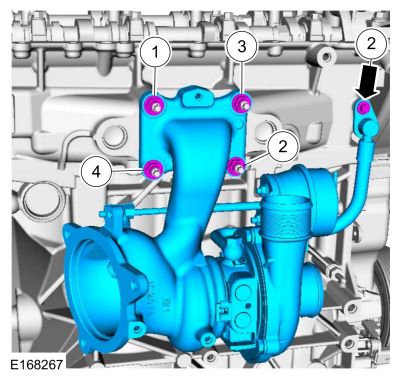
- Tighten in the sequence shown in the illustration.
- Install a new TC oil return pipe gasket. Lubricate the O-ring with clean engine oil.
Material: Engine oil — SAE 5W-20 — synthetic engine oil / XO-5W20-Q1SP (WSS-M2C945-B1)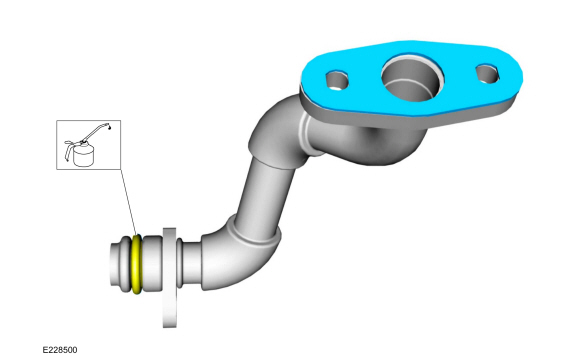
NOTICE: Do not use a wire brush; damage to the sealing area will cause leaks.
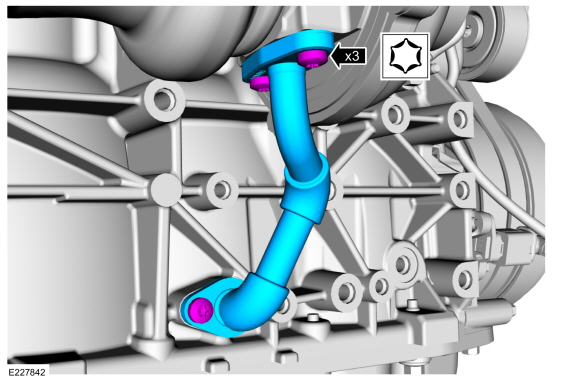
- Carefully use a nylon brush to remove the old O-ring residue, and use brake cleaner to flush the O-ring residue from the turbocharger pipe to the engine O-ring bore. Inspect the area for deep scratches and gouges.
- Install a new turbocharger oil return pipe, then install and tighten the turbocharger oil return pipe bolts.
Material: Motorcraft® Metal Brake Parts Cleaner / PM-4-A, PM-4-B
Torque: 89 lb-in (10 N·m)
- Install the TC heat shield and bolts.
Torque: 89 lb-in (10 N·m)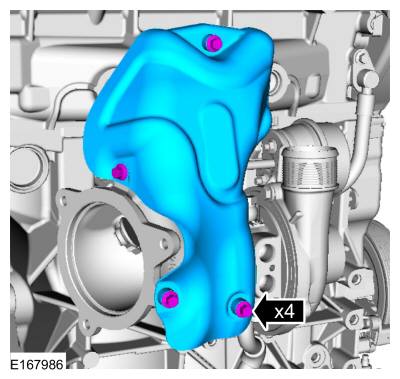
- Lubricate the thermostat housing O-ring.
Material: Motorcraft® Orange Concentrated Antifreeze/Coolant / VC-3-B (WSS-M97B44-D)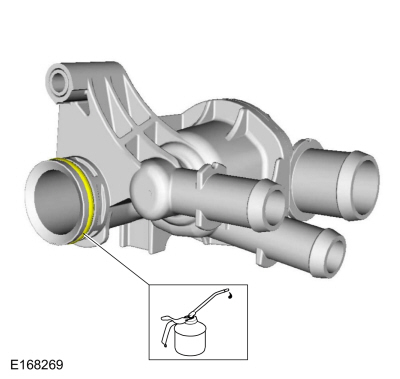
- Install the thermostat housing and stud.
Torque: 44 lb-in (5 N·m)
- Install the thermostat housing nut.
Torque: 150 lb-in (17 N·m)
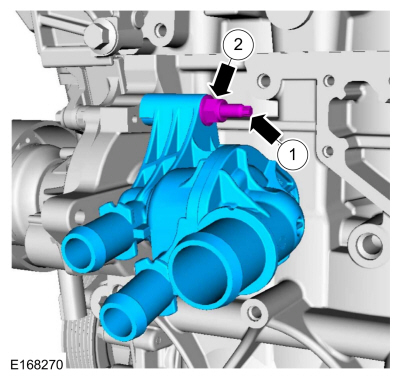
- Install the thermostat housing and stud.
- Install a new oil pressure sensor.
Torque: 159 lb-in (18 N·m)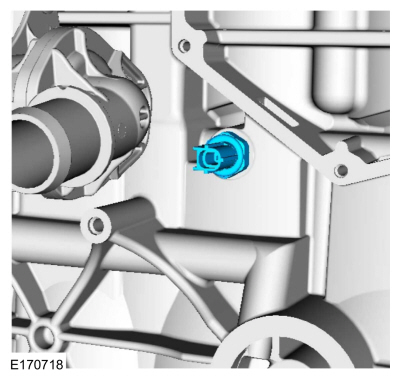
- Inspect the crankcase ventilation oil separator gasket. Lubricate the crankcase ventilation oil separator O-ring.
Material: Engine oil — SAE 5W-20 — synthetic engine oil / XO-5W20-Q1SP (WSS-M2C945-B1)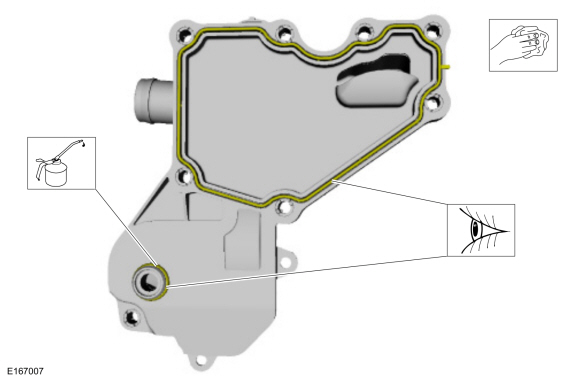
- Install the crankcase ventilation oil separator and tighten the bolts in the sequence shown in 3 steps.
Torque:
Step 1: Tighten bolts 1, 2 and 3 to: 49 lb-in (5.5 N·m)
Step 2: Tighten bolts 4, 5, 6, 7 and 8 to: 49 lb-in (5.5 N·m)
Step 3: Tighten all bolts, one at a time, to: 84 lb-in (9.5 N·m)
- Install the crankcase ventilation oil separator inlet tube and bolt.
Torque: 35 lb-in (4 N·m)
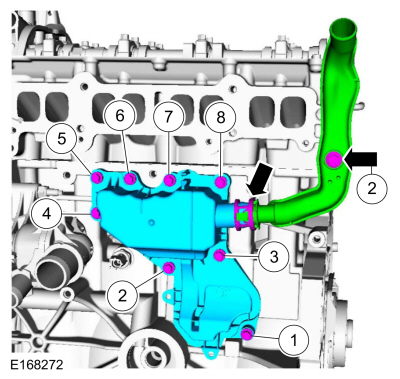
- Install the crankcase ventilation oil separator and tighten the bolts in the sequence shown in 3 steps.
- Install the KS, bolts and secure the retainer.
Torque: 159 lb-in (18 N·m)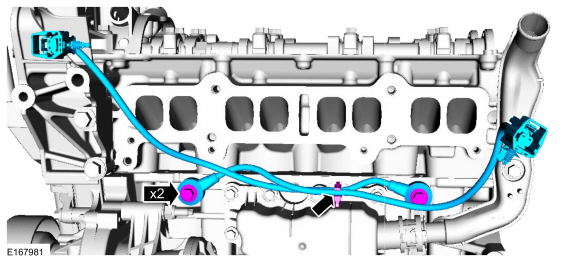
NOTICE: A new oil cooler must be installed, otherwise serious engine damage may occur.
Install a new oil cooler and retainer.
Torque: 41 lb-ft (55 N·m)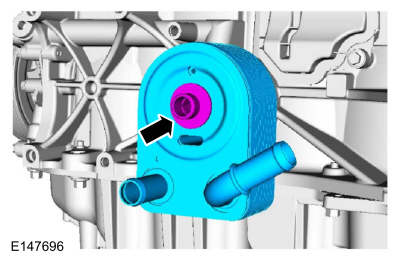
NOTICE: Do not use metal scrapers, wire brushes, discs or other abrasive means to clean the sealing surfaces. These tools cause scratches and gouges that create leak paths.
Make sure the mating surfaces are clean and free of foreign material.
Material: Motorcraft® Metal Surface Preparation Wipes / ZC-31-B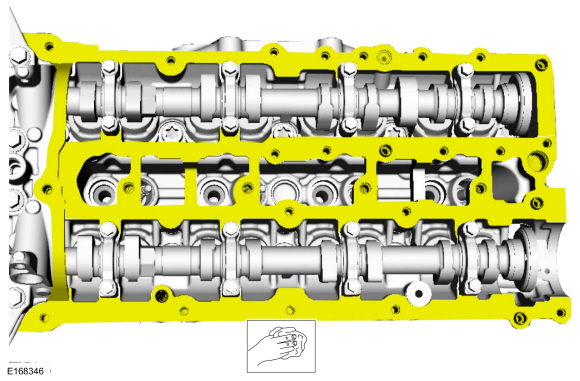
NOTICE: Do not use metal scrapers, wire brushes, discs or other abrasive means to clean the sealing surfaces. These tools cause scratches and gouges that create leak paths.
Make sure the mating surfaces are clean and free of foreign material.
Material: Motorcraft® Metal Surface Preparation Wipes / ZC-31-B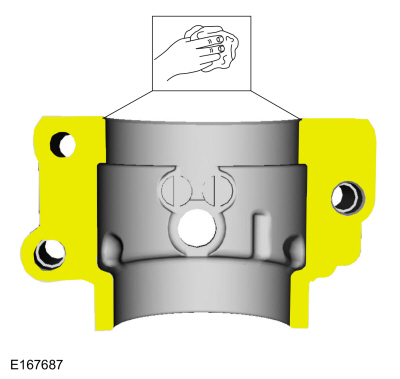
NOTICE: Do not use metal scrapers, wire brushes, discs or other abrasive means to clean the sealing surfaces. These tools cause scratches and gouges that create leak paths.
Make sure the mating surfaces are clean and free of foreign material.
Material: Motorcraft® Metal Surface Preparation Wipes / ZC-31-B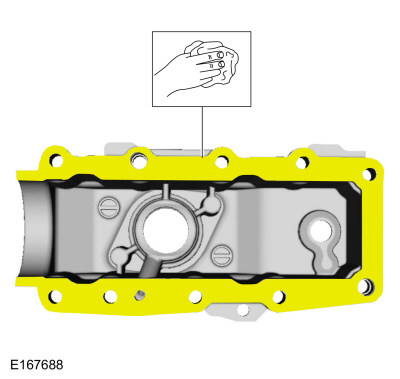
- Apply a 1.5 mm (0.059 in) bead of sealer.
Material: Flange sealer / CU7Z-19B508-A (WSS-M2G348-A11)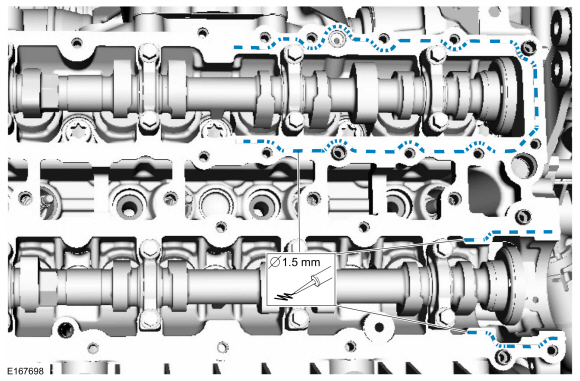
- Install the brake vacuum pump cover, bolts and stud in the sequence shown in 2 steps.
Torque:
Step 1: 35 lb-in (4 N·m)
Step 2: 89 lb-in (10 N·m)
- Install the engine cover stud.
Torque: 44 lb-in (5 N·m)
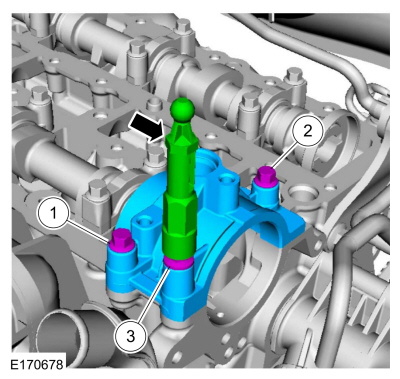
- Install the brake vacuum pump cover, bolts and stud in the sequence shown in 2 steps.
- Install a new high-pressure fuel pump drive unit O-ring and bolts, and tighten in the sequence shown in 3 steps.
Torque:
Step 1: Tighten bolts 1 through 8 to: 35 lb-in (4 N·m)
Step 2: Tighten bolts 1 through 8 to: 124 lb-in (14 N·m)
Step 3: Tighten bolts 9 and 10 to: 97 lb-in (11 N·m)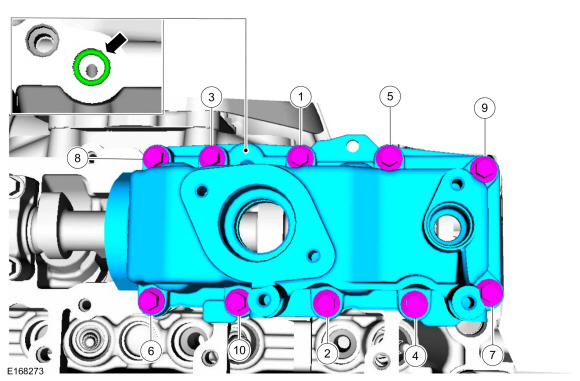
- Install a new valve cover gasket.
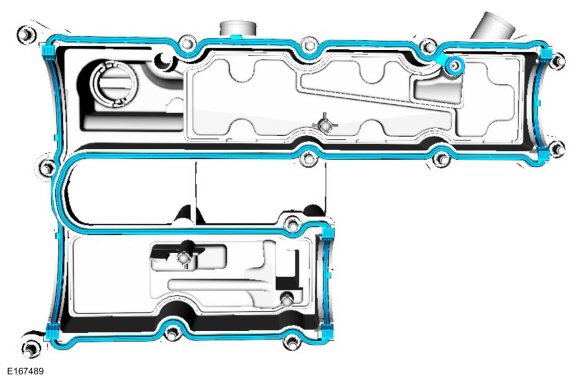
- Apply a 1.5 mm (0.059 in) bead of sealer.
Material: Flange sealer / CU7Z-19B508-A (WSS-M2G348-A11)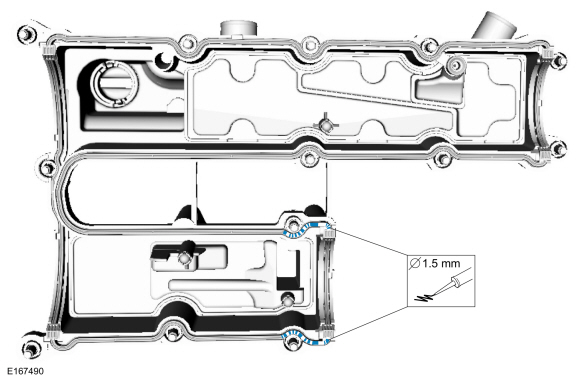
- Apply a 1.5 mm (0.059 in) bead of sealer.
Material: Flange sealer / CU7Z-19B508-A (WSS-M2G348-A11)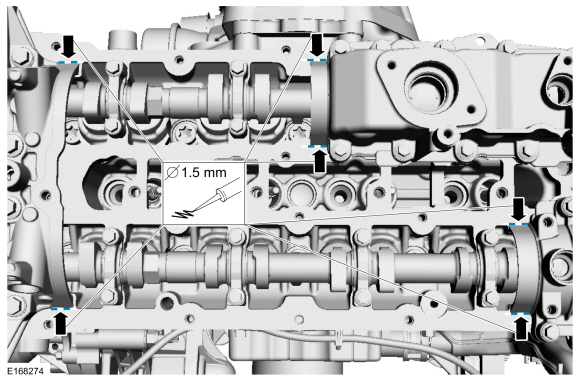
- Install the valve cover and bolts, hand-tightening them first, then tighten the bolts in the sequence shown in 3 steps.
Torque:
Step 1: 44 lb-in (5 N·m)
Step 2: 80 lb-in (9 N·m)
Step 3: 89 lb-in (10 N·m)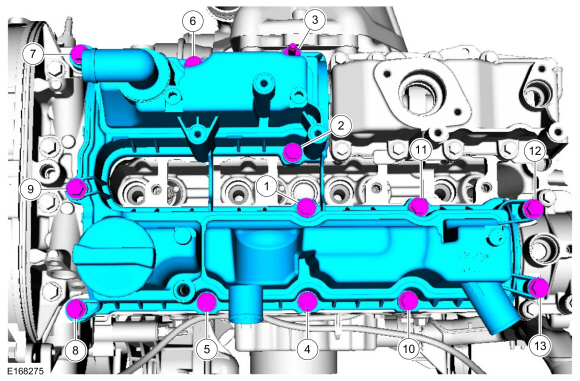
- Clean the fuel injector bores.
Use Special Service Tool: 310-205 Fuel Injector Brush.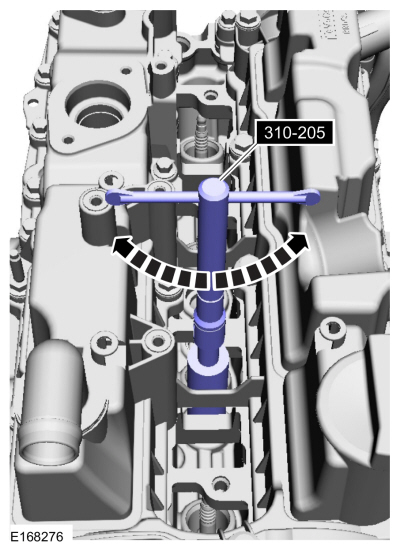
- Remove and discard the fuel injector O-ring and washer.
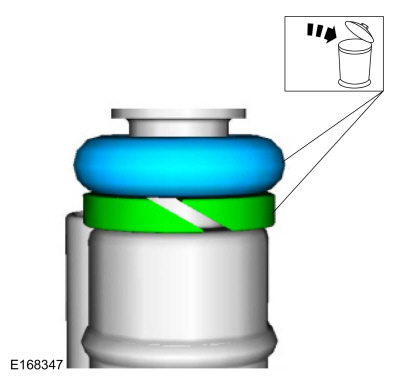
NOTICE: Use care when removing the lower Teflon® seals to avoid scratching, nicking or gouging the fuel injectors.
NOTICE: Do not attempt to cut the lower Teflon® seal without first pulling it away from the fuel injector, otherwise damage to the injector may occur.
- Pull the lower Teflon seal away from the injector.
- Carefully cut and discard the lower fuel injector Teflon seals.
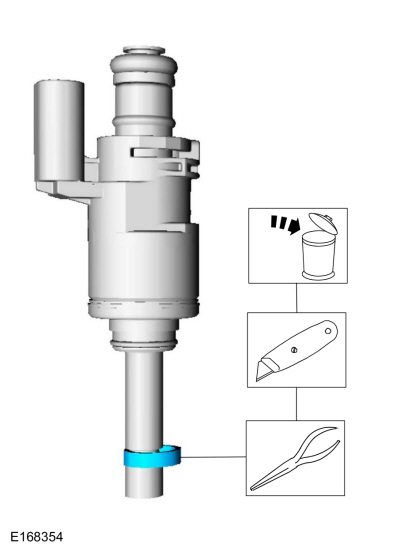
NOTICE: Do not lubricate the new lower Teflon® fuel injector seals.
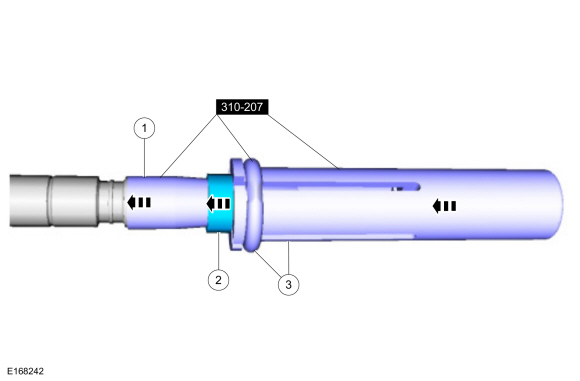
- Use the special service tool: 310-207 Fuel Injector Seal Assembly Installer.
NOTICE: After installing the Teflon® seal, the Teflon® seal guide must be installed onto the fuel injector immediately to avoid excessive expansion of the Teflon® seal.
- Using a push tool, seat the Teflon® seals from the Teflon® seal guide and into the groove on the fuel injectors.
Use the special service tool: 310-207 Fuel Injector Seal Assembly Installer.
NOTICE: Install the fuel injectors into the cylinder head within 15 minutes of sizing the seals due to expansion of the Teflon® seal.
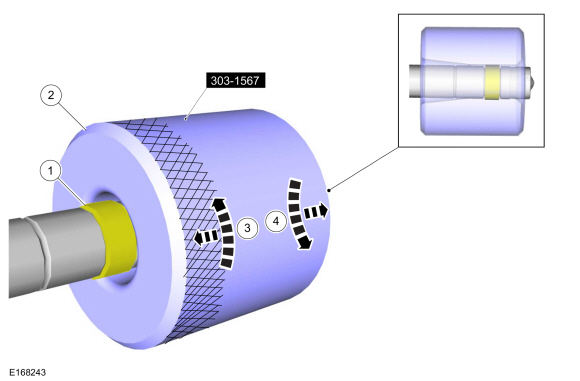
- Some Teflon® seals are massaged with fingers before installing the Teflon® seal sizing tool, which aids in seating the Teflon® seal sizing tool.
- Position the Teflon® seal sizing tool with the large opening facing the Teflon® seal. Press and turn the Teflon® seal sizing tool 180 degrees.
Use special service tool: 303-1567 Teflon® Seal Sizer.
- After installing the Teflon® seal sizing tool, check and make sure the Teflon® seal is in the sizing portion of the Teflon® seal sizer tool. After one minute, rotate the Teflon® seal sizing tool back 180 degrees and remove.
NOTICE: Use fuel injector O-rings made of special fuel-resistant material. Use of standard O-rings may cause the fuel system to leak. Do not reuse O-rings.
Lubricate and install the fuel injector O-ring and washer.
Material: Engine oil — SAE 5W-20 — synthetic engine oil / XO-5W20-Q1SP (WSS-M2C945-B1)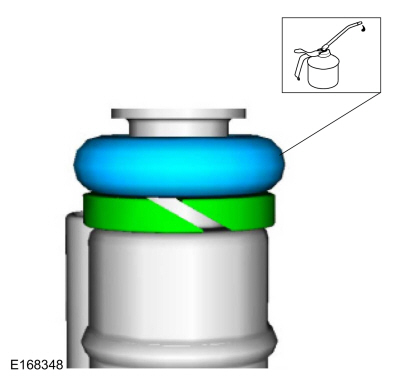
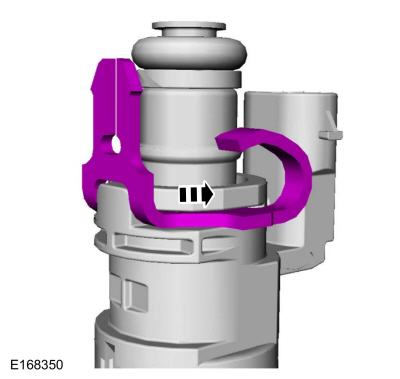
- Install the fuel injector clamp.
- Install the fuel injectors.
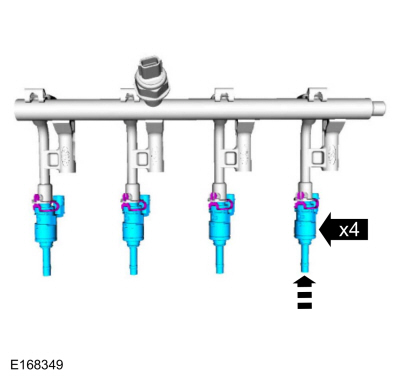
- Apply a force of 90 lb (400 N) to 224.81 lb (1000 N) evenly to the fuel rail assembly over the coil mounting brackets, in a direction parallel to the injector axis. This seats all 4 injector combustion seals in the cylinder head, allowing the injectors to seat.
Torque: 17 lb-ft (23 N·m)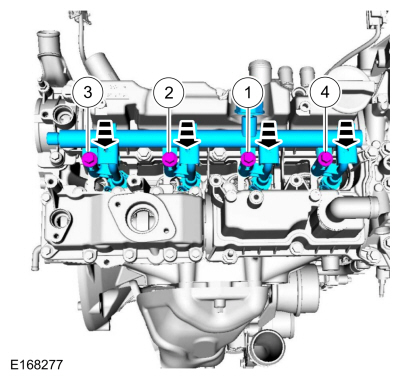
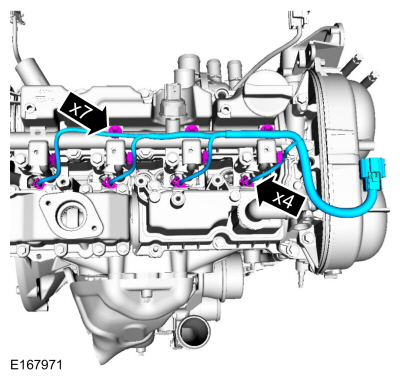
- Install the wiring harness, connect the fuel injector electrical connectors and secure the retainers.
- Lubricate and install the high-pressure fuel pump tappet.
Material: Engine oil — SAE 5W-20 — synthetic engine oil / XO-5W20-Q1SP (WSS-M2C945-B1)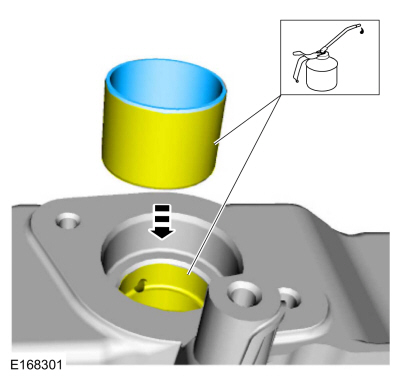
- Lubricate with clean engine oil and install a new high-pressure fuel pump O-ring.
Material: Engine oil — SAE 5W-20 — synthetic engine oil / XO-5W20-Q1SP (WSS-M2C945-B1)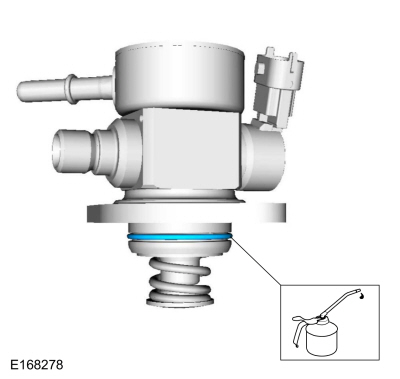
- Install the high-pressure fuel pump and loosely install the 2 high-pressure fuel pump bolts, then tighten each bolt alternately by half a turn until seated.
Torque: 80 lb-in (9 N·m)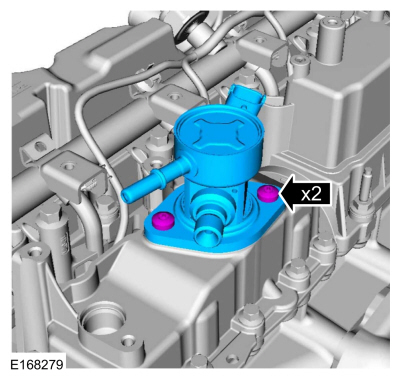
- Install the high-pressure fuel line and tighten the union nuts in 3 steps.
Torque:
Step 1: 15 lb-ft (21 N·m)
Step 2: Wait 5 minutes.
Step 3: 15 lb-ft (21 N·m)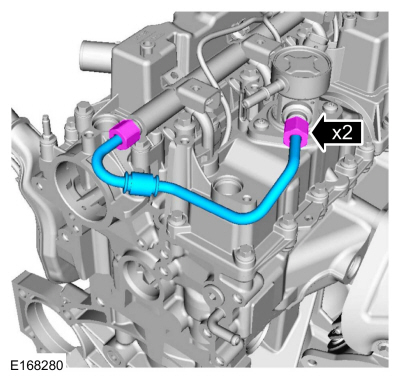
- Install the ignition coil onto the spark plugs and bolts.
Torque: 89 lb-in (10 N·m)
- Install the CMP sensors and bolts.
Torque: 80 lb-in (9 N·m)
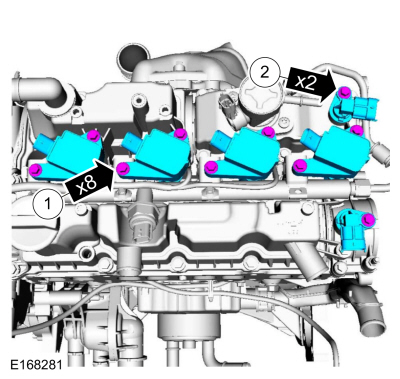
- Install the ignition coil onto the spark plugs and bolts.
- Lubricate the O-ring of the VCT oil control solenoid.
Material: Engine Oil - SAE 5W-20 - Synthetic Engine Oil / XO-5W20-Q1SP (WSS-M2C945-B1)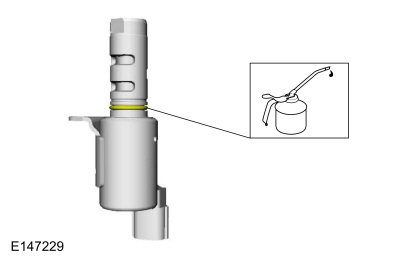
- Install the VCT solenoids and bolts.
Torque: 71 lb-in (8 N·m)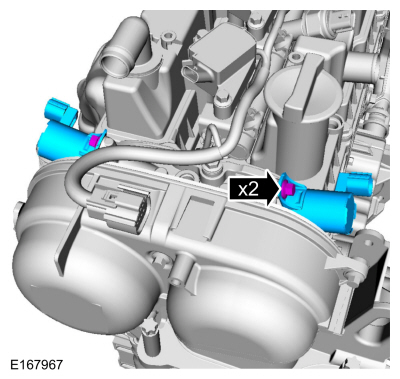
- Inspect the intake manifold gaskets.
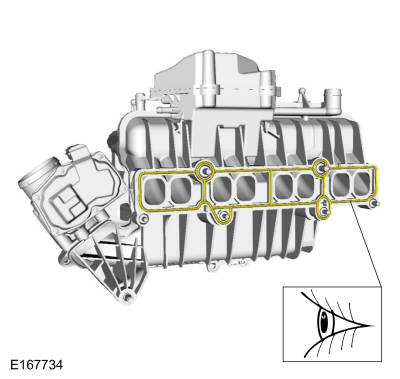
- Install the intake manifold and tighten the bolts in the sequence shown.
Material: Motorcraft® Threadlock 262 / TA-26 (WSK-M2G351-A6)
Torque:
Step 1: Tighten bolts 1, 2, and 7 to: 18 lb-in (2 N·m)
Step 2: Tighten bolts 3 and 4 to: 18 lb-in (2 N·m)
Step 3: Tighten bolts 1 and 2 to: 159 lb-in (18 N·m)
Step 4: Tighten bolts 3, 4, 5, and 6 to: 89 lb-in (10 N·m)
Step 5: Tighten bolts 1 and 2 to: 159 lb-in (18 N·m)
Step 6: Tighten bolt 7 to: 159 lb-in (18 N·m)
Step 7: Tighten bolts 3, 4, 5, and 6 to: 89 lb-in (10 N·m)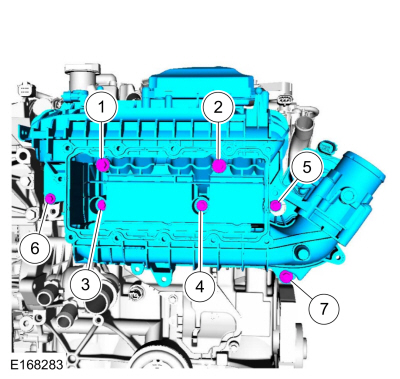
- Inspect the CAC gasket.
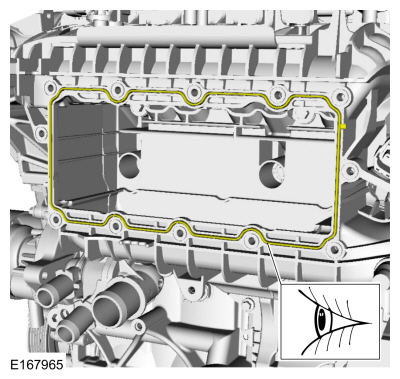
- Inspect the CAC seal.
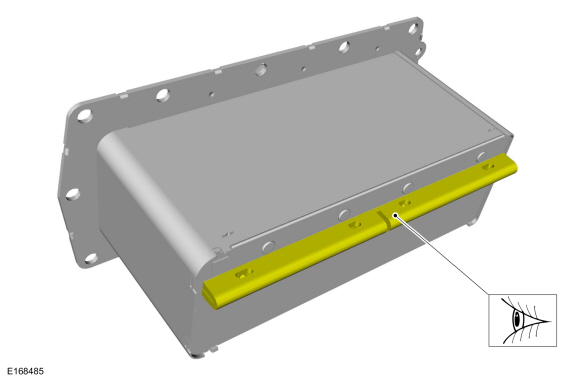
- Install the CAC and bolts in the sequence shown in 4 steps.
Torque:
Step 1: Tighten bolts 7 and 10 to: 18 lb-in (2 N·m)
Step 2: Tighten the remaining bolts by hand: 3 turns
Step 3: Tighten bolts 1 through 12 to: 89 lb-in (10 N·m)
Step 4: Tighten bolts 1 through 12 to: 89 lb-in (10 N·m)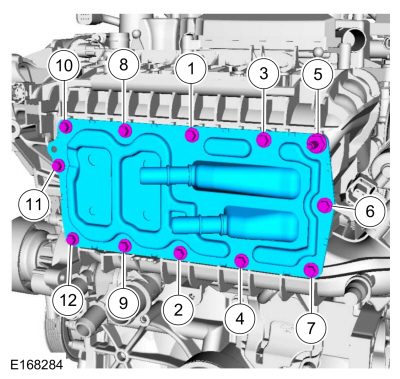
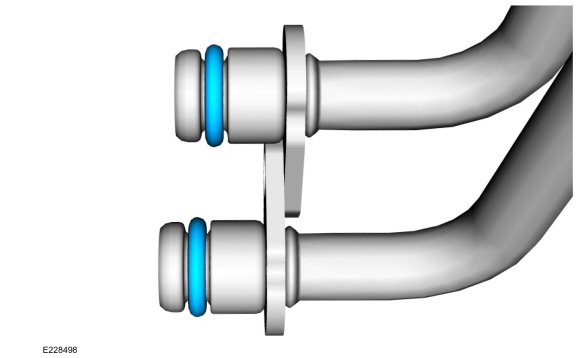
- Install new turbocharger coolant tube O-rings and lubricate them with clean engine coolant.
- Install the TC coolant tube and bracket.
Torque: 89 lb-in (10 N·m)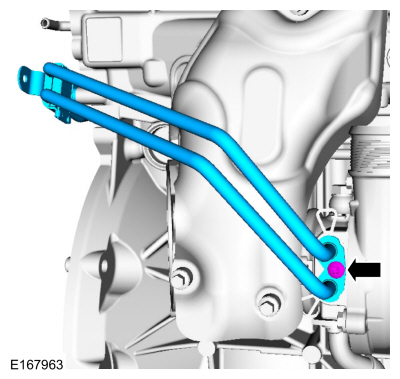
- Position the TC coolant tube and install the clips.
Torque: 97 lb-in (11 N·m)
- Torque: 17 lb-ft (23 N·m)
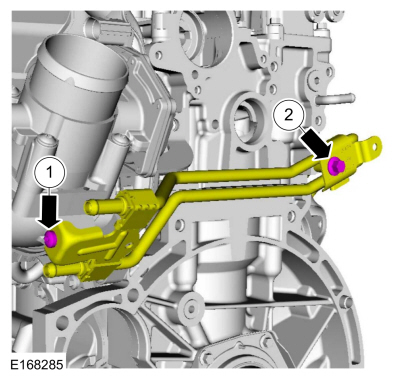
- Position the TC coolant tube and install the clips.
- Install the bracket and bolt.
Torque: 17 lb-ft (23 N·m)
- Install the nut.
Torque: 62 lb-in (7 N·m)
- Install the TC wastegate control hose and secure the clips.
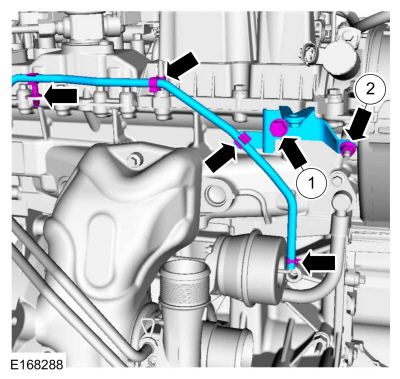
- Install the bracket and bolt.
- Install a new vacuum pump gasket.
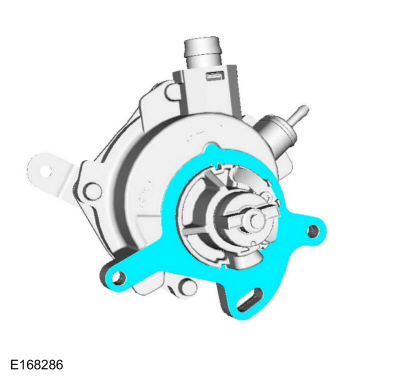
- Make sure the mating surfaces are clean and free of debris, then tap the vacuum pump mounting hole.
Use common service equipment: M6 tap.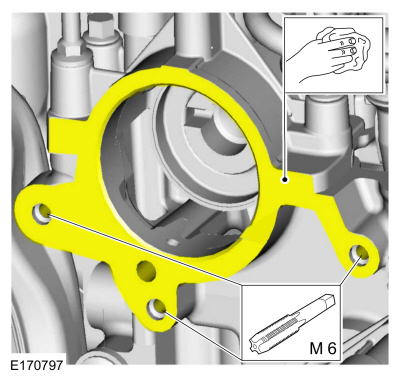
- Apply a 3 mm (0.118 in) bead of flange sealant.
Material: Flange sealant - anaerobic / Loctite® 51031 (WSS-M2G348-A7)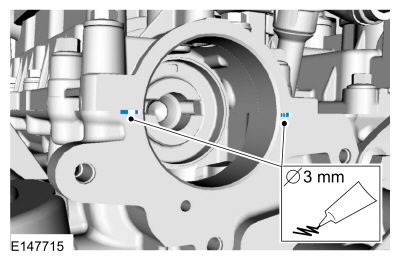
- Install the vacuum pump and new studs.
Torque: 89 lb-in (10 N·m)
- Install the intake manifold support bracket bolt.
Torque: 159 lb-in (18 N·m)
- Install the engine lift bracket and bolts.
Torque: 168 lb-in (19 N·m)
- Install the stud.
Torque: 44 lb-in (5 N·m)
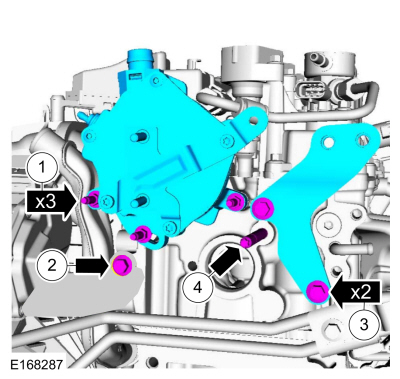
- Install the vacuum pump and new studs.
- Lubricate the coolant outlet O-ring.
Material: Concentrated antifreeze/coolant Motorcraft® Orange / VC-3-B (WSS-M97B44-D)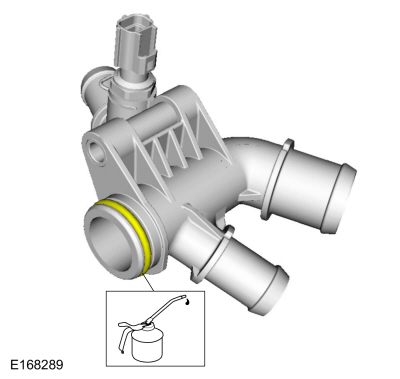
- Install the bracket and nuts.
Torque: 62 lb-in (7 N·m)
- Install the coolant outlet and nut.
Torque: 159 lb-in (18 N·m)
- Install the bracket and bolt.
Torque: 17 lb-ft (23 N·m)
- Install the vacuum hose clips.
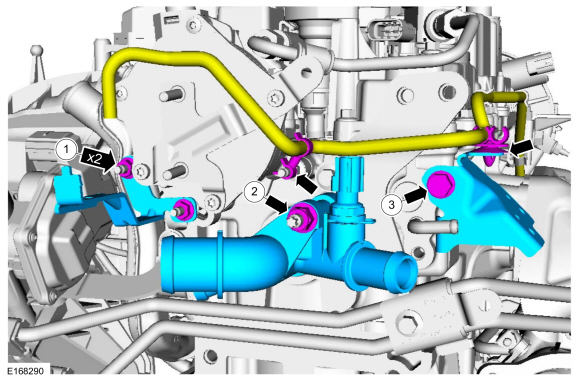
- Install the bracket and nuts.
- Connect the vacuum hose and bracket.
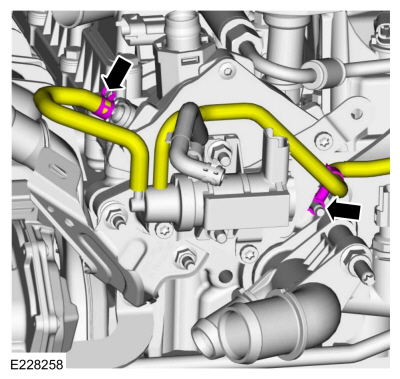
- Install the wiring harness, connect the electrical connectors and secure the retainers.
- Install the oil level indicator.
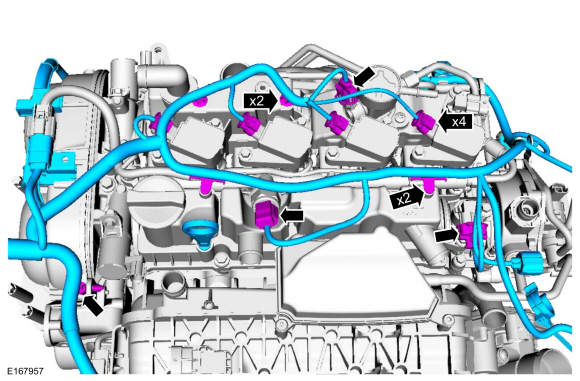
- Connect the CHT sensor harness electrical connector and install the cover.
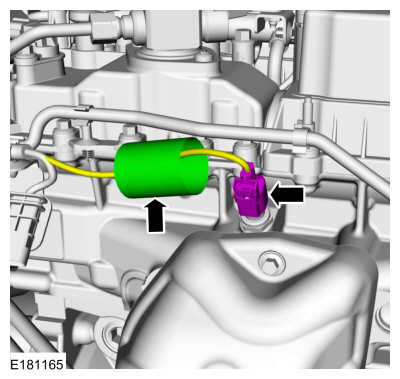
- Install the wiring harness retainers and connect the electrical connectors.
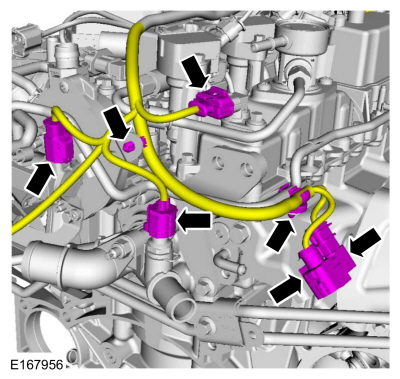
- Install the wiring harness retainers and connect the electrical connectors.
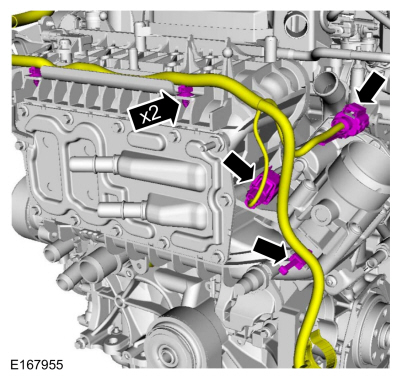
- Install the harness clips and connect the electrical connector.
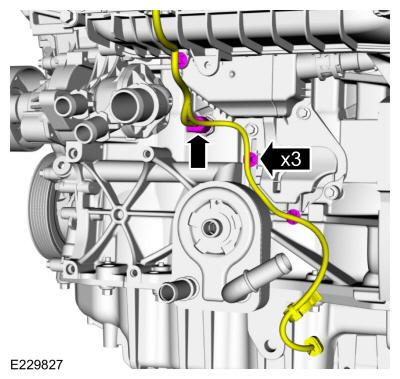
- Position the harness and connect the electrical connectors.
- Attach the harness clip and install the retainer.
Torque: 89 lb-in (10 N·m)
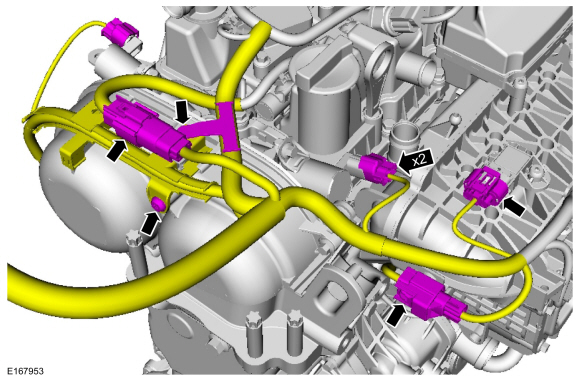
- Install the clips and connect the CKP electrical connector.
- Position the ground cable and install the stud.
Torque: 168 lb-in (19 N·m)
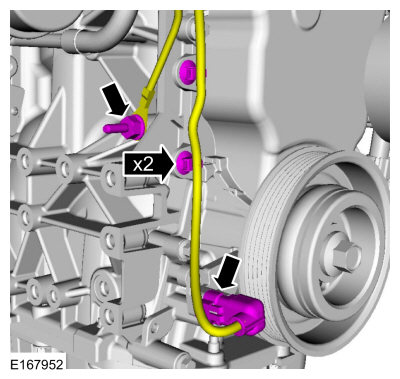
- Install the generator and generator mounting stud.
Torque: 89 lb-in (10 N·m)
- Install the generator mounting bolt.
Torque: 35 lb-ft (48 N·m)
- Install the generator mounting nut.
Torque: 35 lb-ft (48 N·m)
- Install the generator mounting stud.
Torque: 35 lb-ft (48 N·m)
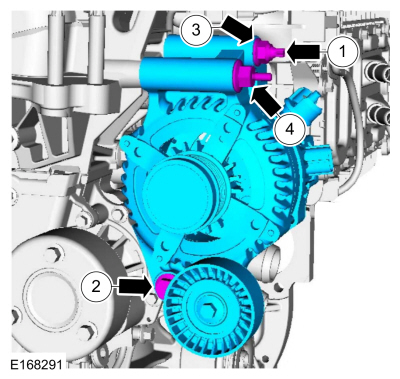
- Install the generator and generator mounting stud.
- Install the A/C compressor bracket and bolts.
Torque: 18 lb-ft (25 N·m)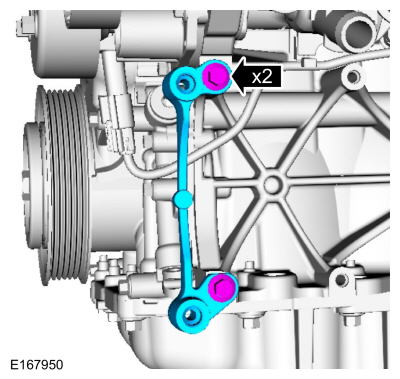
- Install the A/C compressor and studs.
Torque: 18 lb-ft (25 N·m)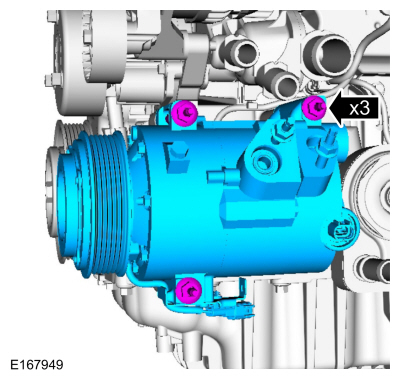
- Install the hoses and connect the couplings.
Use common service equipment: hose clamp removal/installation tool.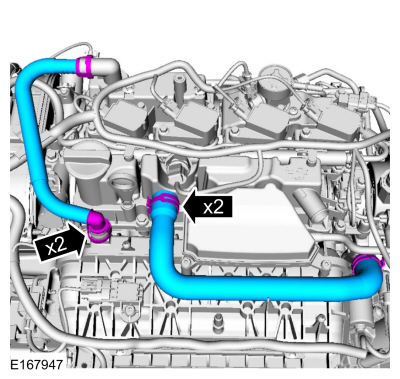
- Install and connect the coolant hoses.
Use common service equipment: hose clamp removal/installation tool.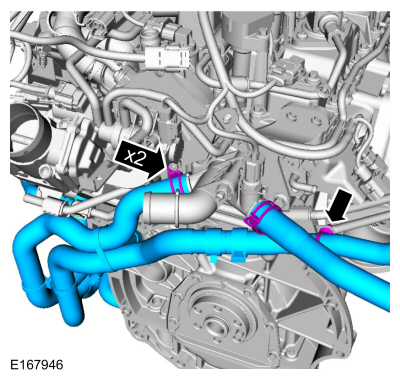
- Connect the coolant hoses.
Use the common service equipment: hose clamp removal/installation tool.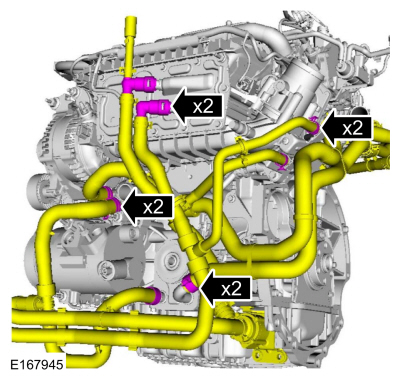
- Install the harness clip and connect the electrical connector.
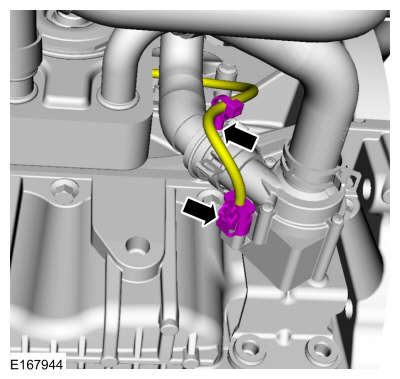
- Install and connect the coolant hose.
Use common service equipment: hose clamp removal/installation tool.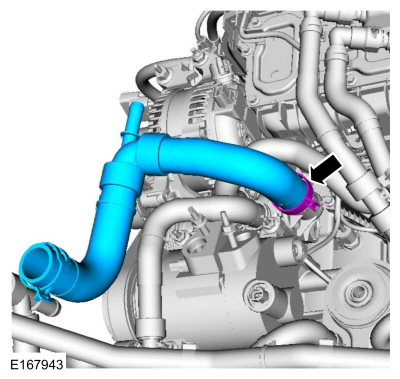
- Install and connect the coolant hose.
Use common service equipment: hose clamp removal/installation tool.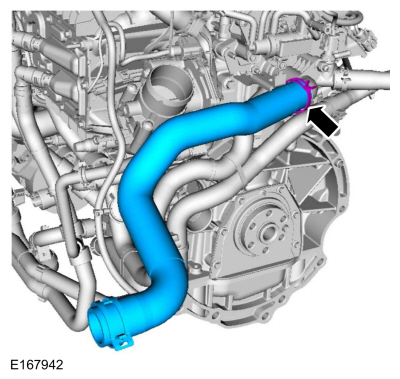
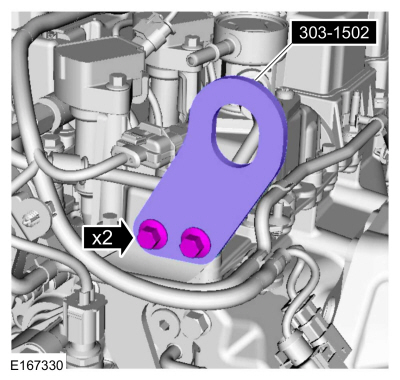
- Install the special service tool: 303-1502 Engine Lifting Device.
- Install the floor crane and special tool.
Install special service tool: 300-OTC1819E Floor crane 2200 #, folding.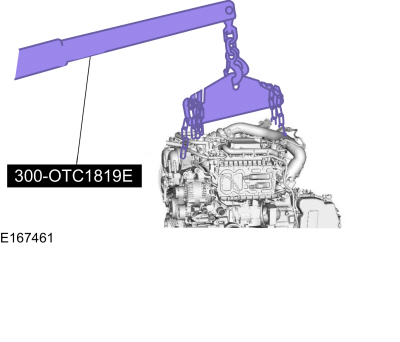
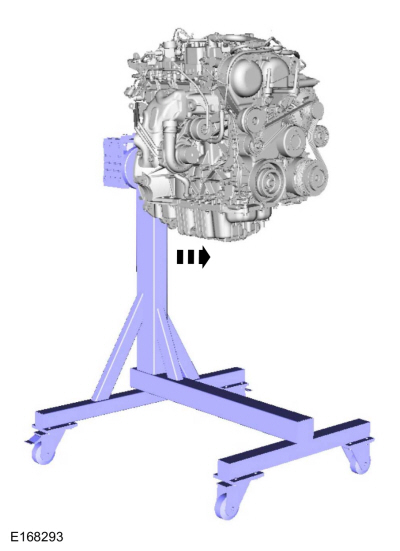
- Remove the engine assembly from the engine stand.
Test yourself
A quick Ford Fusion quiz: every answer comes with an explanation and a link to the manual page.