Powertrain
Engine - Installation
In this manual: Powertrain
92steps
~557min
5/5difficulty
1special tools
Done 0 of 92
Special Service Tools / General Equipment
 |
300-OTC1819E Floor Crane 2200 lb, Folding |
 |
303-1502 Engine Lifting Device TKIT-2012A-FL TKIT-2012A-RYAD |
| Adjustable mounting arm | |
| Hose Clamp Removal/Installation Tool | |
Materials
| Name | Specification |
|---|---|
| Motorcraft® Multi-Purpose Spray Lubricant XL-5-A |
ESB-M1C93-B |
| Engine Oil — SAE 5W-20 — Semi-Synthetic Engine Oil XO-5W20-Q1SP |
WSS-M2C945-B1 |
All vehicles
- Lubricate the torque converter hub guide with universal grease.
Material: Motorcraft® Universal Grease Spray / XL-5-A (ESB-M1C93-B)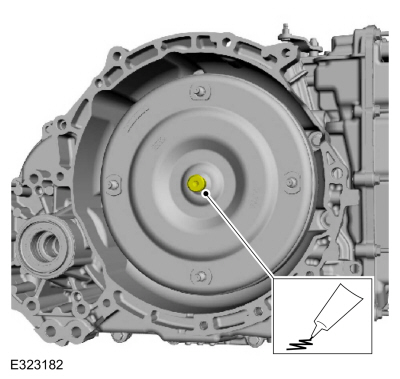
- Inspect the cylinder block dowels. If the dowels are damaged or missing, install new cylinder block dowels.

- Connect the engine to the transmission and install the bolt.
Torque: 35 lb-ft (48 N·m)
- Install the engine to the transmission bolts.
Torque: 35 lb-ft (48 N·m)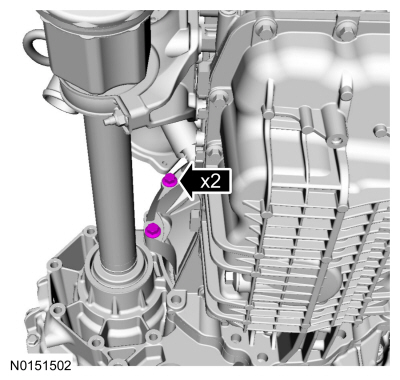
- Install the engine to the transmission bolts.
Torque: 35 lb-ft (48 N·m)
- Install the adjustable mounting bracket.
Use common service equipment: adjustable mounting lever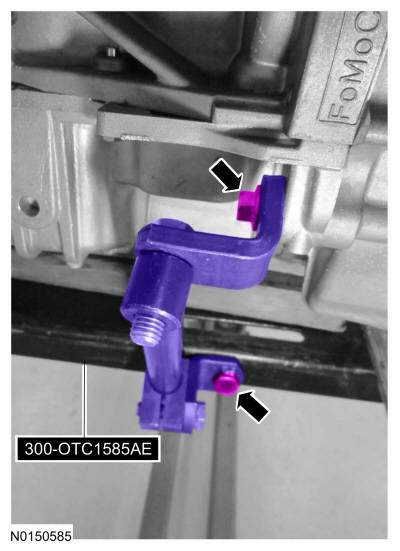
- Remove the special service tool: 300-OTC1819E 2200 lb Floor Crane, Folding.

- Remove the special service tool: 303-1502 Engine Lifting Device.
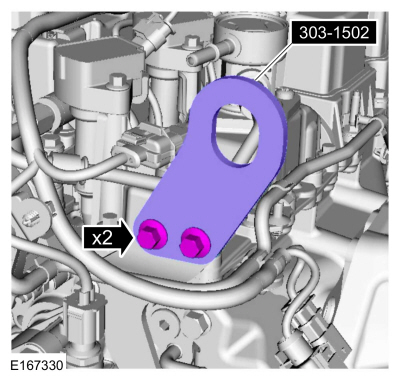
- Install the bracket and bolts.
Torque: 97 lb-in (11 N·m)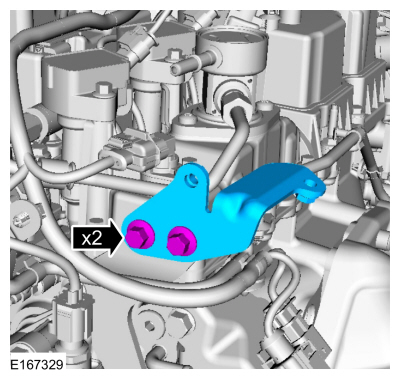
- Install the axle shaft support bracket and bolts.
Torque: 35 lb-ft (48 N·m)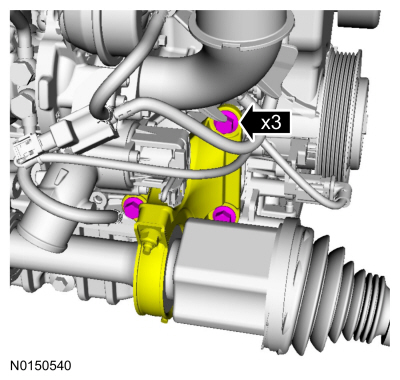
- Install the TC intake pipe, tighten the bolt and tighten the clamp.
Torque:
1: 71 lb-in (8 N·m)
2: 44 lb-in (5 N·m)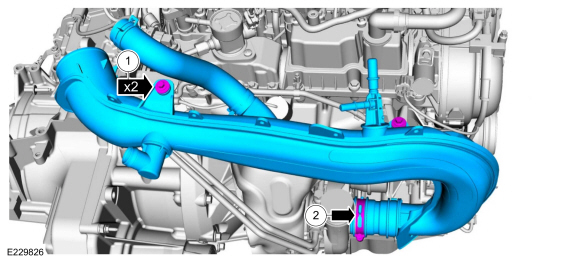
- Install the TC outlet pipe, secure with bolts and tighten the clamps.
Torque:
1: 71 lb-in (8 N·m)
2: 44 lb-in (5 N·m)
- Connect the TC bypass hose.
- Install the wiring harness retainers and connect the electrical connectors.
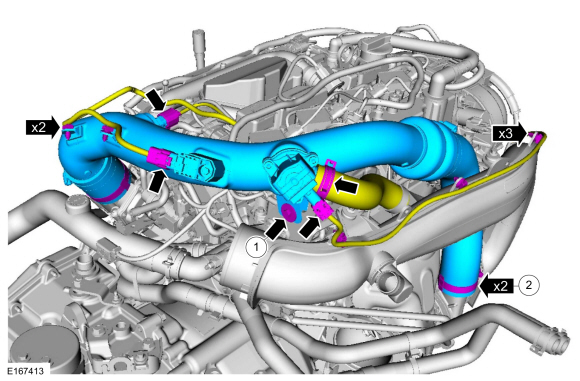
- Install the TC outlet pipe, secure with bolts and tighten the clamps.
- Install the crankcase ventilation hose.
Use common service equipment: hose clamp removal/installation tool.
- Secure the wiring harness retainer.
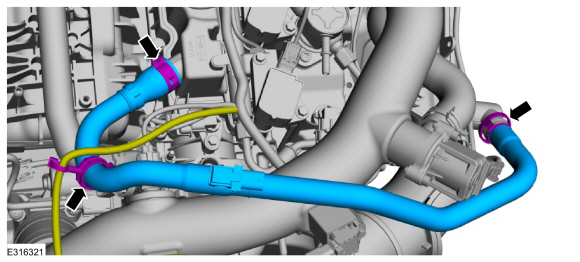
- Install the crankcase ventilation hose.
- Align the marks on the torque converter nuts and tighten the nut.
Torque: 35 lb-ft (48 N·m)
- Install the starter insulator.
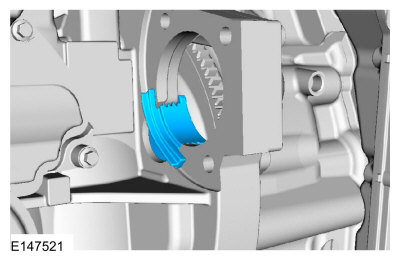
- Install the starter, bolts and stud.
Torque: 35 lb-ft (48 N·m)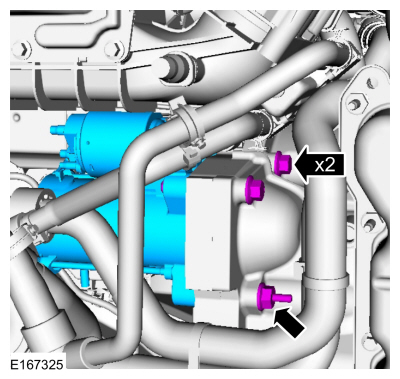
- Position the harness and install the nut.
Torque: 97 lb-in (11 N·m)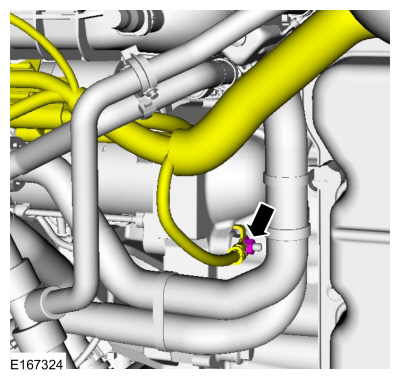
- Position the harness and install the nut.
Torque: 159 lb-in (18 N·m)
- Slide the generator insulator downward.
- Install the harness clips and connect the electrical connector.
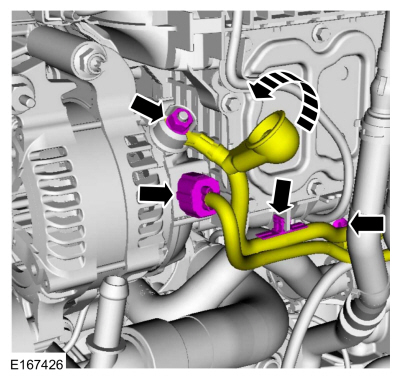
- Position the harness and install the nut.
- Position the starter cable and install the nuts.
Torque:
1: 53 lb-in (6 N·m)
2: 106 lb-in (12 N·m)
Vehicles with automatic stop/start
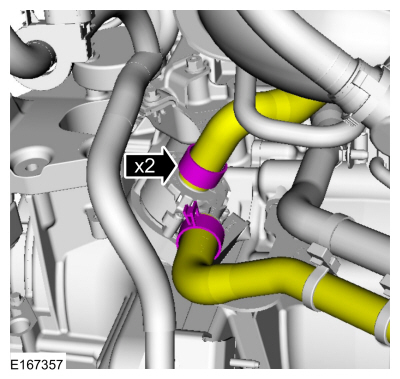
- Connect the coolant hoses.
Use the common service equipment: hose clamp removal/installation tool.
 |
All vehicles
- Install the wiring harness retainers and connect the electrical connectors.

- Install a new catalytic converter gasket and tighten the bolts.
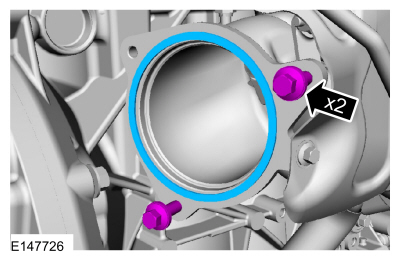
- Install the catalytic converter, install the bolts and tighten the bolts in the sequence shown.
Torque: 22 lb-ft (30 N·m)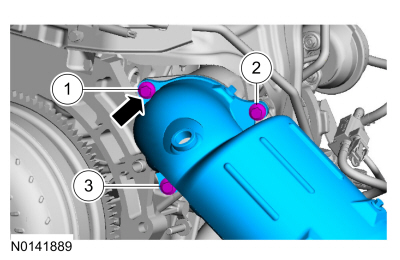
- Install the muffler inlet pipe insulator bracket bolts.
Torque: 18 lb-ft (25 N·m)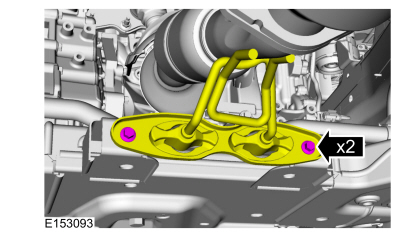
- Tighten the catalytic converter mounting bolts in the sequence shown.
Torque: 22 lb-ft (30 N·m)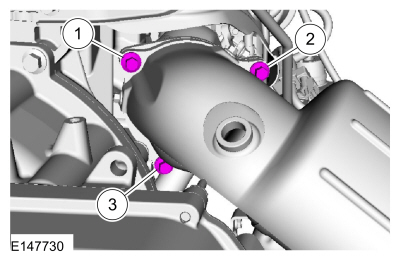
- Install the retainer and connect the electrical connector.

- Tighten the engine mount studs.
Torque: 89 lb-in (10 N·m)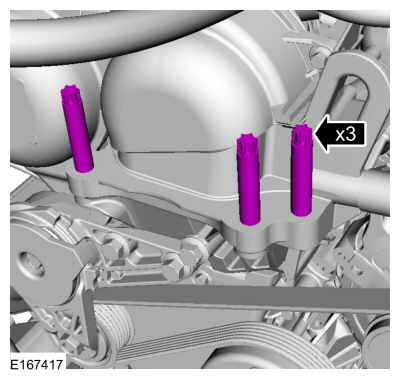
- Using the powertrain lift, raise the powertrain and subframe assembly.
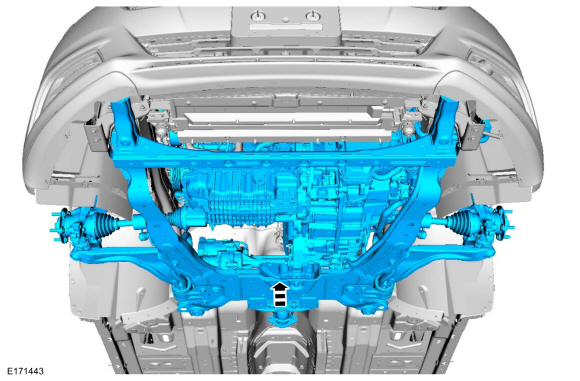
- Install the engine mount and nuts.
Torque: 85 lb-ft (115 N·m)
- Hand-tighten the engine mount bolts.
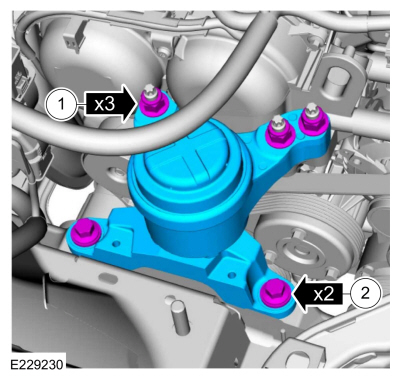
- Install the engine mount and nuts.
- Install the transaxle mount insulator nut.
Torque: 98 lb-ft (133 N·m)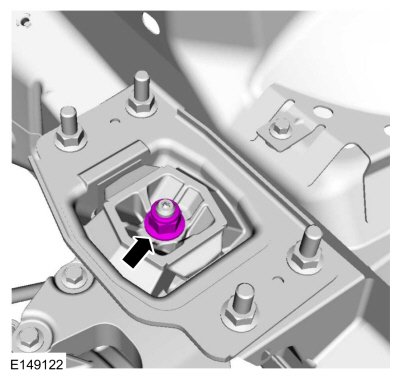
- Hand-tighten the front subframe mounting bolts.
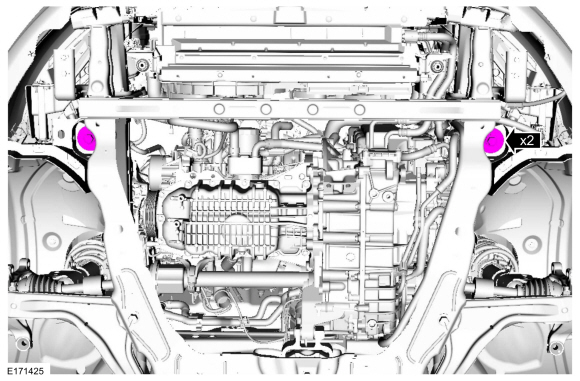
- Install the subframe mount bracket and hand-tighten the bolts.
- Hand-tighten the subframe mount bracket bolts.
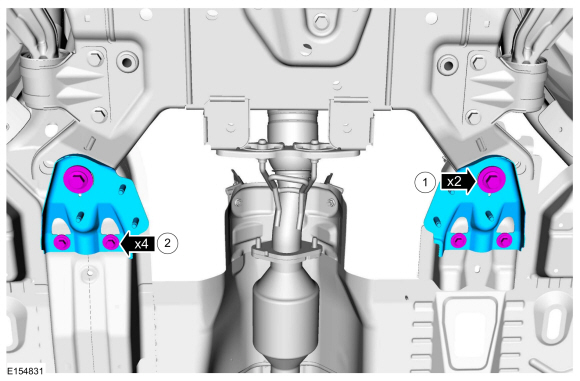
- Install the rear subframe mounting bolts.
Torque: 173 lb-ft (235 N·m)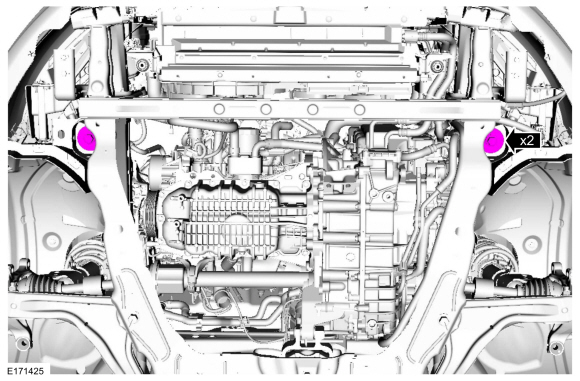
- Tighten the subframe mount bracket bolts in 2 stages.
Torque:
Stage 1: 76 lb-ft (103 N·m)
Stage 2: 270°
- Tighten the subframe mount bracket bolts.
Torque: 44 lb-ft (60 N·m)
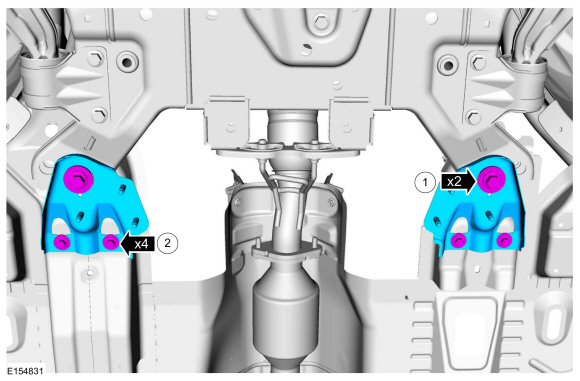
- Tighten the subframe mount bracket bolts in 2 stages.
- Discard.
Use common shop equipment: adjustable mount link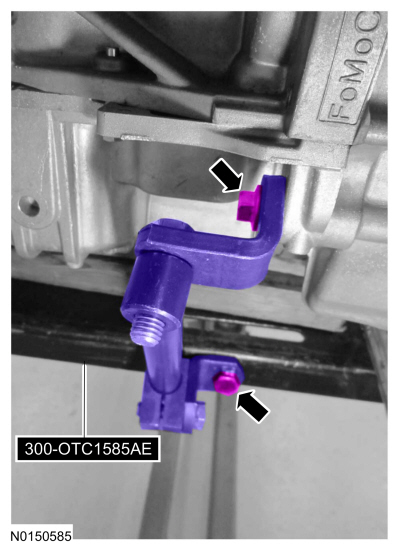
- Tighten the engine mount bolts.
Torque: 66 lb-ft (90 N·m)
- Install the RH steering knuckle assembly, then install the bolts and nuts.
Torque: 173 lb-ft (235 N·m)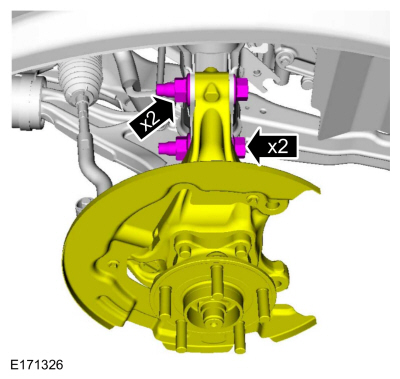
- Install the LH steering knuckle assembly, then install the bolts and nuts.
Torque: 173 lb-ft (235 N·m)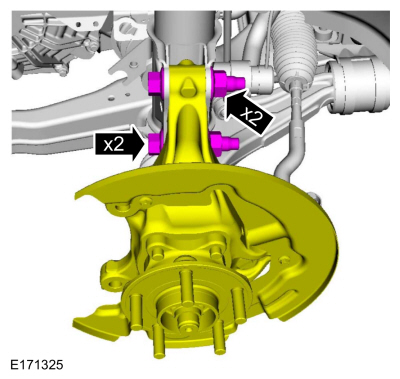
- Install the brake rotor.
Refer to Brake Rotor (206-03 Front Disc Brake, Removal and Installation). - Position the RH stabilizer bar link and install the nut.
Torque: 85 lb-ft (115 N·m)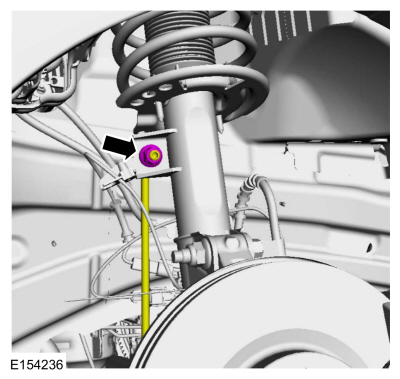
- Position the LH stabilizer bar link and install the nut.
Torque: 85 lb-ft (115 N·m)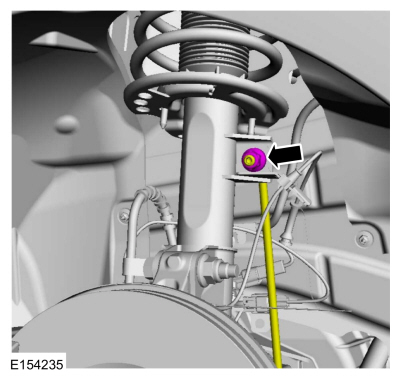
- Position the wheel speed sensor and install the bolt.
Torque: 80 lb-in (9 N·m)
- Position the wheel speed sensor and install the bolt.
Torque: 80 lb-in (9 N·m)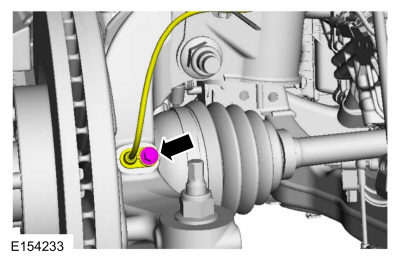
- Install the catalytic converter bushing and nuts.
Torque: 18 lb-ft (25 N·m)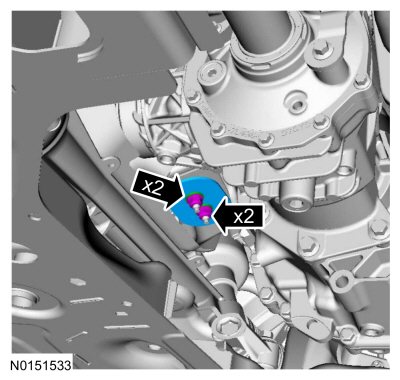
- Install the engine to the transmission bolts.
Torque: 35 lb-ft (48 N·m)
- Install the auxiliary water pump and bolts.
Torque: 17 lb-ft (23 N·m)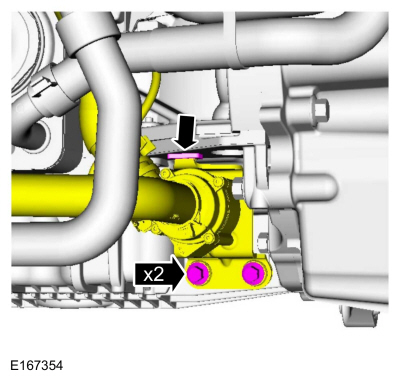
- Install a new muffler inlet pipe gasket.
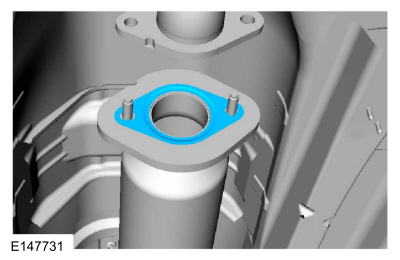
- Position the muffler inlet pipe and install the nuts.
Torque: 35 lb-ft (48 N·m)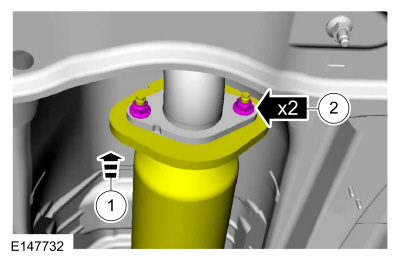
- Install the transverse brace and bolts.
Torque: 33 lb-ft (45 N·m)
- Install the engine oil filter.
Material: Engine oil — SAE 5W-20 — synthetic engine oil / XO-5W20-Q1SP (WSS-M2C945-B1)
Torque: 128 lb-in (14.5 N·m)
- Position the A/C lines and install the nuts.
Torque:
1: 133 lb-in (15 N·m)
2: 89 lb-in (10 N·m)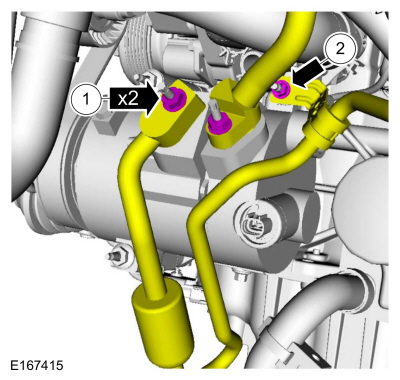
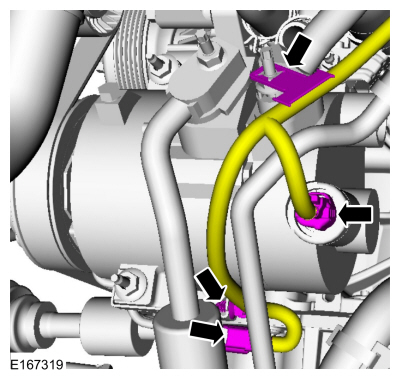
- Connect the electrical connectors and secure the retainers.
- Connect the coolant hose.
Use common service equipment: hose clamp removal and installation tool.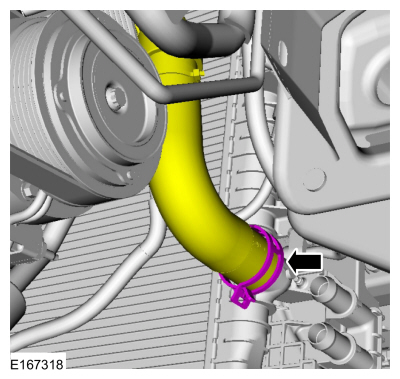
- Connect the coolant hoses.
Use the common service equipment: hose clamp removal/installation tool.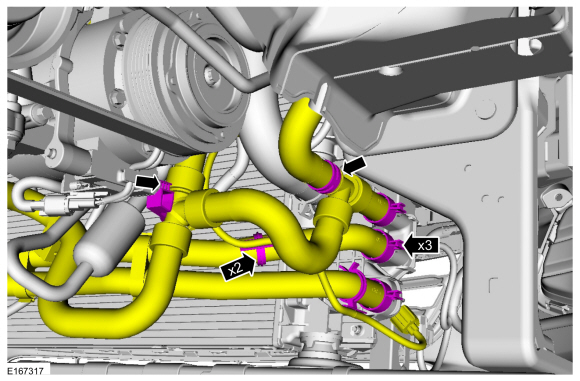
- Install the lower radiator support, retainers and bolts.
Torque: 177 lb-in (20 N·m)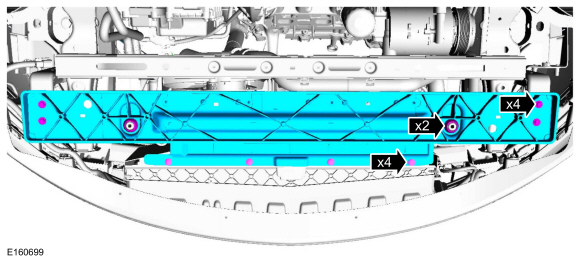
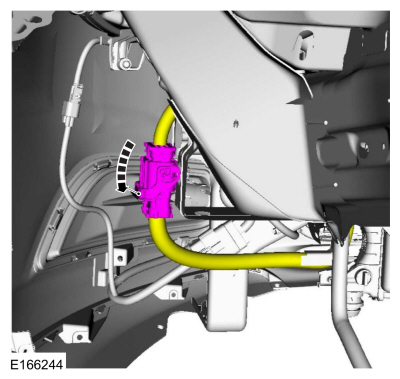
- Connect the electrical connector.
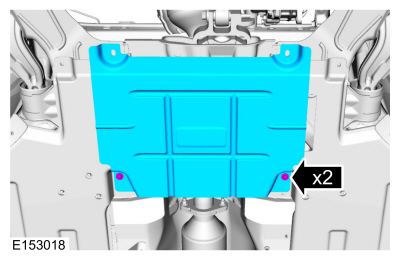
- Install the deflector shields and retainers.
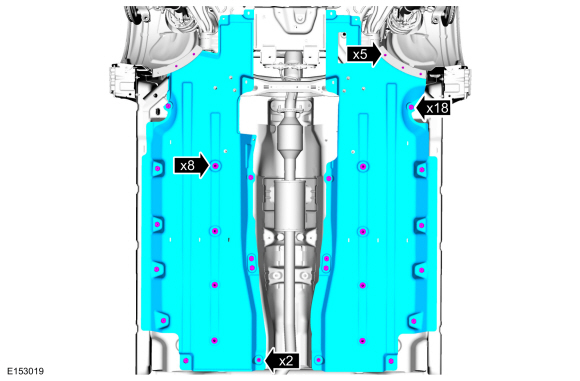
- Install the stone shield and retainers.
- Install the RH and LH front wheels and tires.
Refer to: Wheels and Tires (204-04A Wheels and Tires, Removal and Installation). - Install the accessory drive belt.
Refer to: Accessory Drive Belt (303-05A Accessory Drive — 1.5 L EcoBoost (118 kW/160 L hp) — I4, Removal and Installation). - Remove the cooling module support.

- Install the degas bottle and retainer.
Torque: 80 lb-in (9 N·m)
- Connect the coolant hoses.
Use the common service equipment: hose clamp removal/installation tool.
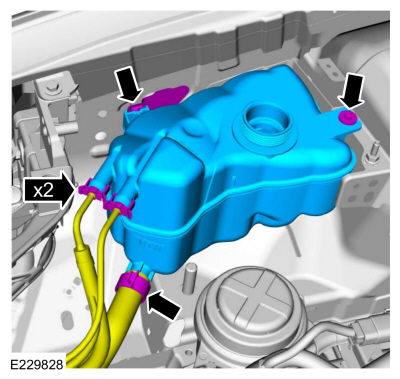
- Install the degas bottle and retainer.
- Install the harness clip and connect the electrical connector.
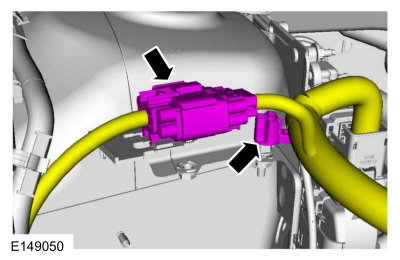
- Connect the PCM electrical connector.
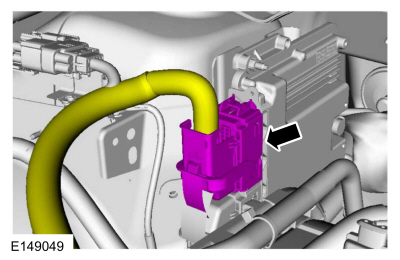
- Connect the coolant hose.
Use common service equipment: hose clamp removal and installation tool.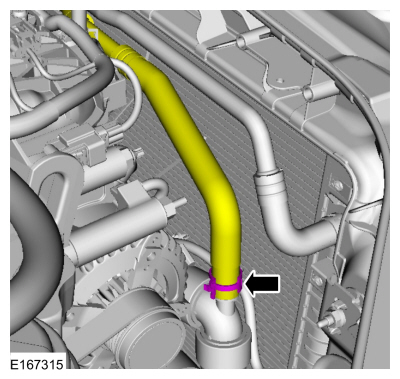
- Connect the coolant hoses to the transmission fluid warmer coolant control valve and install the clamps.
Use common service equipment: hose clamp removal/installation tool.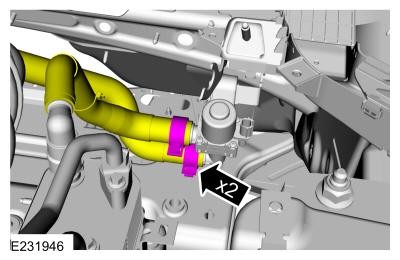
- Connect the coolant hoses to the heater core.
Use common service equipment: hose clamp removal/installation tool.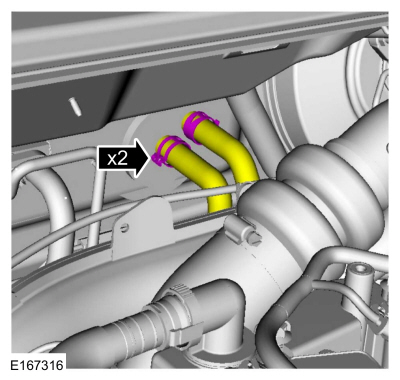
- Connect the shift cable end to the selector lever assembly and install the bolts.
Torque: 18 lb-ft (25 N·m)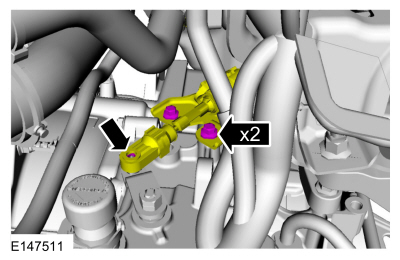
- Install the retainers and connect the coolant tube.
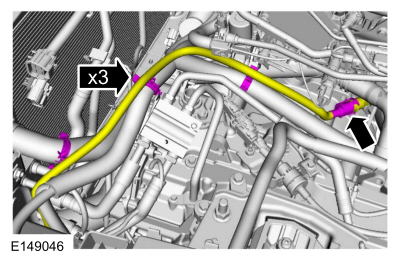
- Install the retainer and connect the coolant hose.
Use common service equipment: hose clamp removal/installation tool.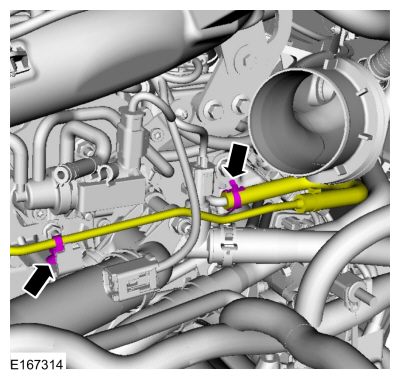
- Connect the transmission fluid cooler lines.

- Install the secondary latches of the transmission fluid cooler lines.

- Connect the coolant hose.
Use common service equipment: hose clamp removal and installation tool.
- Position the wiring harness, install the bolts and secure the retainers.
Torque: 97 lb-in (11 N·m)
- Position the wiring harness and install the nuts.
Torque: 89 lb-in (10 N·m)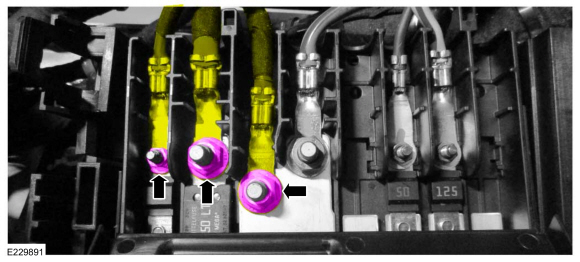
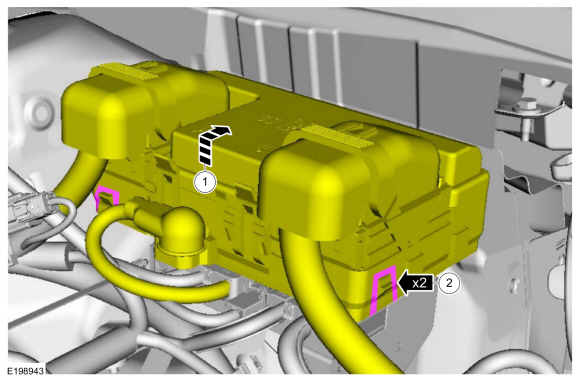
- Close the battery cable terminal cover.

- Position and install the fuse block.
- Position the wiring harness and install the stud.
Torque: 106 lb-in (12 N·m)
- Install the EVAP canister purge valve.
Refer to: Fuel Vapor Management Valve (303-13A Evaporative Emission Control — 1.5 L EcoBoost (118 kW/160 L hp) — I4, Removal and Installation). - Connect the electrical connector of the oil pan pressure sensor wiring harness and the wiring harness clip.
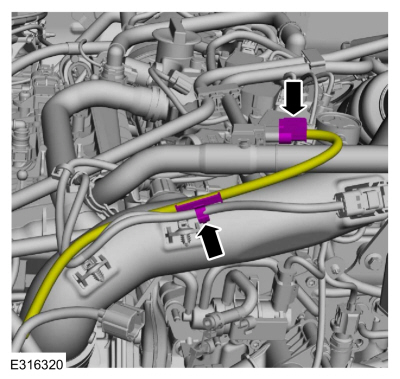
- Secure the retainer and connect the vacuum tube coupling.

- Secure the retainers and connect the fuel tube fittings.

- Install the following components:
- Install the battery tray.
Refer to: Battery Compartment (414-01 Battery, Mounting and Cables, Removal and Installation). - Install the upper air cleaner outlet pipe.
Refer to: Air Cleaner Outlet Pipe (303-12A Intake Air Distribution and Filtering - 1.5 L EcoBoost (118 kW/160 L PS) - I4, Removal and Installation). - Install the air cleaner.
REFER TO: Air Cleaner Element (303-12A Intake Air Distribution and Filtering - 1.5 L EcoBoost (118 kW/160 L PS) - I4, Removal and Installation).
- Install the battery tray.
- Connect the steering column shaft to the steering gear input shaft and install the bolt.
Torque: 18 lb-ft (25 N·m)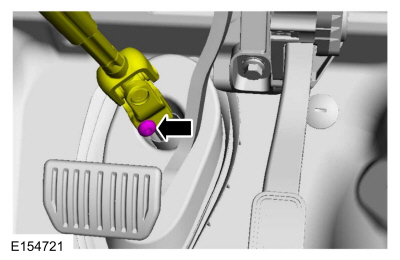
- Remove the special service tool.

- Fill the engine with clean engine oil.
Material: Engine Oil - SAE 5W-20 - Synthetic Engine Oil / XO-5W20-Q1SP (WSS-M2C945-B1) - Fill the cooling system.
Refer to: Engine Cooling System Draining, Vacuum Filling and Bleeding (303-03A Engine Cooling, 1.5 L EcoBoost (118 kW/160 L hp) — I4, General Procedures). - Adjust the shift cable.
Refer to: Selector Lever Cable Adjustment — 1.5 L EcoBoost (118 kW/160 L hp) — I4 (307-05A Automatic Transmission External Controls — 6-Speed Automatic Transmission — 6F35, General Procedures). - Charge the A/C system.
Refer to: Refrigerant Recovery, Evacuation and Charging (A/C) - Vehicles With: R1234YF Refrigerant (412-00 Climate Control System - General Information, General Procedures). - Install the engine outer cover.
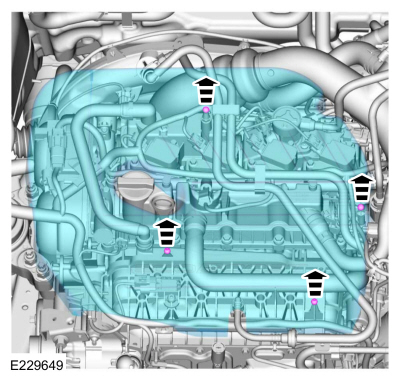
- Start the engine and check the exhaust system for leaks.
- Use the Powertrain Control Module (PCM) misfire monitor profile correction procedure with the diagnostic scan tool.
- Check and, if necessary, adjust the front toe.
Refer to: Front Toe Adjustment (204-00 Suspension System — General Information, General Procedures).
Test yourself
A quick Ford Fusion quiz: every answer comes with an explanation and a link to the manual page.
Was this page helpful?