Restraint
Components and Components Location
In this manual: Restraint
37steps
~222min
4/5difficulty
Done 0 of 37
Contents:
Components and Components Location
Component
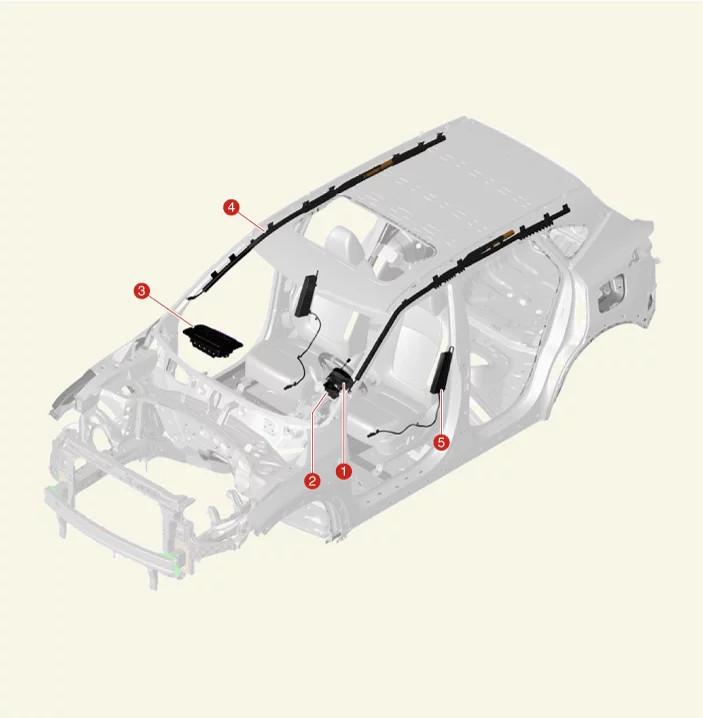
| 1. Driver Airbag (DAB) Module 2. Clock Spring 3. Passenger Airbag (PAB) Module |
4. Curtain Airbag (CAB) Module 5. Side Airbag (SAB) Module |
On Vehicle Inspection
On Vehicle Inspection
Diagnosis with KDS
- The airbag system can be more quickly diagnosed for problems with the KDS (Refer to "DTC guide").
- Self diagnosis : Inspect the Diagnostic Trouble Code (DTC) with the KDS. (Refer to DTC guide when fault code is found.)
Refer to the KDS screen for operating conditions and details.
Driver Airbag (DAB) Module and Clock Spring Description and Operation
Description
- The Driver Airbag (DAB) module is installed on the steering wheel and is electrically connected to the SRS Control Module (SRSCM) via the clock spring. In the event of a front collision, the airbag is deployed to protect the driver.
- The clock spring is a device that transmits the operation signal generated from the sensors installed on the front and side of the vehicle to the inflator (gas generator) of the airbag module via the internal cable. It also transmits the steering wheel remote control switch and horn operation signals to the system via the internal cable.
|

|
Driver Airbag (DAB) Module and Clock Spring Troubleshooting
Troubleshooting
Airbag warning lamp onThe Clock Spring Repair Procedure
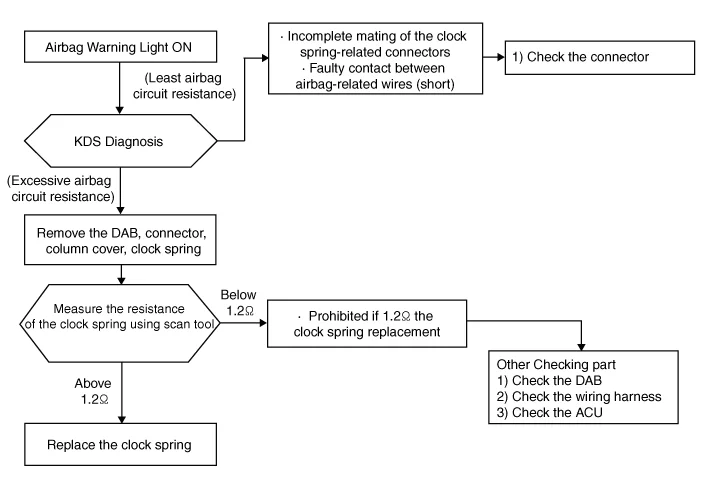
The Clock Spring Repair Procedure
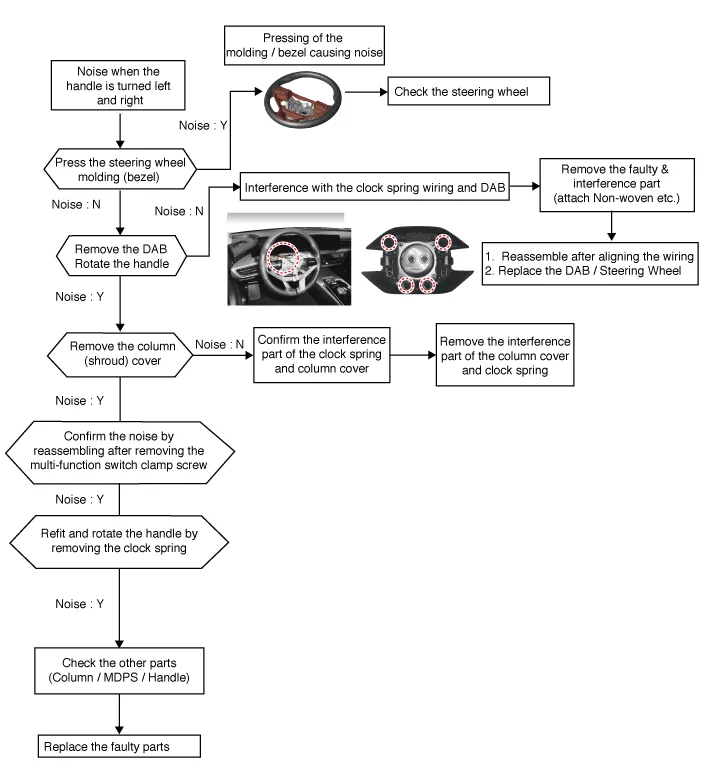
Driver Airbag (DAB) Module and Clock Spring Removal
Removal
Driver Airbag (DAB)
- Disconnect the battery negative ( - ) terminal.
After disconnecting the battery negative ( - ) terminal, wait at least 3 minutes and 30 seconds.
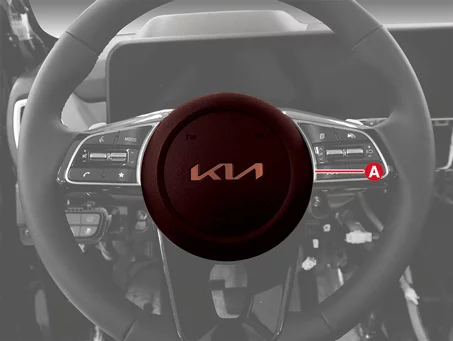
- Remove the driver airbag module by pressing the fastening pin using the service hole (A) on the back of the steering wheel.
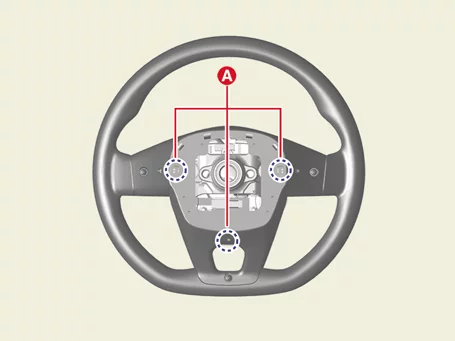
- Remove the driver airbag module (A).
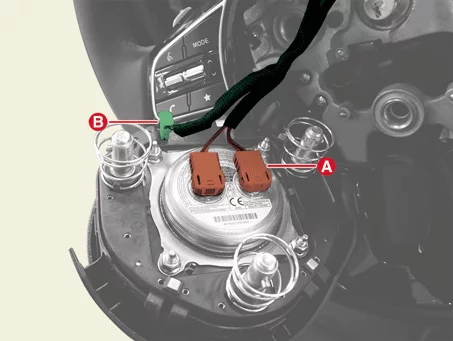
- Disconnect the airbag module connector(A) and the horn connector (B).
Clock Spring
- Disconnect the battery negative ( - ) terminal.
After disconnecting the battery negative ( - ) terminal, wait at least 3 minutes and 30 seconds. - Remove the steering wheel. (Refer to Steering System - "Steering Wheel")
- Remove the steering column shroud lower panel. (Refer to Body - "Steering Column Shroud Panel")
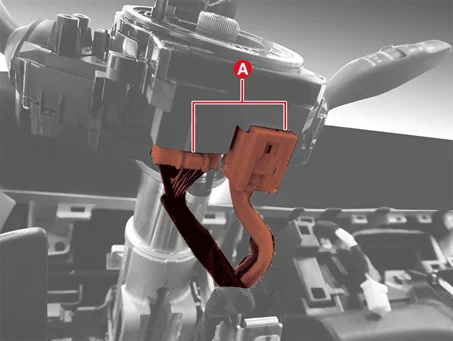
- Disconnect the clock spring connectors (A).
- Remove the clock spring (A) by releasing the fixing hook.
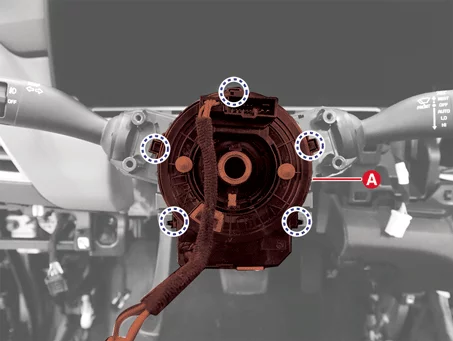
Clip position :
Driver Airbag (DAB) Module and Clock Spring Installation
Installation
- Set the clock spring in neutral position before assembling into the vehicle.
- When the vehicle comes out of the factory, the clock spring is in a neutral state.
- If the white cable is visible through the 7 o’clock neutral window of the vehicle, the clock spring is in neutral state.
- If the white cable is not visible when checking through the 7 o’clock neutral window of the vehicle, adjust the setting to neutral manually.
If the clock spring is not set in neutral state, electric malfunctions such as airbag warning lamp on, horn, hands-free, auto cruise, heated wiring and heated steering, and noise from turning the steering may cause.Neutral Check Window : Normal Neutral Check Window : Fault 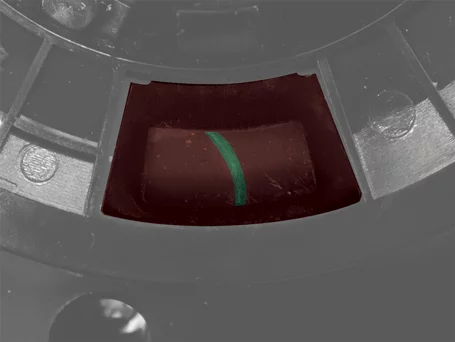
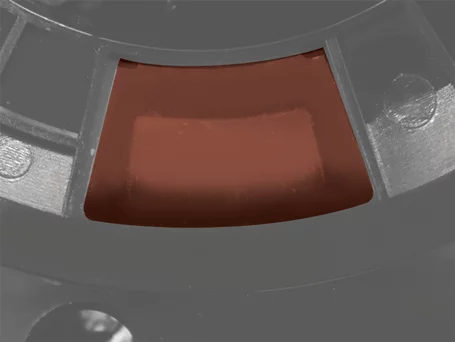
The white cable is visible through 7 O' Clock Neutral Check Window. The white cable is not visible through 7 O' Clock Neutral Check Window. - Clock spring manual neutral setting procedure.
- Press the Auto Lock (A) at 6 o’clock and turn clockwise until the Auto Lock (A) stops.

- Press the 6 o'clock auto lock (A) and turn three times counterclockwise.
- If the white cable is visible through the 7 o’clock neutral window of the vehicle, the clock spring is in neutral state.
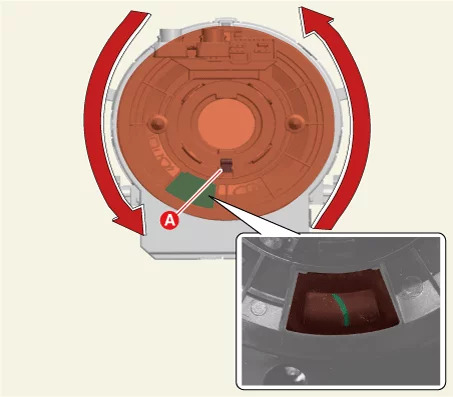
- Press the Auto Lock (A) at 6 o’clock and turn clockwise until the Auto Lock (A) stops.
- Connect the clock spring wiring harness connector and horn wiring harness connector to the clock spring.
- Tighten the screw after installing the steering column shroud.
- Install the steering wheel. (Refer to Steering System - "Steering Wheel")
- Install the airbag module.
- When assembling the DAB module to the wheel, make sure that the airbag wire is not caught in the wheel's internal structure.
- Assemble the airbag wire while pressing it toward the center of the module.
- After installing the airbag module, check if the airbag system and horn operates normally.
When IG is ON, the SRS indicator light should turn off after turning on for about 6 seconds.
Driver Airbag (DAB) Module and Clock Spring Inspection
Inspection
Airbag Module Replace the airbag module with a new one when a problematic part is found during the inspection.
|

- Check the airbag module for dents, cracks, or deformation.
- Check the hooks, connectors and terminals for damage, and harness bundles.
- Check the airbag inflator case for dents, cracks, or deformation.
Passenger Airbag (PAB) Module Description and Operation
Description
The passenger airbag (PAB) is installed inside the crash pad and protects the front passenger in the event of a frontal crash.
|
Passenger Airbag (PAB) Module Troubleshooting
Troubleshooting
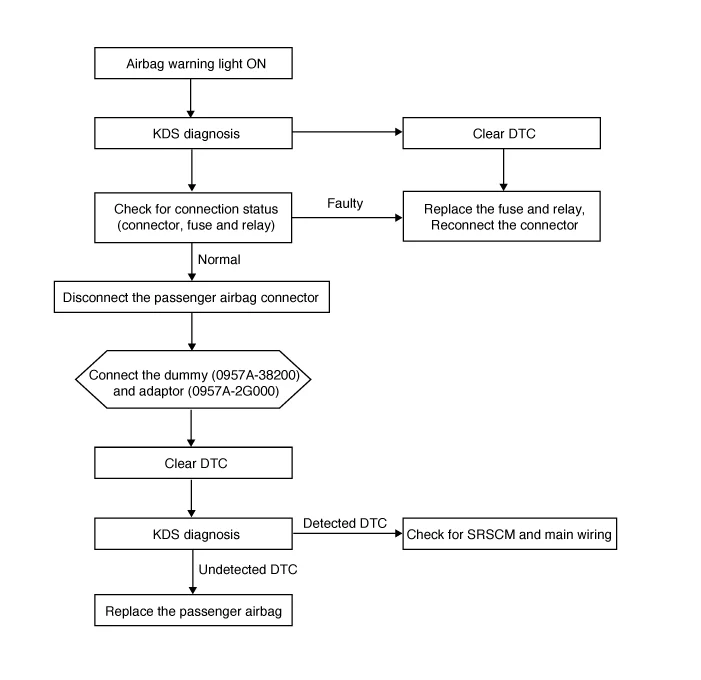
Passenger Airbag (PAB) Module Removal and Installation
Removal
- Disconnect the battery negative ( - ) terminal.
After disconnecting the battery negative ( - ) terminal, wait at least 3 minutes and 30 seconds. - Remove the main crash pad assembly. (Refer to Body - "Main Crash Pad Assembly")
- Remove the passenger airbag module (A) after removing the bolts.
Tightening torque : 3.9 - 5,9 N·m (0.4 - 0.6 kgf·m, 2.9 - 4.3 lb·ft, 34.7 - 52.1 lb·in)
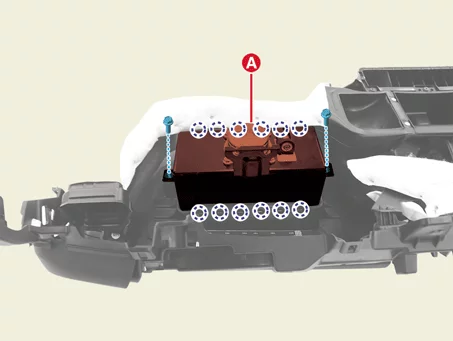
Clip position :
Installation
- Install in reverse order of removal.
Be sure to keep the torque specifications presented in shop manuals. Otherwise, it could lead to the malfunction of airbag system. - After installing the airbag module, check if the airbag system operates normally.
When IG is ON, the SRS indicator light should turn off after turning on for about 6 seconds.
Side Airbag (SAB) module Description and Operation
Description
- A Side Airbag (SAB) module is installed on the left and right sides of the driver’s seat back and on the right side of the front passenger’s seat back, and protects the occupants in the event of a side collision or rollover accident.
- In the event of a side collision, the Side Impact Sensors (SIS) installed at the center of the left and right front door modules, the center pillar, and the left and right sides of the quarter panel detect the collision. The SRS Control Module (SRSCM) determines whether the side airbags (SAB) are deployed or not by using the signal from the sensors. In addition, when a vehicle rollover accident occurs, the SRSCM detects the vehicle rollover accident and determines whether to deploy the side airbags (SAB).
|
Side Airbag (SAB) module Troubleshooting
Troubleshooting
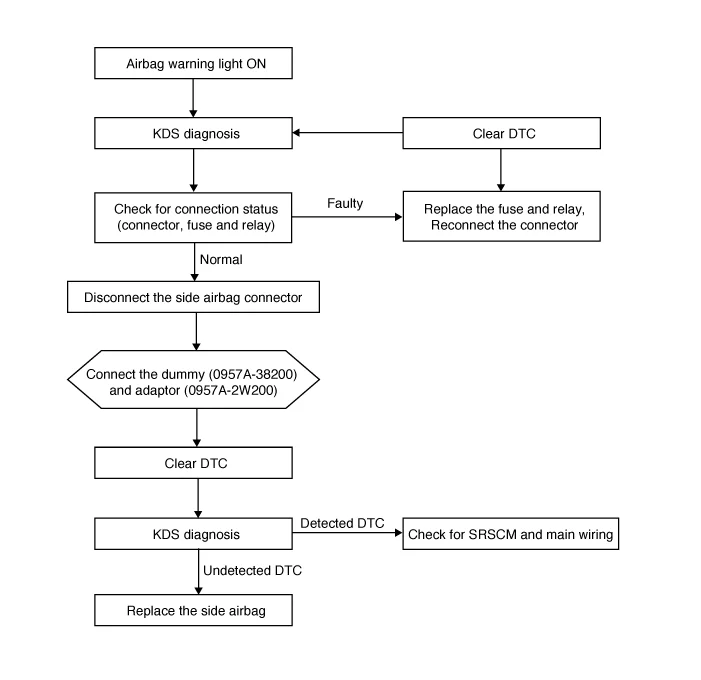
Side Airbag (SAB) module Removal and Installation
Removal
|
- Disconnect the battery negative ( - ) terminal.
After disconnecting the battery negative ( - ) terminal, wait at least 3 minutes and 30 seconds. - Remove the front seat back assembly from the front seat back frame. (Refer to Body - "Front Seat Back Cover")
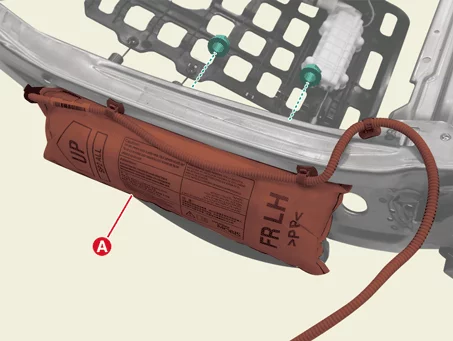
When replacing the airbag due to a deployment of the airbag, replace the seat back assembly. - Remove the Side Airbag (SAB) (A) wiring clips (B).
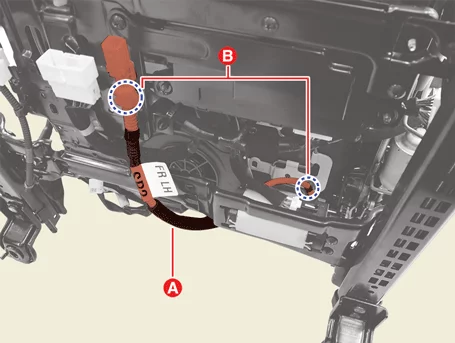
- Remove the side airbag wiring mounting clips.
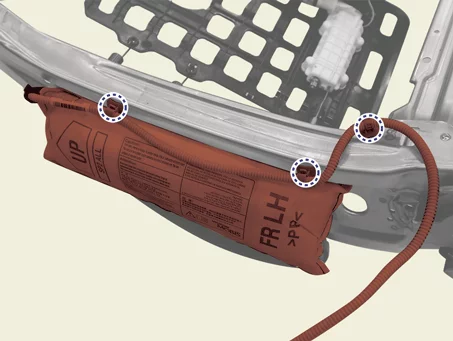
- Remove the side airbag (A) after removing the nuts.
Tightening torque : 6.9 - 9,8 N·m
Installation
- Install in reverse order of removal.
- Incorrect installation of the front seat back cover blocks the normal deployment of the Side Airbags (SAB), so make sure that the front seat back cover is properly installed.
- Be sure to keep the torque specifications presented in shop manuals. Otherwise, it could lead to the malfunction of airbag system.
- After installing the airbag module, check if the airbag system operates normally.
When IG is ON, the SRS indicator light should turn off after turning on for about 6 seconds.
Curtain Airbag (CAB) Module Description and Operation
Description
- The Curtain Airbag (CAB) module is built-in on the left and right side of the roof trim, and protects the occupants in the event of a side collision or rollover accident.
- In the event of a side collision, the Acceleration type Side Impact Sensor (A-SIS), Pressure type Side Impact Sensor (P-SIS) installed at the center of the left and right front door modules, the center pillar, and the left and right sides of the detect the collision. The Supplemental Restraint System Control Module (SRSCM) determines whether the Curtain Airbags (CAB) are deployed or not by using the signal from the sensors. In addition, when a vehicle rollover accident occurs, the SRSCM detects the vehicle rollover accident and determines whether to deploy the Curtain Airbags (CAB).
|
Curtain Airbag (CAB) Module Troubleshooting
Troubleshooting

Curtain Airbag (CAB) Module Removal and Installation
Removal
- Disconnect the battery negative ( - ) terminal.
After disconnecting the battery negative ( - ) terminal, wait at least 3 minutes and 30 seconds. - Remove the roof trim. (Refer to Body - "Roof Trim Assembly")
- Disconnect the curtain airbag module connector (A).
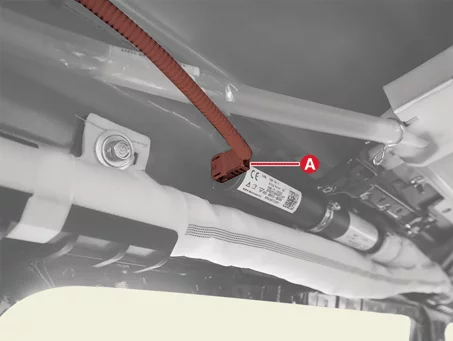
- Remove the curtain airbag module (A) after removing the bolts and clip.
Tightening torque : 7.8 - 11,8 N·m
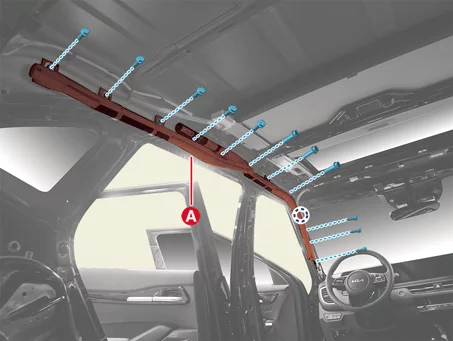
Clip position :
Installation
- Install in reverse order of removal.
- Use the color of sentence and line on a module to identify curtain airbag.
- Left side : Yellow label (attached to plastic cover)
- Right side : Orange label (attached to plastic cover)
- Be careful not to twist when the curtain airbag module installing. The curtain airbag module may not deploy normally if twisted.
- Be sure to keep the torque specifications presented in shop manuals. Otherwise, it could lead to the malfunction of airbag system.
- After installing the airbag module, check if the airbag system operates normally.
When IG is ON, the SRS indicator light should turn off after turning on for about 6 seconds.
Airbag Module Disposal Procedure ➤
Was this page helpful?