Radiator
Components and Component Location
Components

| 1. Radiator 2. Radiator Upper Hose 3. Radiator Lower Hose 4. Radiator Upper Mounting Bracket (RH) |
5. Radiator Upper Mounting Bracket (LH) 6. Radiator Lower Mounting Insulator (RH) 7. Radiator Lower Mounting Insulator (LH) |
Repair Procedures
Removal and Installation
Disconnect the negative battery cable.
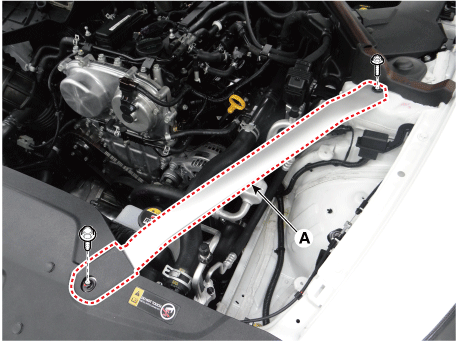
Remove the front brace (A).
[RH]

[LH]
Remove the engine compartment under cover (front).
(See Engine and Transaxle Assembly - Under Hood)
Drain the engine coolant.
(Refer to Cooling System - "Engine Coolant")
Remove the front bumper assembly.
(Refer to Body (Interior and Exterior) - "Front Bumper Assembly")
Disconnect the cooling fan connector (A).
[BLDC (Brushless DC) Motor Type]

[DC Motor Type]

Remove the reservoir tank.
(See Cooling System - Reservoir Tank)
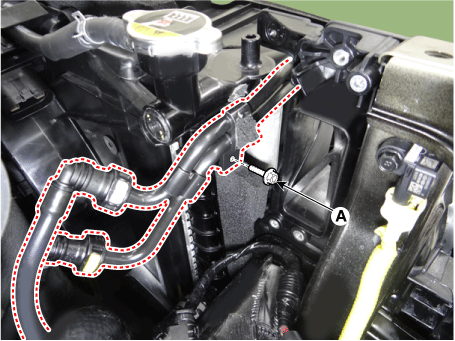
Disconnect the upper radiator hose (A).

Disconnect the radiator lower hose (A).

Remove the air duct (A).
Tightening torque:
3.9–5.9 N·m (0.4–0.6 kgf·m, 2.9–4.3 ft·lbf, 34.7–52.1 in·lbf)

Disconnect the hood latch release cable (A).

Disconnect the hood switch connector (A).
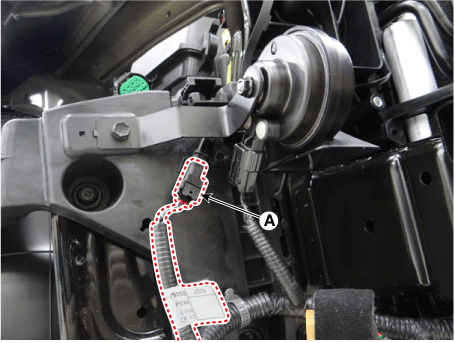
Disconnect the hood switch wiring (A).

Remove the radiator upper support bracket (A).
Tightening torque: 16.7–26 N·m

Remove the transmission oil cooler mounting bolts (A).
Tightening torque:
4.9–7.8 N·m (0.5–0.8 kgf·m, 3.6–5.8 ft·lbf, 43.4–69.4 in·lbf)
[LH]

[RH]

Loosen the A/C condenser mounting bolts (A).
Tightening torque:
4.9–7.8 N·m (0.5–0.8 kgf·m, 3.6–5.8 ft·lbf, 43.4–69.4 in·lbf)
[LH]

[RH]

Remove the right air cleaner adapter (A).
Tightening torque: 7.8–9.8 N·m

Loosen the transmission oil cooler tube mounting bolt (A).
Tightening torque:
4.9–7.8 N·m (0.5–0.8 kgf·m, 3.6–5.8 ft·lbf, 43.4–69.4 in·lbf)
Remove the radiator assembly (A).

Remove the cooling fan assembly (A).
Tightening torque:
4.9–7.8 N·m (0.5–0.8 kgf·m, 3.6–5.8 ft·lbf, 43.4–69.4 in·lbf)
[BLDC (Brushless DC) Motor Type]

[DC Motor Type]

Install in the reverse order of removal.
Fill the engine coolant.
(Refer to Cooling System - "Engine Coolant")
Start the engine and check for leaks.
Recheck the engine coolant level.
Inspection
Radiator Cap Inspection
Remove the radiator cap, moisten its seal with engine coolant, and then install it on the radiator cap tester.

Apply a pressure of 79.4–122.58 kPa (0.95–1.25 kgf/cm², 11.5–17.78 psi).
Check for pressure drop.
If the pressure drops, replace the radiator cap.
Radiator Leak Test
Wait until the engine cools, then carefully remove the radiator cap and fill the radiator with engine coolant, then install it on the pressure tester.

Connect the tester to the radiator and apply a pressure of 93.16–122.58 kPa (0.95–1.25 kgf/cm², 13.51–17.78 psi).
Check for engine coolant leaks and pressure drop.
Remove the tester and install the radiator cap.
Test yourself
A quick Kia Stinger CK quiz: every answer comes with an explanation and a link to the manual page.