Ignition signal
Component Function Check
1.INSPECTION STARTTurn ignition switch OFF, and restart engine.
Does the engine start? YES >> GO TO 2.
NO >> Proceed to EC-414, "Diagnosis Procedure".
2.IGNITION SIGNAL FUNCTION With CONSULT-III
1. Perform “POWER BALANCE” in “ACTIVE TEST” mode of “ENGINE” using CONSULT-III.
2. Check that each circuit produces a momentary engine speed drop.
 Without CONSULT-III
1. Let engine idle.
2. Check the voltage signal between ECM harness connector and ground with an oscilloscope.
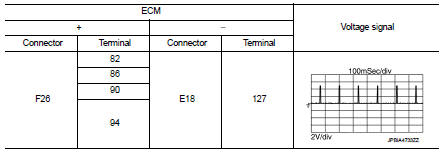
NOTE
:
The pulse cycle changes depending on rpm at idle.
Is the inspection result normal? YES >> INSPECTION END
NO >> Proceed to EC-414, "Diagnosis Procedure".
Diagnosis Procedure
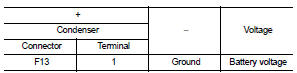
1.CHECK CONDENSER POWER SUPPLY 1. Turn ignition switch OFF. 2. Disconnect condenser harness connector. 3. Turn ignition switch ON.4. Check the voltage between condenser harness connector and ground.
Is the inspection result normal? YES >> GO TO 3.
NO >> GO TO 2.
2.CHECK CONDENSER POWER SUPPLY CIRCUIT 1. Turn ignition switch OFF. 2. Disconnect IPDM E/R harness connector.3. Check the continuity between IPDM E/R harness connector and condenser harness connector.
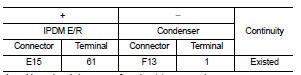
4. Also check harness for short to ground.
Is the inspection result normal? YES >> Perform the trouble diagnosis for power supply circuit.
NO >> Repair or replace error-detected parts.
3.CHECK CONDENSER GROUND CIRCUIT 1. Turn ignition switch OFF.2. Check the continuity between Condenser harness connector and ground.

3. Also check harness for short to power.
Is the inspection result normal? YES >> GO TO 4.
NO >> Repair or replace error-detected parts.
4.CHECK CONDENSERCheck the condenser. refer to EC-417, "Component Inspection (Condenser)".
Is the inspection result normal? YES >> GO TO 5.
NO >> Replace condenser.
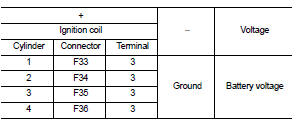
5.CHECK IGNITION COIL POWER SUPPLY 1. Reconnect all harness connectors disconnected. 2. Disconnect ignition coil harness connector. 3. Turn ignition switch ON.4. Check the voltage between ignition coil harness connector and ground.
Is the inspection result normal? YES >> GO TO 6.
NO >> Perform the trouble diagnosis for power supply circuit.
6.CHECK IGNITION COIL GROUND CIRCUIT 1. Turn ignition switch OFF.2. Check the continuity between ignition coil harness connector and ground.
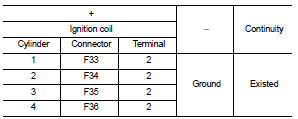
3. Also check harness for short to power.
Is the inspection result normal? YES >> GO TO 7.
NO >> Repair or replace error-detected parts.
7.CHECK IGNITION COIL OUTPUT SIGNAL CIRCUIT 1. Disconnect ECM harness connector.2. Check the continuity between ECM harness connector and ignition coil harness connector.
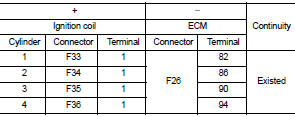
3. Also check harness for short to ground and short to power.
Is the inspection result normal? YES >> GO TO 8.
NO >> Repair or replace error-detected parts.
8.CHECK IGNITION COIL WITH POWER TRANSISTORCheck the ignition coil with power transistor. Refer to EC-416, "Component Inspection (Ignition Coil with Power Transistor)".
Is the inspection result normal? YES >> Check intermittent incident. Refer to GI-42, "Intermittent Incident".
NO >> Replace malfunctioning ignition coil with power transistor. Refer to EM-53, "Exploded View".
Component Inspection (Ignition Coil with Power Transistor)
1.CHECK IGNITION COIL WITH POWER TRANSISTOR-I 1. Turn ignition switch OFF. 2. Disconnect ignition coil harness connector.3. Check resistance between ignition coil terminals as per the following.
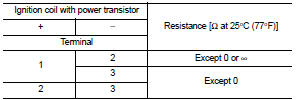
Is the inspection result normal? YES >> GO TO 2.
NO >> Replace malfunctioning ignition coil with power transistor. Refer to EM-53, "Exploded View".
2.CHECK IGNITION COIL WITH POWER TRANSISTOR-II CAUTION:Do the following procedure in the place where ventilation is good without the combustible. 1. Turn ignition switch OFF. 2. Reconnect all harness connectors disconnected.
3. Remove fuel pump fuse in IPDM E/R to release fuel pressure.
NOTE:
Do not use CONSULT-III to release fuel pressure, or fuel pressure applies again during the following procedure.
12. Crank engine for about three seconds, and check whether spark is generated between the spark plug and the grounded metal portion.
Spark should be generated.
CAUTION:• During the operation, always stay 0.5 cm (19.7 in) away from the spark plug and the ignition coil. Be careful not to get an electrical shock while checking, because the electrical discharge voltage becomes 20 kV or more.
• It might cause to damage the ignition coil if the gap of more than 17 mm (0.66 in) is taken.
NOTE:When the gap is less than 13 mm (0.52 in), the spark might be generated even if the coil is malfunctioning

Is the inspection result normal? YES >> INSPECTION END NO >> Replace malfunctioning ignition coil with power transistor. Refer to EM-53, "Exploded View".
Component Inspection (Condenser)
1.CHECK CONDENSER 1. Turn ignition switch OFF. 2. Disconnect condenser harness connector.3. Check resistance between condenser terminals as per the following.
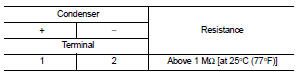
Is the inspection result normal? YES >> INSPECTION END
NO >> Replace Condenser.