Engine Control System MR16DDT

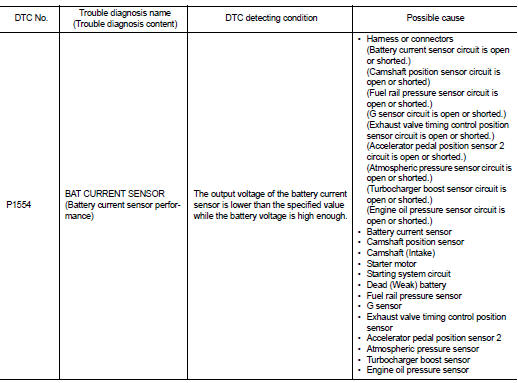
P1554 battery current sensor

In this manual: Engine Control System MR16DDT
Foreword — 1General information — 45Engine Mechanical MR16DDT — 61Engine Mechanical HR16DE — 52Engine Mechanical K9K — 46Engine Lubrication System MR16DDT — 18Engine Lubrication System HR16DE — 14Engine Lubrication System K9K — 11Engine Cooling System MR16DDT — 28Engine Cooling System HR16DE — 29Engine Cooling System K9K — 24Engine Control System MR16DDT — 163Engine Control System HR16DE — 115Engine Control System K9K — 129Fuel System MR16DDT — 13Fuel system HR16DE — 11Fuel system K9K — 12Exhaust system MR16DDT — 7Exhaust system HR16DE — 10Exhaust system K9K — 7Starting system — 24Accelerator control system — 6Clutch — 25Driveline transfer: TY21B — 77Driveline rear propeller Shaft: 3Fφ16-ETJ75 — 12Driveline rear final drive: RTVS — 31Transaxle & transmission 5MT: RS5F92R — 31Transaxle & transmission 6MT: RS6F94R — 30Transaxle & transmission CVT: RE0F10B — 93Transaxle & transmissioN CVT: RE0F11A — 103Front Axle MR16DDT — 18Front Axle HR16DE — 17Front Axle K9K — 17Rear Axle 2WD — 6Rear Axle 4WD — 13Front Suspension — 21Rear Suspension 2WD — 13Rear Suspension 4WD — 17Road Wheels & Tires — 6Brake System LHD — 24Brake System RHD — 24Parking Brake System — 8Brake Control System without ESP — 44Brake Control System with ESP — 63Steering System — 14Steering Control System — 27Seat Belt — 8SRS Airbag — 24SRS Airbag Control System — 93Ventilation System — 11Heater & Air Conditioning System HR16DE — 28Heater & Air Conditioning System MR16DDT — 28Heater & Air Conditioning Control System Type 1 — 49Heater & Air Conditioning Control System Type 2 — 51Heater & Air Conditioning Control System Type 3 — 32Heater & Air Conditioning Control System Type 4 — 40Heater & Air Conditioning Control System Type 5 — 21Interior — 16Instrument Panel — 10Seat — 18Door & Lock Type 1 — 83Door & Lock type 2 — 80Door & Lock type 3 — 65Door & Lock type 4 — 60Security Control System with intelligent key system — 82Security Control System without intelligent key system — 41Glass & Window System — 15Power Window Control System — 28Body Repair — 13Exterior — 20Mirrors — 26Exterior Lighting System Halogen type — 51Interior Lighting System — 24Wiper & Washer — 45Defogger — 31Horn — 4Power Outlet — 4Body Control System With intelligent key system — 21Body Control System Without intelligent key system — 23LAN system can fundamental — 6LAN system can — 31LAN System can system (type 1) — 1LAN System can system (type 2) — 1LAN System can system (type 3) — 1LAN System can system (type 4) — 1LAN System can system (type 5) — 1LAN System can system (type 6) — 1LAN System can system (type 7) — 2LAN System can system (type 8) — 1LAN System can system (type 9) — 1LAN System can system (type 10) — 1LAN System can system (type 11) — 1Power Control System IPDM E/R (with I-key) — 14Power Control System IPDM E/R (without I-key) — 14Power Control System Power distribution system — 25Charging System — 22Power Supply, Ground & Circuit Elements — 20Meter, Warning Lamp & Indicator — 33Warning Chime System — 22Audio, Visual & Navigation System Audio without navigation — 30Audio, Visual & Navigation System Audio with navigation — 33Audio, Visual & Navigation System NISSAN dynamic control system — 22Cruise Control System — 1Drive Mode System — 10Maintenance — 14
~3min read

DTC Logic

DTC DETECTION LOGIC

DTC CONFIRMATION PROCEDURE

DTC CONFIRMATION PROCEDURE

1.PERFORM COMPONENT FUNCTION CHECK

Perform component function check. Refer to EC-337, "Component Function Check".

NOTE

:
Use component function check to check the overall function of the battery current sensor circuit. During this check, a 1st trip DTC might not be confirmed.

Is the inspection result normal? YES >> INSPECTION END

NO >> Proceed to EC-338, "Diagnosis Procedure".

Component Function Check

1.PRECONDITIONING TESTING CONDITION: • Before performing the following procedure, confirm that battery voltage is more than 12.8 V at idle.

• Before performing the following procedure, confirm that all load switches and A/C switch are turned OFF.

>> GO TO 2.

2.PERFORM COMPONENT FUNCTION CHECK

1. Start engine and let it idle. With CONSULT-III


1. Start engine and let it idle. 2. Select “BAT CUR SEN” in “DATA MONITOR” mode of “ENGINE” using CONSULT-III.

3. Check “BAT CUR SEN” indication for 10 seconds.

“BAT CUR SEN” should be above 2,300 mV at least once.

1. Start engine and let it idle. Without CONSULT-III


1. Start engine and let it idle.

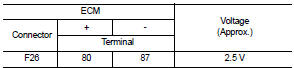
2. Check the voltage between ECM harness connector and ground.

Is the inspection result normal?

Is the inspection result normal? YES >> INSPECTION END

NO >> Proceed to EC-338, "Diagnosis Procedure".

Diagnosis Procedure

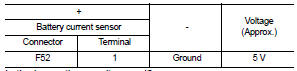
1.CHECK BATTERY CURRENT SENSOR POWER SUPPLY 1. Turn ignition switch OFF. 2. Disconnect battery current sensor harness connector. 3. Turn ignition switch ON.

4. Check the voltage between battery current sensor harness connector and ground.
Is the inspection result normal?

Is the inspection result normal? YES >> GO TO 3.

NO >> GO TO 2.

2.CHECK SENSOR POWER SUPPLY CIRCUIT 1. Turn ignition switch OFF. 2. Disconnect ECM harness connector.

3. Check harness connector for short to power and short to ground, between the following terminals.
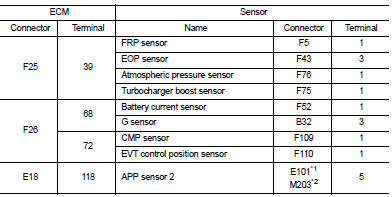
*1: LHD models or RHD with CVT models

*1: LHD models or RHD with CVT models *2: RHD with M/T models

Is the inspection result normal? YES >> Perform the trouble diagnosis for power supply circuit.

NO >> Repair or replace error-detected parts.

3.CHECK BATTERY CURRENT SENSOR GROUND CIRCUIT 1. Turn ignition switch OFF. 2. Disconnect ECM harness connector.

3. Check the continuity between battery current sensor harness connector and ECM harness connector.
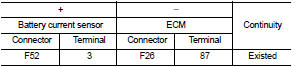
4. Also check harness for short to power.

4. Also check harness for short to power.

Is the inspection result normal? YES >> GO TO 4.

NO >> Repair or replace error-detected parts.

4.CHECK BATTERY CURRENT SENSOR INPUT SIGNAL CIRCUIT

1. Check the continuity between battery current sensor harness connector and ECM harness connector.

2. Also check harness for short to ground and to power.

2. Also check harness for short to ground and to power.

Is the inspection result normal? YES >> GO TO 5.

NO >> Repair or replace error-detected parts

5.CHECK BATTERY CURRENT SENSOR

Check the battery current sensor. Refer to EC-330, "Component Inspection".

Is the inspection result normal? YES >> Check intermittent incident. Refer to GI-42, "Intermittent Incident".

NO >> Replace battery negative cable assembly. Refer to PG-125, "Exploded View".

Component Inspection

1.CHECK BATTERY CURRENT SENSOR 1. Turn ignition switch OFF. 2. Reconnect harness connectors disconnected. 3. Disconnect battery negative cable. 4. Install jumper cable between battery negative terminal and body ground. 5. Turn ignition switch ON.

6. Check the voltage between ECM harness connector and ground.
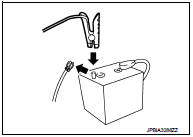

Before measuring the terminal voltage, confirm that the battery is fully

Before measuring the terminal voltage, confirm that the battery is fully charged. Refer to PG-111, "How to Handle Battery".

Is the inspection result normal? YES >> INSPECTION END

NO >> Replace battery negative cable assembly. Refer to PG-125, "Exploded View".