Front fender
Replacing this part is a basic operation for a front side impact.
Information on additional or trim parts is given in their respective chapters.
It is a removable bodywork component made of NORYL GTX 974 plastic.
REPAIR
For repair of the component, see repair manual 502.
Note: The rear part of the wing is bonded to its upper support by means of the expanding insert. To avoid damaging the wing when removing it, the insert must be heated to release it. It must be replaced when refitting (see instructions at the end of the paragraph).REMOVAL - REFITTING
Removal and refitting present no particular difficulties. The procedure only covers the adjustment possibilities.
All gaps are given in chapter 40A-E.
To access the wing fixings, the following must be removed first:
- the side section of the cowl grille,
- the engine side cover,
- the windscreen pillar trim,
- the upper wing trim,
- the mudguard,
- the front part of the sill protector,
- the side indicator repeater,
- the front bumper,
- the headlamp unit.
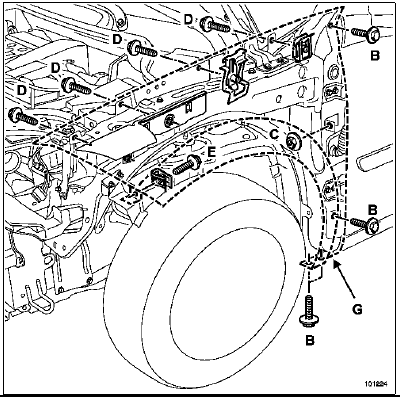
Tightening torque |
|
| wing bolt | 8 N.m |

BASIC ADJUSTMENT
Adjustment zones
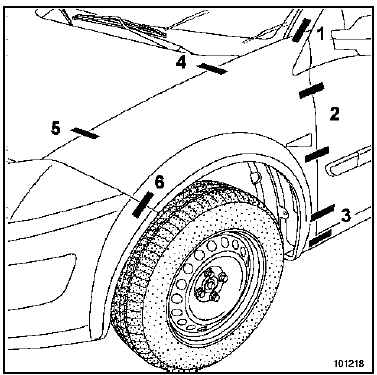
Specific features of wing adjustment
The main adjustments of the component gaps (zones 1 to 5) are made at the fixing screws of the upper wing mounting bracket.
Remove the vehicle mounting bracket.
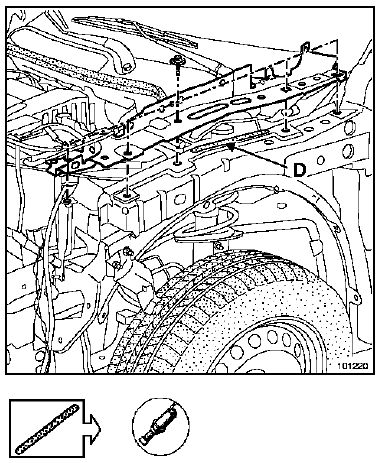
Remove and clean the adhesive bead (D).
Position the bracket and the wing on the vehicle.
Bring all fixings into place without tightening them.
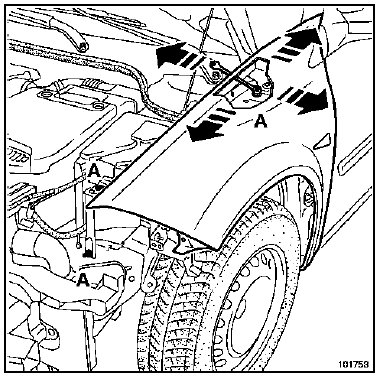
Adjust the gaps of the component (zones 1 to 5) at the fixing screws (A) of the upper bracket.
WARNINGOnly the fixings (A) are accessible when the wing is in place.
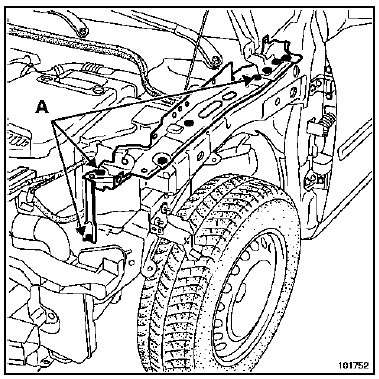
Remove the wing.
Mark the position of the bracket, then remove it to redo the adhesive bead. For this, a M.J.Pro type setting adhesive (reference: 77 11 172 676) must be used.
Tighten all fixings of the upper bracket.
REMINDER: All gaps and flushness are given in chapter 40A-E.
FINAL ADJUSTMENT
Follow this adjustment sequence:
- Wing - Door adjustment:
Adjust the gaps and flushness of zones 2 and 3 (screws B, D and nut C).
Check the adjustment and lock the zone.
- Wing - Pillar adjustment:
Adjust the gaps and flushness of zone 1 (screws B, D and nut C).
Check the adjustment and lock the zone.
- Wing - Bonnet adjustment:
Adjust the flushness and an even gap of zones 4 and 5 (screws D). If necessary, adjust the bonnet.
Check the adjustment and lock the zone.
- Wing - Headlamp - Bumper adjustment:
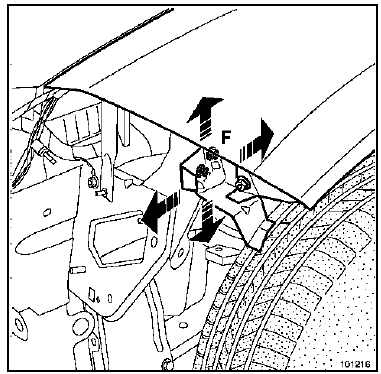
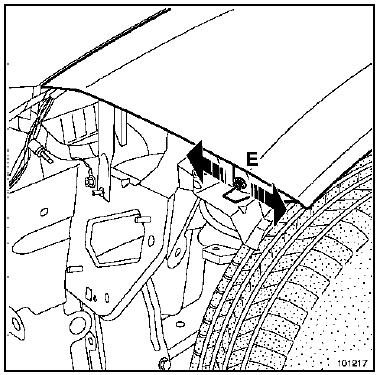
Adjust the gaps and flushness of zone 6 (screws E, nuts F).
If necessary, adjust the headlamp unit.
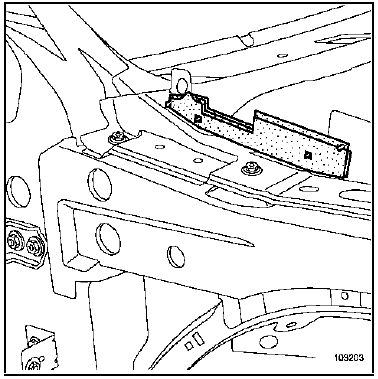
Note: There is no adjustment at the bumper level; it is indexed in the lower wing clamp.Detail of the expanding insert position.
- The expanding insert must be replaced (see method described in chapter 40 AL).
Test yourself
A quick Renault Megane quiz: every answer comes with an explanation and a link to the manual page.