Partial engine assy (2AZ−FE)(From July, 2003)
- WORK FOR PREVENTING GASOLINE FROM SPILLING OUT
- REMOVE FRONT WHEELS
- REMOVE ENGINE UNDER COVER LH
- REMOVE ENGINE UNDER COVER RH
- REMOVE FRONT FENDER APRON SEAL RH
- DRAIN ENGINE OIL
- DRAIN ENGINE COOLANT
- DRAIN AUTOMATIC TRANSAXLE FLUID (A/T)
Using a 10 mm hexagon wrench, remove the drain plug and gasket. Drain automatic transaxle fluid.
Install a new gasket and the drain plug.
Torque: 49 N·m
a. Install a new gasket and the drain plug after draining transaxle oil.
Torque: 49 N·m- REMOVE BATTERY
- REMOVE AIR CLEANER ASSY
- REMOVE ENGINE COVER SUB−ASSY No.1
- DISCONNECT RADIATOR HOSE INLET
- DISCONNECT RADIATOR HOSE OUTLET
- DISCONNECT OIL COOLER OUTLET HOSE No.2 (A/T)
- DISCONNECT OIL COOLER OUTLET HOSE No.3 (A/T)
- REMOVE ENGINE MOVING CONTROL ROD W/BRACKET
a. Remove the 3 bolts and the engine moving control rod w/ bracket.
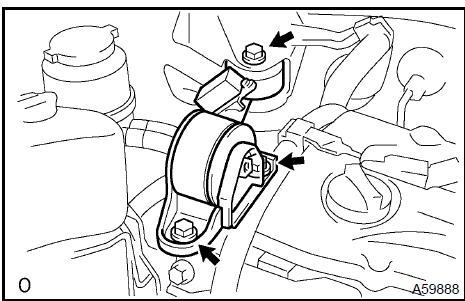
- REMOVE ENGINE MOUNTING STAY No.2 RH
- REMOVE ENGINE MOUNTING BRACKET No.2 RH
- REMOVE FAN AND GENERATOR V BELT
- DISCONNECT OIL RESERVOIR TO PUMP HOSE No.1
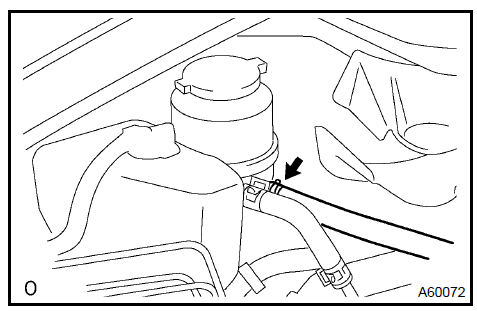
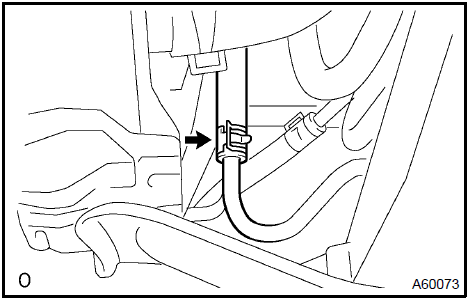
- DISCONNECT UNION TO CONNECTOR TUBE HOSE
- DISCONNECT FLOOR SHIFT CABLE TRANSMISSION CONTROL SHIFT (A/T)
- DISCONNECT FLOOR SHIFT CABLE TRANSMISSION CONTROL SHIFT (M/T)
- DISCONNECT FLOOR SHIFT CABLE TRANSMISSION CONTROL SELECT (M/T)
- REMOVE CLUTCH RELEASE CYLINDER ASSY (M/T)
Remove the bolt and flexible hose.
Remove the 2 bolts and clutch release cylinder.
- DISCONNECT HEATER INLET WATER HOSE
- DISCONNECT HEATER OUTLET WATER HOSE
- DISCONNECT FUEL TUBE SUB−ASSY
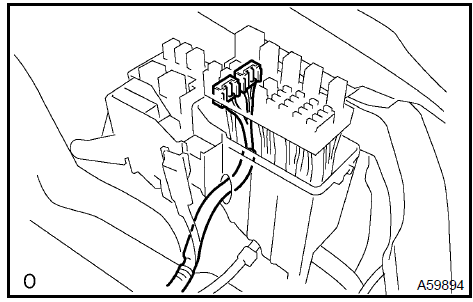
- DISCONNECT ENGINE WIRE
Disconnect the engine wire from the ECM and J/B.
Disconnect the engine wire from the engine room J/B.
Remove the nut fixing the wire harness.
Using a screwdriver, unlock the engine room J/B.
Disconnect the engine wire by pulling it upward.
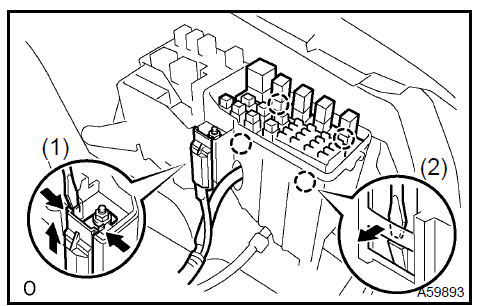
3. Disconnect the connectors.
c. Pull out the engine wire.
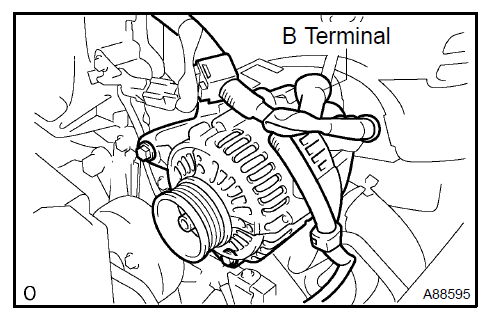
Disconnect the B terminal of the generator.
Remove the body ground.
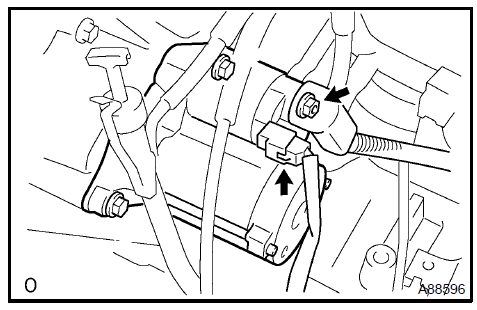
Remove the starter connector.
a. Remove the nut and disconnect terminal 30 of the starter.
 Disconnect engine wire No.2
- REMOVE GENERATOR ASSY
- REMOVE COMPRESSOR AND MAGNETIC CLUTCH
HINT: Hang up the hoses instead of detaching.
- REMOVE EXHAUST PIPE ASSY FRONT
- REMOVE FRONT STABILIZER LINK ASSY LH
Using a 6 mm socket hexagon wrench, fix the stud bolt.
Remove the nut and disconnect the stabilizer link.
HINT: Use the same procedures described for the LH side.
38. REMOVE FRONT AXLE HUB LH NUTa. Using SST and a hammer, strike the lock nut covering to remove it.
SST 09930−00010
NOTICE:- Set the drive shaft’s groove so that it faces up. Then use the SST and hammer.
- Remove the covering from the lock nut completely or the screw of the drive shaft may be damaged.
- Do not sharpen the tip of the SST.
b. Using a 30 mm socket wrench, remove the lock nut.
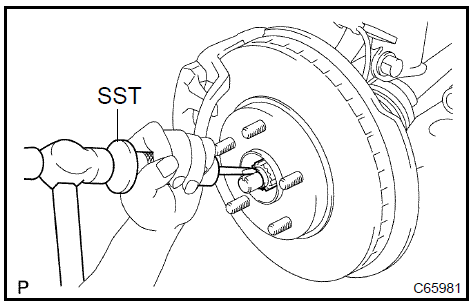
Remove front axle hub LH nut 39. REMOVE FRONT AXLE HUB RH NUT
HINT: Use the same procedures described for the LH side.
40. REMOVE SPEED FRONT LH (W/ ABS)a. Remove the bolt and disconnect the speed from the steering knuckle.
NOTICE: Keep the speed tip and connection free from foreign matter. 41. REMOVE SPEED FRONT RH (W/ ABS)HINT: Use the same procedures described for the LH side.
42. DISCONNECT TIE ROD ASSY LHRemove the cotter pin and castle nut.
Using SST, disconnect the tie rod end from the steering knuckle.
SST 09628−62011

Remove speed front RH (W/ abs) 43. DISCONNECT TIE ROD ASSY RH
HINT: Use the same procedures described for the LH side.
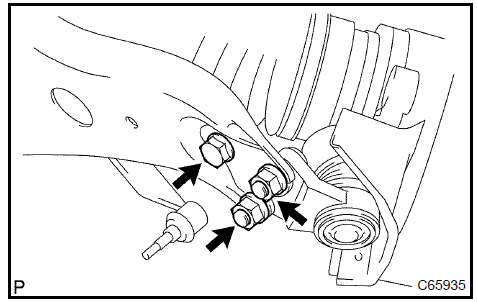
44. DISCONNECT FRONT SUSPENSION ARM SUB−ASSY LOWER No.1 LHRemove the bolt and 2 nuts, as shown in the illustration.
Using a plastic hammer, disconnect the drive shaft from the axle hub.
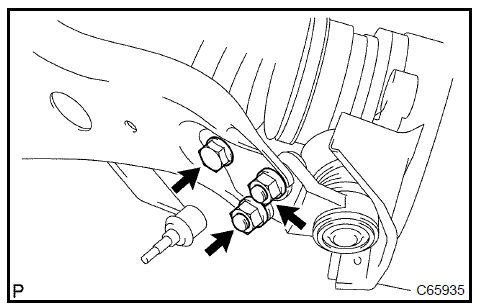 Disconnect front suspension arm sub-assy lower No.1 LH 45. DISCONNECT FRONT SUSPENSION ARM SUB−ASSY LOWER No.1 RH
HINT: Use the same procedures described for the LH side.
46. REMOVE DRIVE PLATE & TORQUE CONVERTER CLUTCH SETTING BOLTa. Fix the crankshaft and remove the 6 setting bolts.

a. Loosen the sliding yoke bolt.
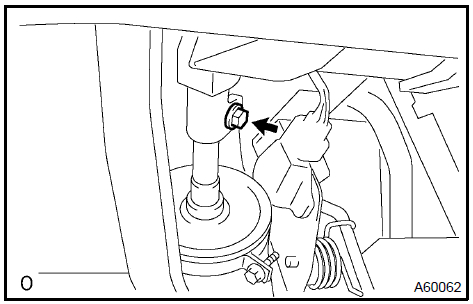
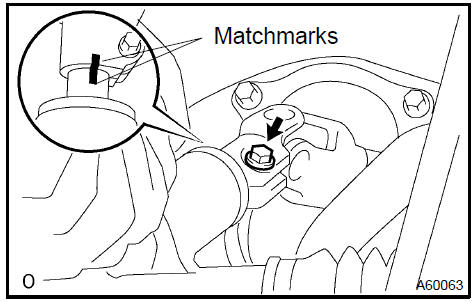
Place matchmarks on the intermediate shaft and control valve shaft.
Remove the bolt and the steering intermediate shaft.
d. To prevent the steering wheel from rotating, fix the wheel with the seat belt.
NOTICE: If the steering wheel is not fixed, the spiral cable will be damaged.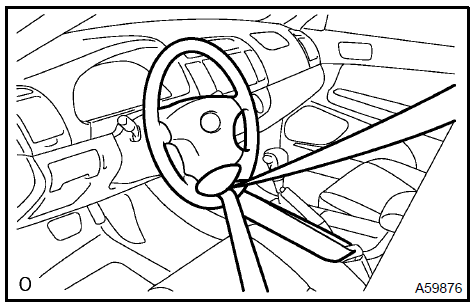
Set the engine lifter.
Remove the 4 bolts, 2 nuts and frame side rail plate RH and LH.
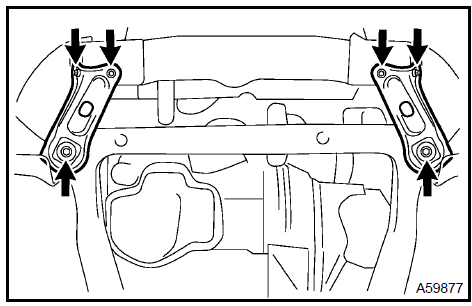
Remove the 4 bolts, 2 nuts and front suspension member brace rear RH and LH.
Carefully remove the engine assembly from the vehicle.
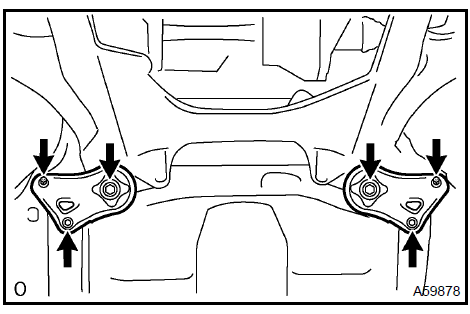
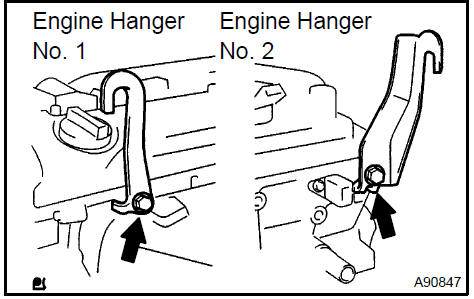
e. Install the 2 engine hangers as shown in the illustration.
Parts No.:

f. Using a chain block and an engine sling device, hang the engine assembly.
Disconnect the PS oil pressure switch connector.
Remove the 2 bolts and vane pump from the engine.
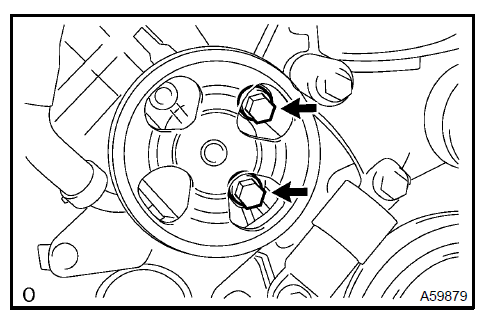 Remove vane pump assy 50. REMOVE FRONT FRAME ASSY
a. A/T: Remove the nut installing the engine mounting insulator LH.

b. M/T: Remove the bolt installing the engine mounting insulator LH.
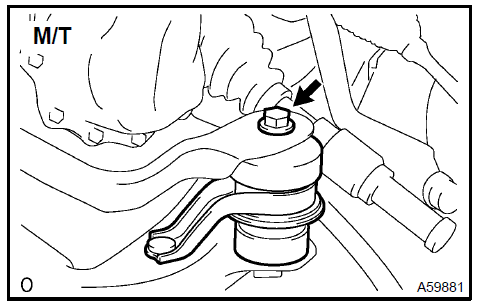
c. Remove the nut installing the engine mounting insulator RH.

d. Remove the bolt installing the engine mounting insulator FR.
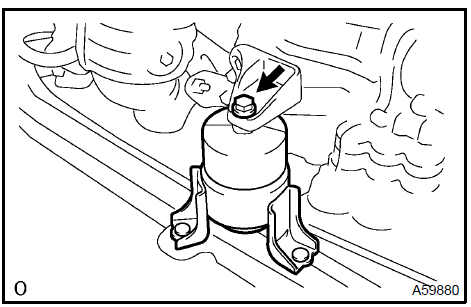
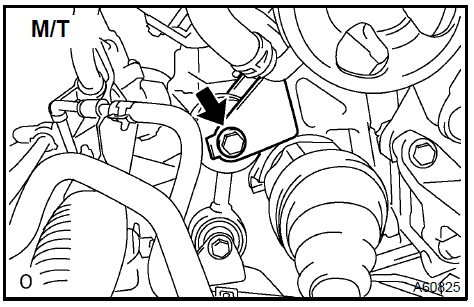
e. M/T: Remove the bolt installing the engine lateral control rod.
f. Raise the engine assembly and separate the front frame.
- REMOVE FRONT DRIVE SHAFT ASSY LH
- REMOVE FRONT DRIVE SHAFT ASSY RH
- REMOVE STARTER ASSY
- SEPARATE AUTOMATIC TRANSAXLE ASSY (A/T)
- SEPARATE MANUAL TRANSAXLE ASSY (M/T)
- REMOVE DRIVE PLATE & RING GEAR SUB−ASSY (A/T)
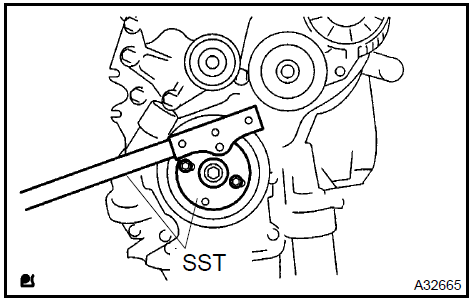
a. TMC made: Using SST, fix the crankshaft.
SST 09213−54015 (91651−60855), 09330−00021
b. TMMK made: Using SST, fix the crankshaft.
SST 09960−10010 (09962−01000, 09963−01000)
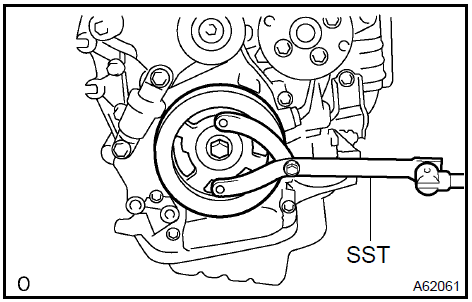
c. Remove the 8 bolts, rear spacer, drive plate and front spacer.

- REMOVE CLUTCH COVER ASSY (M/T)
- REMOVE CLUTCH DISC ASSY (M/T)
- REMOVE FLYWHEEL SUB−ASSY (M/T)
a. Using SST, fix the crankshaft.
SST 09213−54015 (91651−60855), 09330−00021
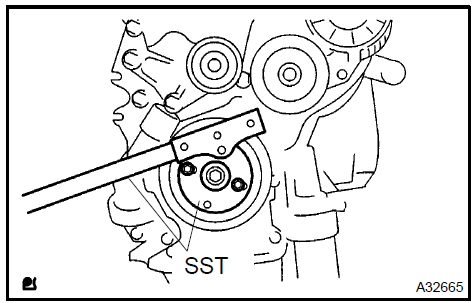
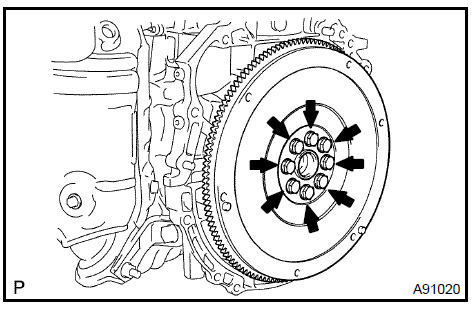
b. Remove the 8 bolts, rear spacer and flywheel.
- INSTALL ENGINE STAND
- REMOVE INTAKE MANIFOLD
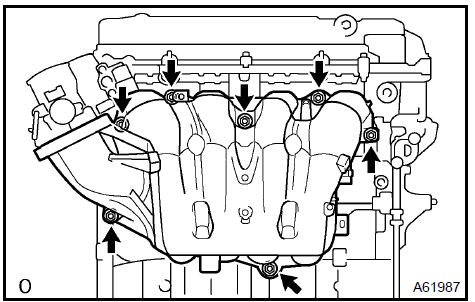
a. Remove the 5 bolts, 2 nuts, intake manifold and gasket.
a. Using a precision straight edge and feeler gauge, measure the surface contacting the cylinder head for warpage.
Maximum warpage: 0.20 mm (0.0079 in.)If the warpage is greater than maximum, replace the manifold.
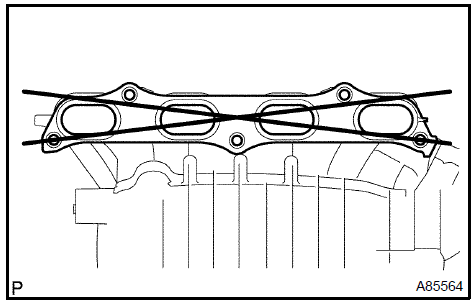
Inspect intake manifold
- REMOVE INTAKE MANIFOLD RUNNER VALVE ASSY (PZEV only)
- REMOVE VENTILATION HOSE
- REMOVE VENTILATION HOSE No.2
- REMOVE ENGINE WIRE
- REMOVE INTAKE MANIFOLD INSULATOR No.1
- REMOVE OIL LEVEL GAGE SUB−ASSY
- REMOVE OIL LEVEL GAGE GUIDE
- REMOVE MANIFOLD CONVERTER INSULATOR No.1
- REMOVE EXHAUST MANIFOLD CONVERTER SUB−ASSY
a. Remove the 3 bolts, 2 nuts, and the No. 1 and No. 2 exhaust manifold stays.
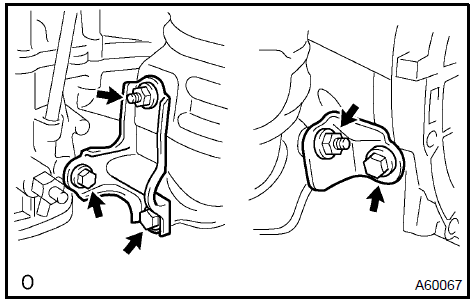
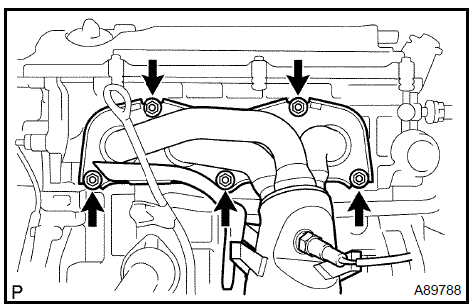
b. Remove the 5 nuts, exhaust manifold converter and gasket.
a. Using a precision straight edge and feeler gauge, measure the surface contacting the cylinder head for warpage.
Maximum warpage: 0.70 mm (0.0276 in.)If the warpage is greater than the maximum, replace the manifold.
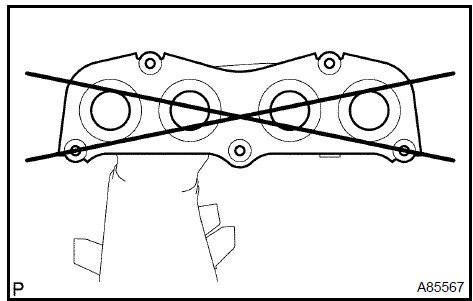 Inspect converter sub-assy, exhaust manifold
- REMOVE WATER INLET
- REMOVE THERMOSTAT
- REMOVE IGNITION COIL ASSY
- REMOVE V−RIBBED BELT TENSIONER ASSY
a. Remove the bolt, nut and belt tensioner.
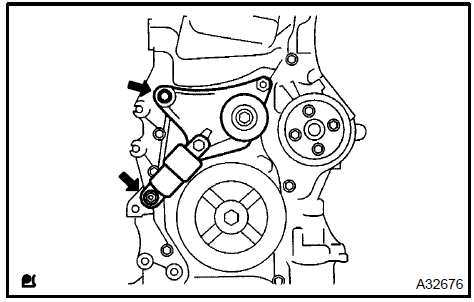
Remove V-ribbed belt tensioner assy
- REMOVE DRIVE SHAFT BEARING BRACKET
- REMOVE ENGINE MOUNTING BRACKET RH
- REMOVE FUEL DELIVERY PIPE W/INJECTOR
- REMOVE WATER BY−PASS PIPE No.1
- REMOVE ENGINE OIL PRESSURE SWITCH ASSY
a. Remove the oil pressure switch.
 Remove engine oil pressure switch assy 82. REMOVE KNOCK
Disconnect the connector.
Remove the nut and .
- REMOVE ENGINE COOLANT TEMPERATURE
- REPLACE PARTIAL ENGINE ASSY
- INSTALL ENGINE COOLANT TEMPERATURE
Install a new gasket to the .
Install the .
Torque: 20 N·m
a. Install the with the nut, as shown in the illustration.
Torque: 20 N·m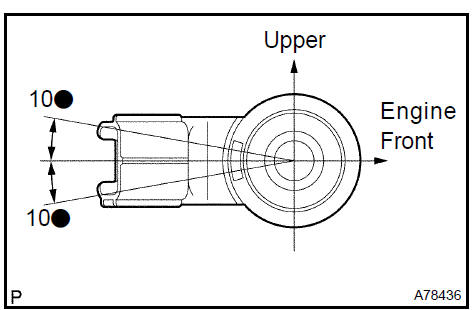
Install knock 87. INSTALL ENGINE OIL PRESSURE SWITCH ASSY
Clean the threads of the oil pressure switch. Apply adhesive to 2 or 3 threads of the oil.
Adhesive: Part No. 08833−00080 THREE BOND 1344 or equivalentInstall the oil pressure switch.
Torque: 15 N·m
a. Install a new gasket and the by−pass pipe with the bolt and 2 nuts.
Torque: 9 N·m- INSTALL FUEL DELIVERY PIPE W/INJECTOR
- INSTALL ENGINE MOUNTING BRACKET RH Torque: 54 N·m
- INSTALL DRIVE SHAFT BEARING BRACKET Torque: 64 N·m
- INSTALL V−RIBBED BELT TENSIONER ASSY
a. Install the belt tensioner with the bolt and the nut.
Torque: 60 N·m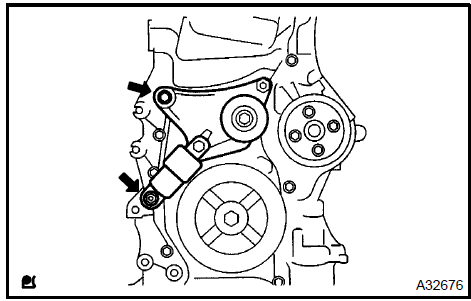
Install v-ribbed belt tensioner assy
- INSTALL IGNITION COIL ASSY Torque: 9 N·m
- INSTALL THERMOSTAT
- INSTALL WATER INLET Torque: 9 N·m
- INSTALL EXHAUST MANIFOLD CONVERTER SUB−ASSY
a. Install a new gasket and the exhaust manifold converter.
Uniformly tighten the 5 nuts in the sequence shown in the illustration.
Torque: 37 N·m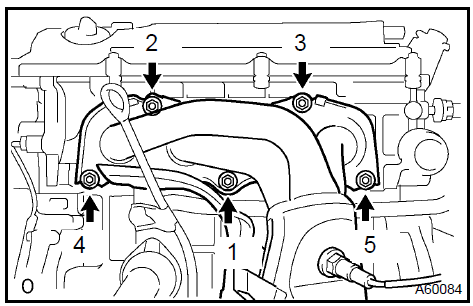
b. Install the No. 1 and No. 2 exhaust manifold stays with the 3 bolts and 2 nuts.
Torque: 44 N·m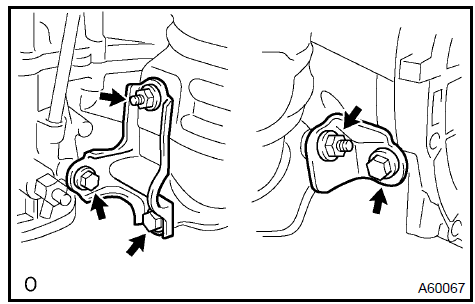
- INSTALL MANIFOLD CONVERTER INSULATOR No.1 Torque: 12 N·m
- INSTALL OIL LEVEL GAGE GUIDE
Apply a light coat of engine oil to the O−ring and install it to the guide.
Install the oil level gage and guide with the bolt.
Torque: 9 N·m- INSTALL INTAKE MANIFOLD RUNNER VALVE ASSY (PZEV only)
- INSTALL INTAKE MANIFOLD
a. Install a new gasket and the intake manifold with the 5 bolts and 2 nuts.
Torque: 30 N·m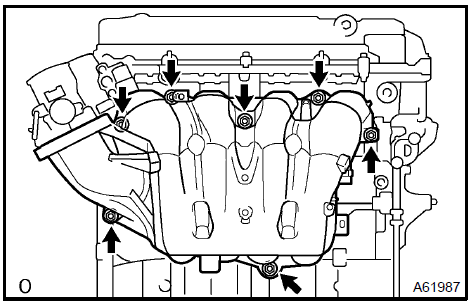
a. TMC made: Using SST, fix the crankshaft.
SST 09213−54015 (91651−60855), 09330−00021
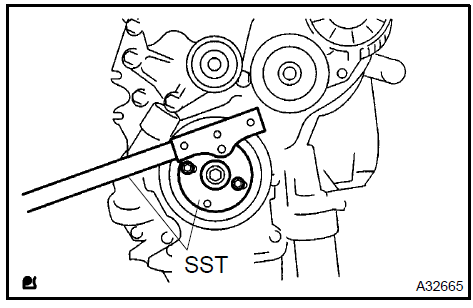
b. TMMK made: Using SST, fix the crankshaft.
SST 09960−10010 (09962−01000, 09963−01000)

Clean the bolt and the bolt hole.
- Apply adhesive to 2 or 3 threads of the bolt end. Adhesive: Part No. 08833−00070, THREE BOND or equivalent.
Install the front spacer, drive plate and rear spacer with 8 bolts. Uniformly tighten the 8 bolts in the sequence shown in the illustration.
Torque: 98 N·m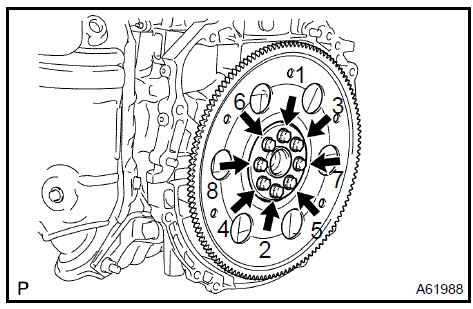
a. Using SST, fix the crankshaft.
SST 09213−54015 (91651−60855), 09330−00021
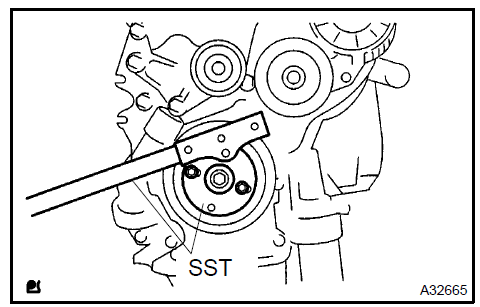
Clean the bolt and the bolt hole.
Apply adhesive to 2 or 3 threads of the bolt end.
Adhesive: Part No. 08833−00070, THREE BOND or equivalent.Install the flywheel. Uniformly tighten the 8 bolts in the sequence shown in the illustration.
Torque: 130 N·m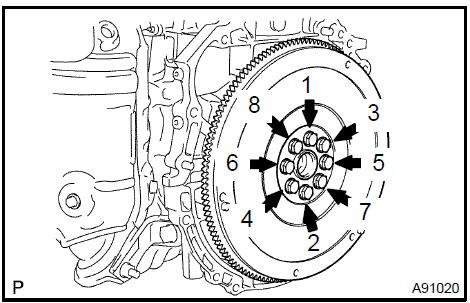
- INSTALL CLUTCH DISC ASSY (M/T)
- INSTALL CLUTCH COVER ASSY (M/T)
- INSTALL AUTOMATIC TRANSAXLE ASSY (A/T)
- INSTALL MANUAL TRANSAXLE ASSY (M/T)
- INSTALL STARTER ASSY Torque: 39 N·m
- INSTALL FRONT DRIVE SHAFT ASSY RH
- INSTALL FRONT DRIVE SHAFT ASSY LH
- INSTALL FRONT FRAME ASSY
a. A/T: Install the engine mounting insulator LH with the nut.
Torque: 95 N·m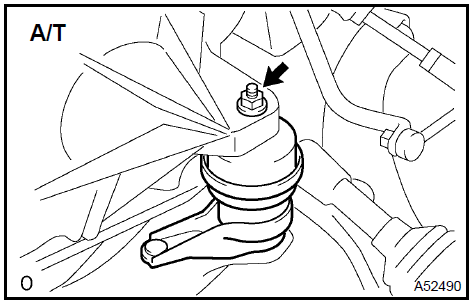
b. M/T: Install the engine mounting insulator LH with the bolt.
Torque: 143 N·m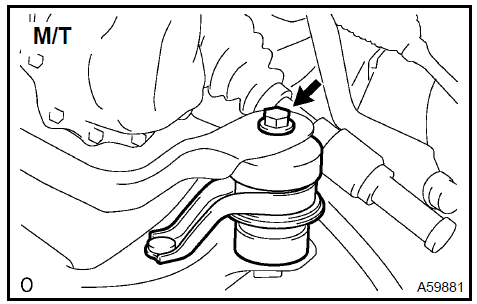
c. Install the engine mounting insulator RH with the nut.
Torque: 95 N·m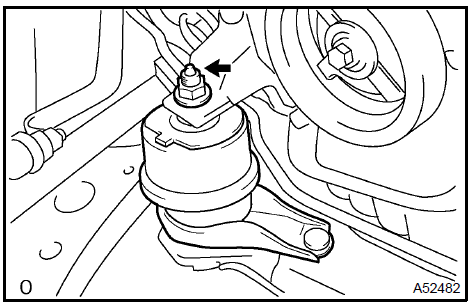
d. Install the engine mounting insulator FR with the bolt.
Torque: 87 N·m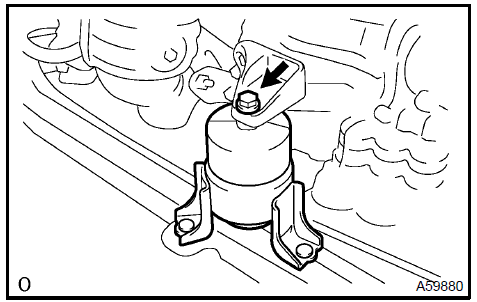
e. M/T: Install the engine lateral control rod with the bolt.
Torque: 89 N·m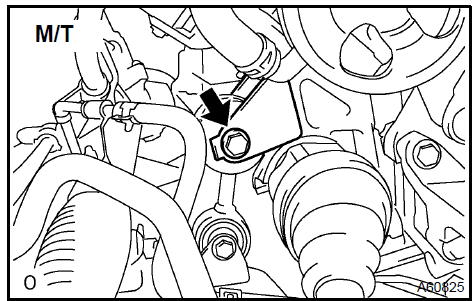
Install the vane pump to the engine with the 2 bolts.
Connect the PS oil pressure switch connector.
Torque: 43 N·m
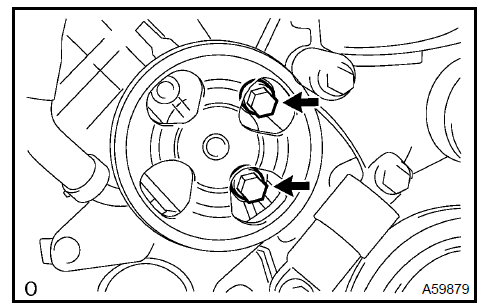
Install vane pump assy 112. INSTALL ENGINE ASSEMBLY WITH TRANSAXLE
Set the engine assembly with transaxle on the engine lifter.
Install the engine assembly to the vehicle.
Install the frame side plate LH and RH with the 4 bolts and 2 nuts.
Torque:
85 N·m for bolt A 32 N·m for bolt B and nut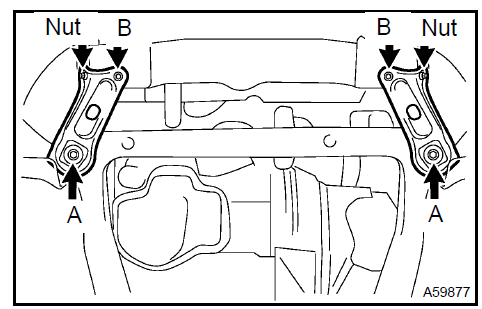
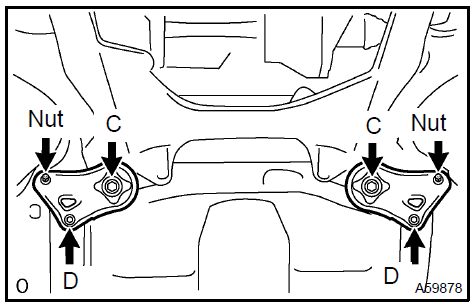
d. Install the front suspension member brace rear RH and LH with the 4 bolts and 2 nuts.
Torque:85 N·m for bolt C 32 N·m for bolt D and nut
a. Align the matchmarks on the intermediate shaft and control valve shaft.
Torque: 35 N·m
b. Tighten the bolt.
Torque: 35 N·m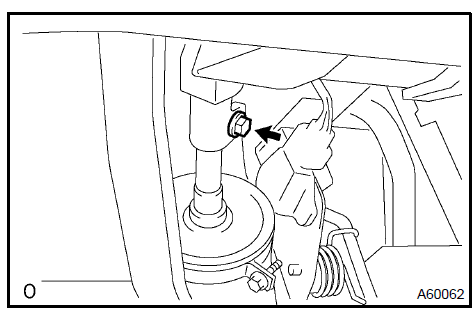
a. Fix the crankshaft, and install the 6 setting bolts.
Torque: 41 N·m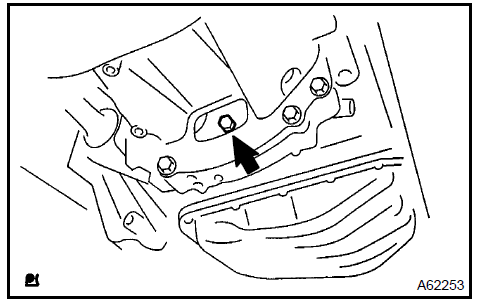
Install drive plate & torque converter clutch setting bolt (A/T) 115. INSTALL FRONT SUSPENSION ARM SUB−ASSY LOWER No.1 LH
Install the drive shaft to the steering knuckle.
- Install the suspension lower arm with the bolt and the 2 nuts. Torque: 75 N·m
Install front suspension arm sub-assy lower No.1 LH 116. INSTALL FRONT SUSPENSION ARM SUB−ASSY LOWER No.1 RH
HINT: Use the same procedures described for the LH side.
117. INSTALL TIE ROD ASSY LHa. Connect the tie rod end to the steering knuckle and install a new castle nut.
Torque: 49 N·m NOTICE:- Prevent any lubricant from contacting the thread and the taper portions.
- fter tightening the castle nut, tighten it to the additional direction within 60 to put into a cotter pin.
b. Insert a new cotter pin.
118. INSTALL TIE ROD ASSY RHHINT: Use the same procedures described for the LH side.
- INSTALL SPEED FRONT LH (W/ABS) Torque: 8 N·m
- INSTALL SPEED FRONT RH (W/ABS) Torque: 8 N·m
- INSTALL FRONT AXLE HUB LH NUT
Using a 30 mm socket wrench, install a new hub nut.
Torque: 294 N·mUsing a chisel and hammer, tapped the front axle hub LH nut.

Install front axle hub LH nut 122. INSTALL FRONT AXLE HUB RH NUT
HINT: Use the same procedures described for the LH side.
123. INSTALL FRONT STABILIZER LINK ASSY LHa. Using a 5 mm socket hexagon wrench, fix the stud bolt and install the nut.
Torque: 74 N·m 124. INSTALL FRONT STABILIZER LINK ASSY RHHINT: Use the same procedures described for the LH side.
- INSTALL EXHAUST PIPE ASSY FRONT
- CONNECT FUEL TUBE SUB−ASSY
- INSTALL RETURN TUBE SUB−ASSY
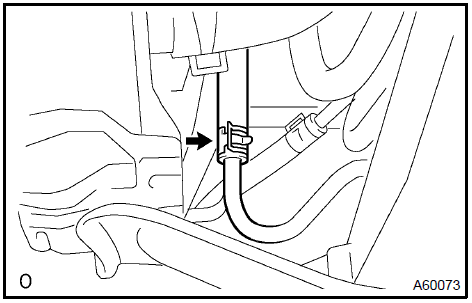

- INSTALL COMPRESSOR AND MAGNETIC CLUTCH
- INSTALL GENERATOR ASSY
- INSTALL FAN AND GENERATOR V BELT
- CONNECT ENGINE WIRE No.2
- CONNECT ENGINE WIRE
- INSTALL ENGINE MOUNTING BRACKET No.2 RH Torque: 52 N·m
- INSTALL ENGINE MOUNTING STAY No.2 RH Torque: 64 N·m
- INSTALL ENGINE MOVING CONTROL ROD W/BRACKET
a. Install the engine mounting control rod with the 3 bolts.
Torque: 64 N·m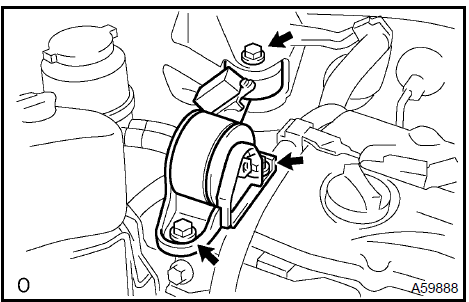
Install engine moving control rod W/bracket
- INSTALL AIR CLEANER ASSY Torque: 5 N·m
- ADD AUTOMATIC TRANSAXLE FLUID (A/T)
- ADD MANUAL TRANSAXLE OIL (M/T)
- ADD ENGINE OIL
- ADD ENGINE COOLANT
- ADD POWER STEERING FLUID
- BLEED POWER STEERING FLUID
- CHECK FOR OIL LEAKS
- CHECK FOR ENGINE COOLANT LEAKS
- CHECK FOR FUEL LEAKS
- INSTALL FRONT WHEEL
- ADJUST FRONT WHEEL ALIGNMENT
- INSPECT CHECK IDLE SPEED AND IGNITION TIMING
- INSPECT CO/HC
- CHECK ABS SPEED SIGNAL (W/ ABS)
a. Using SST, remove the oil filter.
SST 09228−06501

Remove oil filter sub-assy 2. REMOVE OIL FILTER UNION
a. Using a 12 mm hexagon wrench, remove the union.
- REMOVE OIL FILLER CAP SUB−ASSY
- REMOVE VENTILATION VALVE SUB−ASSY
- REMOVE SPARK PLUG
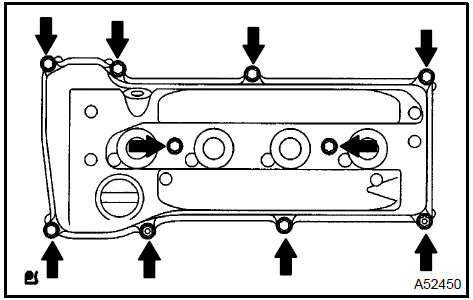
- REMOVE CYLINDER HEAD COVER SUB−ASSY
a. Remove the 8 bolts, 2 nuts, and cylinder head cover.
Remove cylinder head cover sub-assy
- REMOVE CYLINDER HEAD COVER GASKET
- REMOVE CRANKSHAFT POSITION
- REMOVE CRANKSHAFT PULLEY
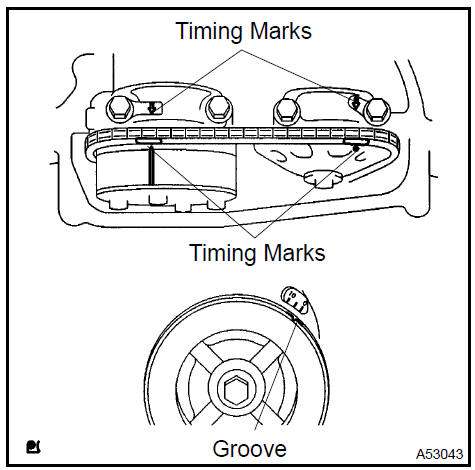
Turn the crankshaft pulley and align its groove with timing mark 0 of the timing chain cover.
Check that the timing marks of the camshaft timing sprockets are aligned with the timing marks of the No. 1 bearing cap, as shown in the illustration.
c. TMC made: Remove the crankshaft pulley.
1. Using SST, fix the pulley and loosen the bolt.
SST 09213−54015 (91651−60855), 09330−00021
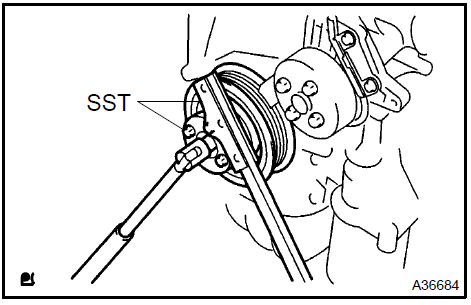
2. Using SST, remove the bolt and pulley.
SST 09950−50013 (09951−05010, 09952−05010, 09953−05020, 09954−05021)
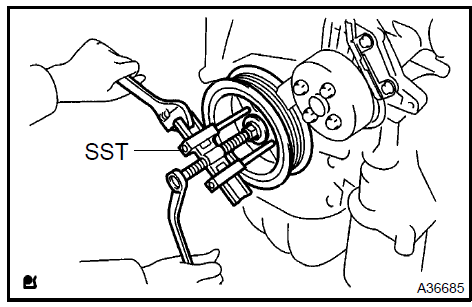
d TMMK made: Remove the crankshaft pulley.
1. Using SST, fix the crankshaft pulley and loosen a pulley set bolt.
SST 09960−10010 (09962−01000, 09963−01000)
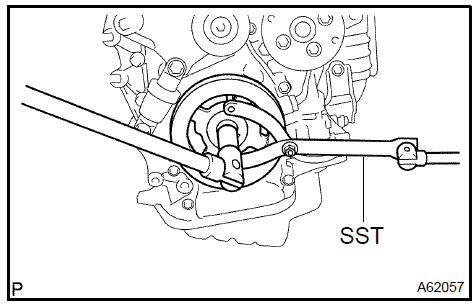
2. Using SST, remove the crankshaft pulley.
SST 09950−40011 (09951−04010, 09952−04010, 09953−04030, 09954−04010, 09955−04041, 09957−04010, 91111−51014)
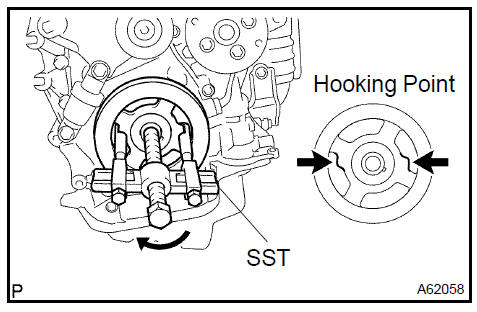
a. Remove the 2 nuts, chain tensioner and gasket.
NOTICE: Do not to turn the crankshaft without the chain tensioner.
Remove chain tensioner assy No.1 11. REMOVE WATER PUMP PULLEY
a. Using SST, remove the water pump pulley.
SST 09960−10010 (09962−01000, 09963−00700)
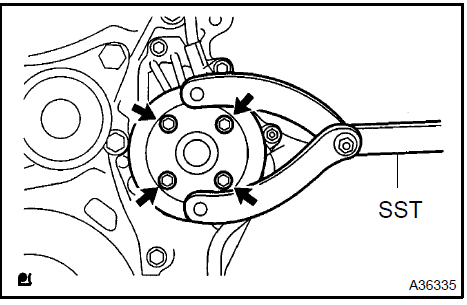
Remove water pump pulley 12. REMOVE WATER PUMP ASSY
a. Remove the 4 bolts, 2 nuts, bracket and water pump.
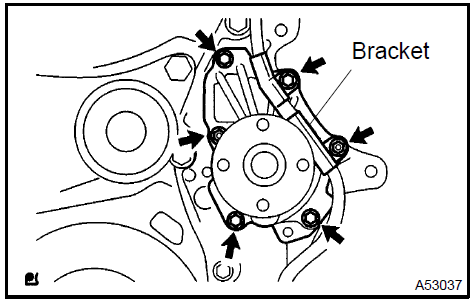
Remove water pump assy
- REMOVE OIL PAN DRAIN PLUG
- REMOVE OIL PAN SUB−ASSY
a. Remove the 12 bolts and 2 nuts.
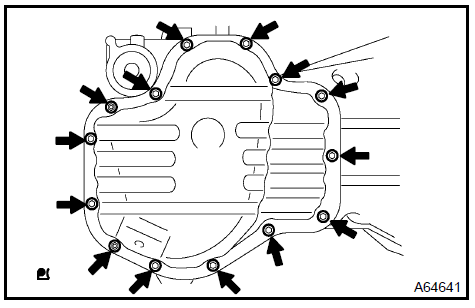
b. Insert the blade of SST between the crankcase and oil pan. Cut off applied sealer and remove the oil pan.
SST 09032−00100
NOTICE: Be careful not to damage the contact surface of the cylinder block and oil pan.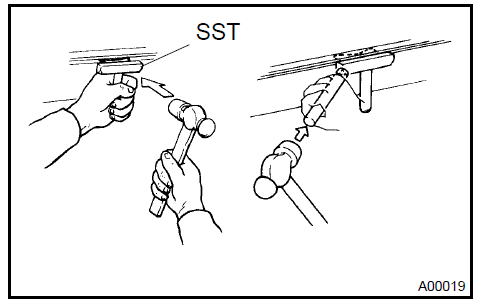
Remove the 14 bolts and 2 nuts.
Remove the timing chain cover by prying between the timing chain cover and cylinder head or cylinder block with a screwdriver.
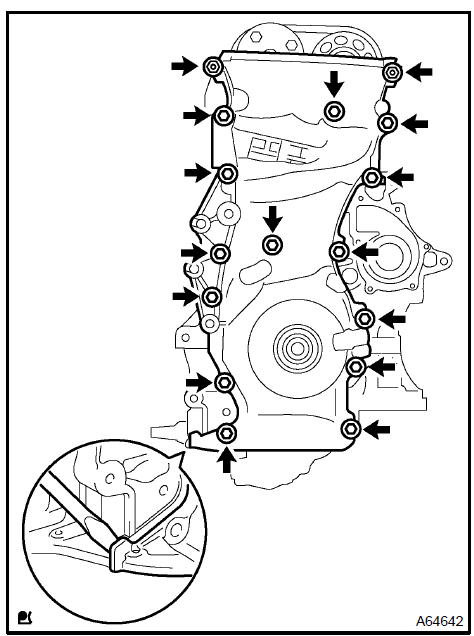
Remove timing chain or belt cover sub-assy 16. REMOVE TIMING GEAR CASE OR TIMING CHAIN CASE OIL SEAL
a. Using a screwdriver and a hammer, remove the oil seal.
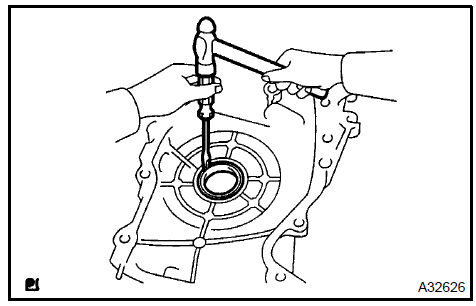
Remove timing gear case or timing chain case oil seal
- REMOVE CRANKSHAFT POSITION PLATE No.1
- REMOVE TIMING CHAIN GUIDE
- REMOVE CHAIN TENSIONER SLIPPER
- REMOVE CHAIN VIBRATION DAMPER No.1
- REMOVE CHAIN SUB−ASSY
- REMOVE CRANKSHAFT TIMING GEAR OR SPROCKET
- REMOVE No.2 CHAIN SUB−ASSY
a) Turn the crankshaft counterclockwise by 90 , and align the adjusting hole of the oil pump driven sprocket with the groove of the oil pump.
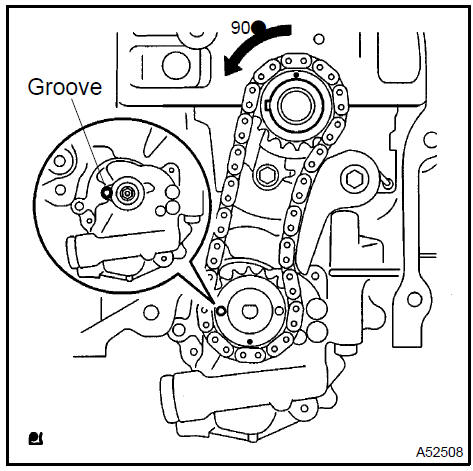
b. Put a bar (ϕ 4 mm) in the adjusting hole of the oil pump driven sprocket to temporarily lock the sprocket in position.
Remove the nut.

Remove the bolt, chain tensioner plate and spring.
Remove the oil pump drive sprocket, oil pump driven sprocket and chain.
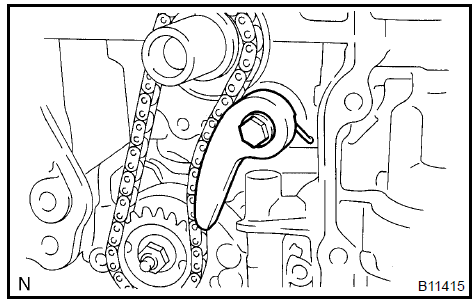
a. Remove the 3 bolts, oil pump and gasket.
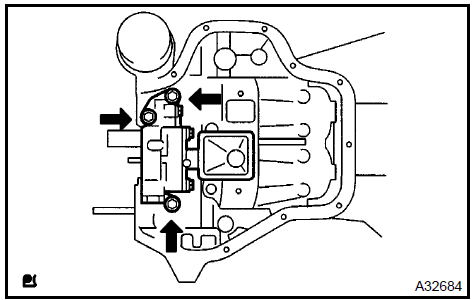
Uniformly loosen and remove the No. 2 camshaft’s 10 bearing cap bolts in the sequence shown in the illustration.
Then remove the 5 bearings.
Remove the camshaft.
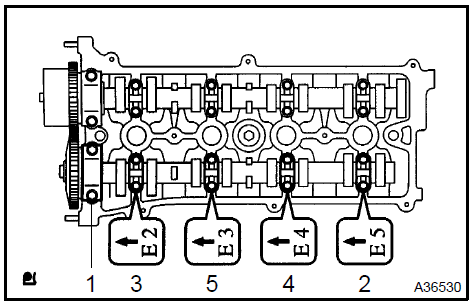 Remove No.2 Camshaft 26. REMOVE CAMSHAFT
Uniformly loosen and remove the No. 2 camshaft’s 10 bearing cap bolts in the sequence shown in the illustration.
Then remove the 5 bearings.
Remove the camshaft.
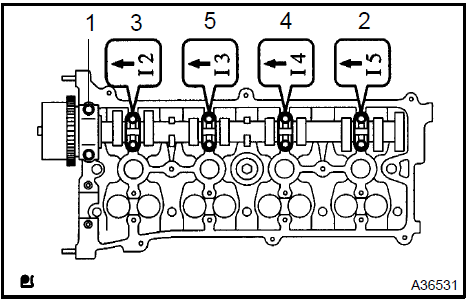 Remove camshaft
- REMOVE CAMSHAFT BEARING No.1
- REMOVE CAMSHAFT TIMING GEAR OR SPROCKET
a. Fix the camshaft with a vise and remove the camshaft timing sprocket.
NOTICE: Be careful not to damage the camshaft.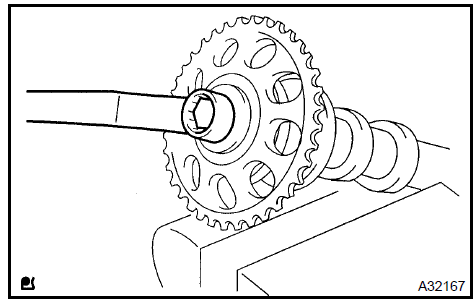 Remove camshaft timing gear or sprocket 29. REMOVE CAMSHAFT TIMING GEAR ASSY
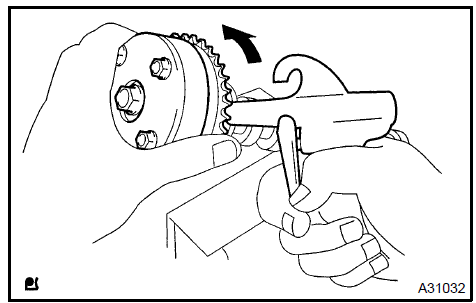
Fix the camshaft with a vise, and make sure that the camshaft timing gear does not move.
Cover all the oil ports with vinyl tape except the advanced angle side, as shown in the illustration.

c. Using an air gun, apply about 150 kPA (1.5 kgf/cm, 21 psi) of air pressure to the port on the advanced angle side.
CAUTION: Some oil spraying will occur. Contain the spray with a shop rag.HINT: This operation releases the lock pin for the extreme retarded angle lock.
d. Under the condition above, check that the camshaft timing gear can be turned by hand to the advanced angle side (counterclockwise), the direction of the arrow in the illustration.
Standard: Must turnHINT: The camshaft timing gear will turn to the advanced angle side without applying force by hand depending on the force of the air pressure applied. Also, if applying pressure to the oil path is difficult as a result of air leakage from the port, the lock−pin may be difficult to release.
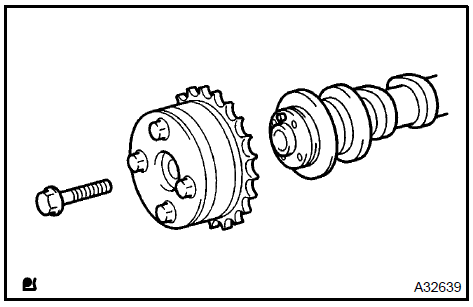
e. Remove the fringe bolt from the camshaft timing gear.
NOTICE:- Be sure not to remove the other 4 bolts.
- If planning to reuse the camshaft timing gear, release the straight pin lock first, and then install the gear.
- REMOVE CAMSHAFT BEARING No.2
- REMOVE CAMSHAFT TIMING OIL CONTROL VALVE ASSY
- REMOVE CYLINDER HEAD SUB−ASSY
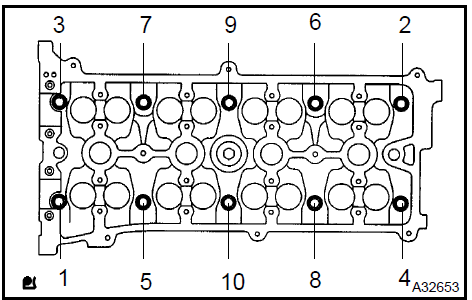
a. Using a 10 mm bi−hexagon wrench, uniformly loosen the 10 bolts in the sequence shown in the illustration. Remove the 10 cylinder head bolts and plate washers.
NOTICE:- Be careful not to drop washers into the cylinder head.
- Head warpage or cracking could
- REMOVE CYLINDER HEAD GASKET
- REMOVE CYLINDER BLOCK WATER DRAIN COCK SUB−ASSY
- REMOVE OIL CONTROL VALVE FILTER
a. Using a 6 mm socket hexagon wrench, remove the plug and filter.
- REMOVE W/HEAD TAPER SCREW PLUG No.1
- INSPECT BALANCESHAFT THRUST CLEARANCE
a. Using a dial indicator, measure the thrust clearance while moving the balance shaft back and forth.
Specified thrust clearance: 0.050 to 0.090 mm (0.0020 to 0.0035 in.)If the thrust clearance is greater than the maximum, replace the balance shaft housing and bearings. If necessary, replace the balance shaft.
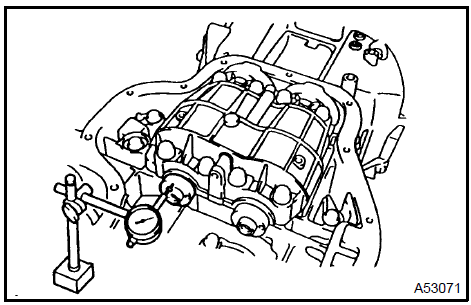 Inspect balanceshaft thrust clearance 38. INSPECT BALANCESHAFT OIL CLEARANCE
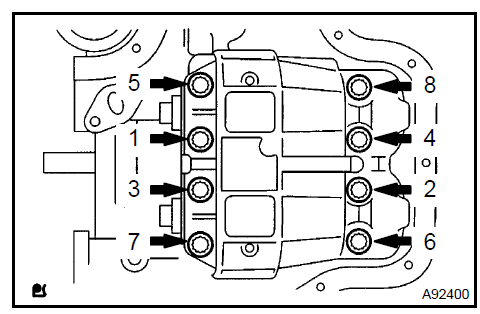
a. Uniformly loosen and remove the 8 bolts in the sequence shown in the illustration.
NOTICE: Be careful not to damage the contact surfaces of the balance shaft housing and crankcase.HINT: Keep the lower bearing and balance shaft housing together.
b. Lift out the No. 1 and No. 2 balance shafts.
HINT: Keep the upper bearing with the crankcase.
Clean each bearing and journal.
Check each bearing and journal for pitting and scratches.
If a bearing or journal is damaged, replace the bearings. If necessary, replace the balance shaft.
e. Place the No. 1 and No. 2 balance shafts on the crankcase.

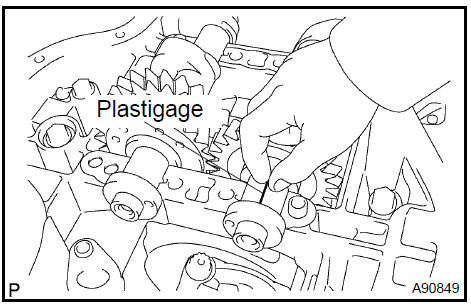
Lay a strip of Plastigage across each journal, and install the balance shaft housing.
Apply light coat of engine oil on the threads and under the heads of the balance shaft housing bolts.
h. Uniformly tighten the 8 bolts in the sequence shown in the illustration.
Torque: 22 N·mHINT: The balance shaft housing bolts are tightened in 2 progressive steps.
Mark the front side of each balance shaft housing bolt head with paint.
Retighten the bolts by 90 as shown in the illustration.
Check that the paint marks are now at a 90 angle to the front.

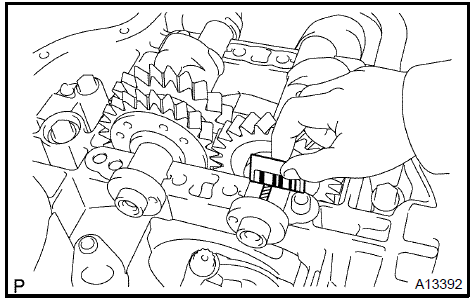
l. Remove the balance shaft housing, and measure the Plastigage at its widest point.
Specified oil clearance: 0.004 to 0.031 mm (0.0002 to 0.0012 in.)m. Completely remove the plastigage after the inspection.
If the clearance is greater than the maximum, replace the bearing.
If necessary, replace the balance shaft.
HINT: If replacing a bearing, replace it with one that has the same number as the stiffening crankcase. There are 3 sizes of standard bearings: 1, 2 and 3.
Balance shaft housing journal bore diameter: Balance shaft journal diameter: 22.985 to 23.000 mm (0.9049 to 0.9055 in.) Standard bearing center wall thickness:
n. Completely remove the Plastigage after the inspection.

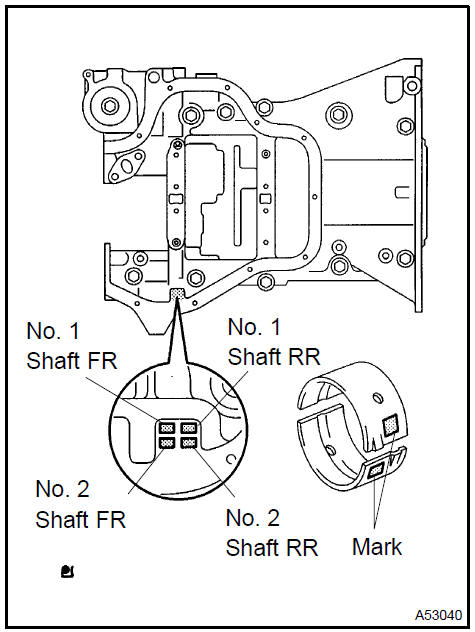
- REMOVE BALANCESHAFT
- REMOVE BALANCESHAFT BEARING No. 1
- REMOVE ENGINE REAR OIL SEAL
Using a knife, cut off the oil seal lip.
Using a screwdriver with its tip taped, pry out the oil seal.
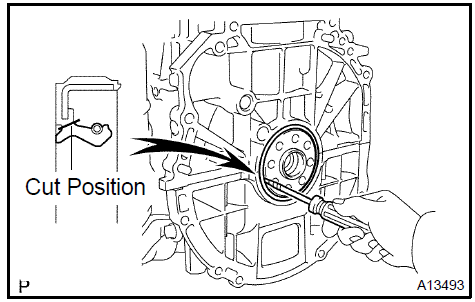 Remove engine rear oil seal 42. REMOVE STIFFENING CRANKCASE ASSY
Uniformly loosen and remove the 11 bolts in the sequence shown in the illustration.
Using a screwdriver, remove the crankcase by prying the portions between the crankcase and cylinder block.
c. Remove the O−ring from the cylinder block.
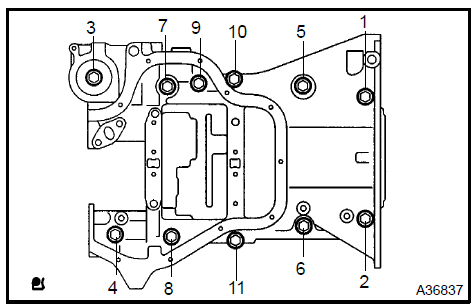 Remove stiffening crankcase assy 43. INSPECT OIL PUMP DRIVE SPROCKET
Wrap the chain around the drive sprocket.
Using a vernier caliper, measure the drive sprocket diameter with the chain.
If the diameter is less than the minimum, replace the chain and sprocket.
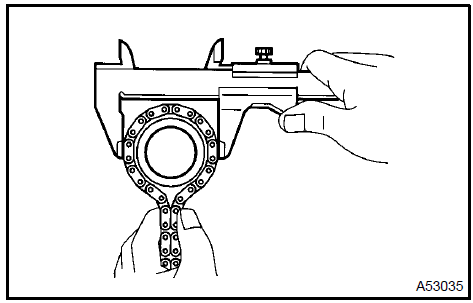 Inspect oil pump drive sprocket 44. INSPECT OIL PUMP DRIVEN SPROCKET
Wrap the chain around the driven sprocket.
Using a vernier caliper, measure the driven sprocket diameter with the chain.
If the diameter is less than the minimum, replace the chain and drive shaft gear.
 Inspect oil pump driven sprocket 45. INSPECT CRANKSHAFT TIMING GEAR OR SPROCKET
Wrap the chain around the timing sprocket.
Using a vernier caliper, measure the timing sprocket diameter with the chain.
If the diameter is less than the minimum, replace the chain and timing gear.
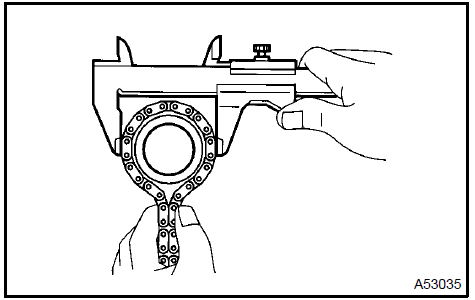 Inspect crankshaft timing gear or sprocket 46. INSPECT CHAIN TENSIONER SLIPPER
a. Measure the tensioner slipper wear.
Maximum wear: 1.0 mm (0.039 in.)If the wear is greater than the maximum, replace the tensioner slipper.
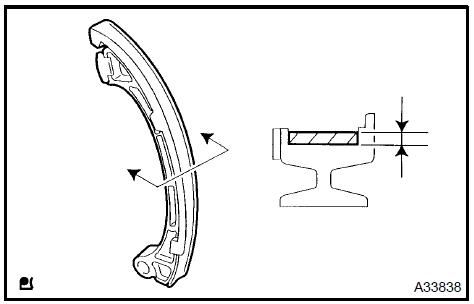 Inspect chain tensioner slipper 47. INSPECT CHAIN VIBRATION DAMPER No.1
a. Measure the vibration damper wear.
Maximum wear: 1.0 mm (0.039 in.)If the wear is greater than the maximum, replace the vibration damper.
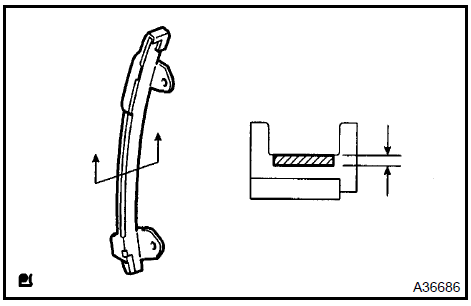 Inspect chain vibration damper No.1 48. INSPECT CYLINDER HEAD SET BOLT
a. Using a vernier caliper, measure the length of the head bolts from the seat to the end.
Specified bolt length: 161.3 to 164.2 mm (6.350 to 6.465 in.)If the length is greater than the maximum, replace the bolt.
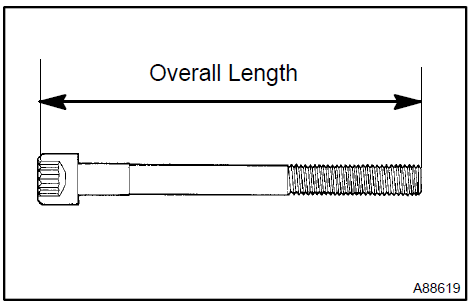 Inspect cylinder head set bolt 49. INSPECT CHAIN TENSIONER ASSY No.1
Check that the plunger moves smoothly when the ratchet pawl is raised.
Release the ratchet pawl and check that the plunger is locked in place by the ratchet pawl and does not move when pushed with finger.
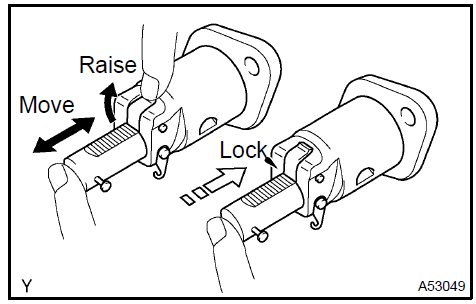 Inspect chain tensioner assy No.1 50. INSPECT CHAIN SUB−ASSY
a. Using a vernier caliper, measure the length of 15 links with the chain fully stretched.
Maximum chain elongation: 115.4 mm (4.543 in.)If the elongation is greater than the maximum, replace the chain.
NOTICE: Make the same measurements pulling at 3 or more places selected at random. Average the measurements.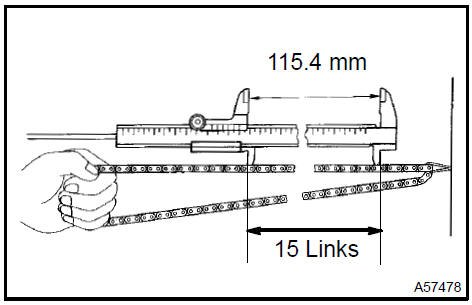 Inspect chain sub-assy 51. INSPECT CAMSHAFT TIMING GEAR OR SPROCKET
Wrap the chain around the timing sprocket.
Using a vernier caliper, measure the timing sprocket diameter with the chain.
Minimum sprocket diameter (w/chain): 97.3 mm (3.831 in.)
If the diameter is less than the minimum, replace the chain and timing gear.
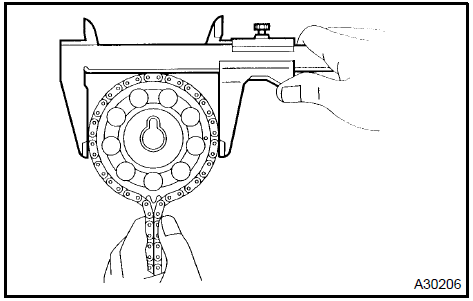 Inspect camshaft timing gear or sprocket 52. INSPECT CAMSHAFT
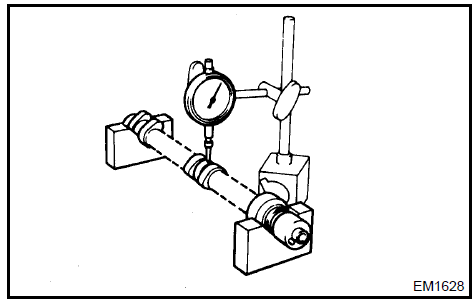
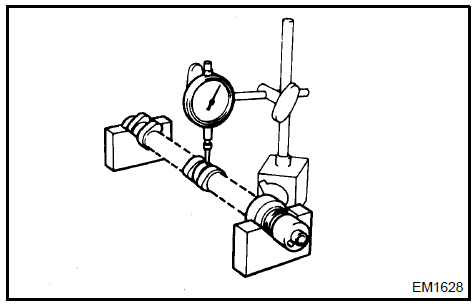
a. Check the camshaft for runout.
Place the camshaft on V−blocks.
Using a dial indicator, measure the circle runout at the center journal.
Maximum circle runout: 0.03 mm (0.0012 in.)
If the circle runout is greater than the maximum, replace the camshaft.
b. Using a micrometer, measure the cam lobe height.
Specified cam lobe height: 46.599 to 46.809 mm (1.8346 to 1.8429 in.)If the cam lobe height is less than the minimum, replace the camshaft.
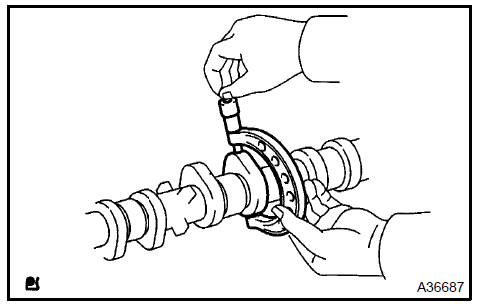
c. Using a micrometer, measure the journal diameter.
No. 1 journal diameter: 35.971 to 35.985 mm (1.4162 to 1.4167 in.) Other journal diameter: 22.959 to 22.975 mm (0.9039 to 0.9045 in.)If the journal diameter is not as specified, check the oil clearance.

a. Check the camshaft for runout.
1. Place the camshaft on V−blocks.
Using a dial indicator, measure the circle runout at the center journal.
Maximum circle runout: 0.03 mm (0.0012 in.)If the circle runout is greater than the maximum, replace the camshaft.
b. Using a micrometer, measure the cam lobe height.
Specified cam lobe height: 45.599 to 46.809 mm (1.8346 to 1.8429 in.)If the cam lobe height is less than the minimum, replace the camshaft.
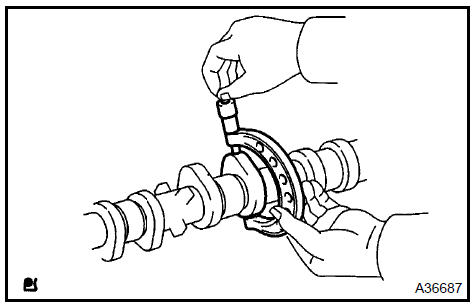
c. Using a micrometer, measure the journal diameter.
No. 1 journal diameter: 35.971 to 35.985 mm (1.4162 to 1.4167 in.) Other journal diameter: 22.959 to 22.975 mm (0.9039 to 0.9045 in.)If the journal diameter is not as specified, check the oil clearance.

Install the bearings in the crankcase and balance shaft housing.
Apply a light coat of engine oil on the bearings.
Rotate the driven gear No. 1 of balance shaft No. 1 for the rotating direction until it hits the stopper.
Confirm that the matchmarks on driven gear No. 1 and No. 2 are matched.
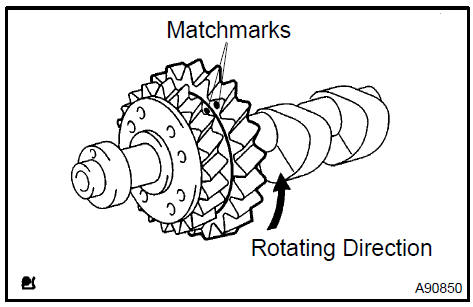
Align the timing marks of the No. 1 and No. 2 balance shafts as shown in the illustration.
Place the No. 1 and No. 2 balance shafts on the crank case.
Apply a light coat of engine oil under the heads of the balance shaft housing bolts.
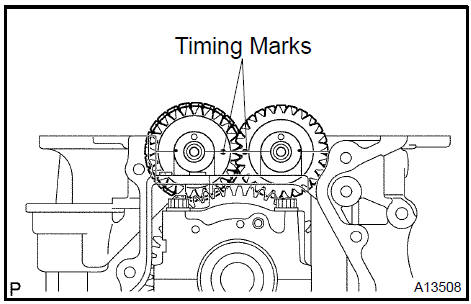
f. Uniformly tighten the 8 bolts in the sequence shown in the illustration.
Torque: 22 N·mHINT: The balance shaft housing bolts are tightened in 2 progressive steps.
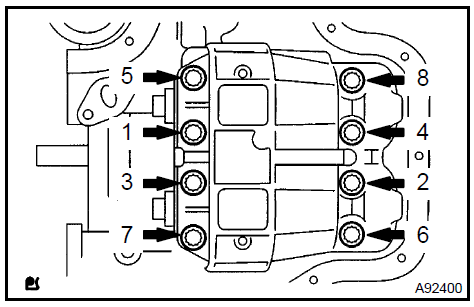
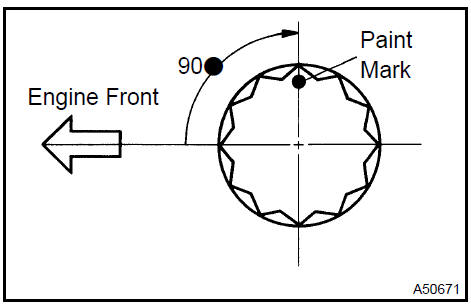
Mark the front side of each balance shaft housing bolt head with paint.
Retighten the bolts by 90 as shown in the illustration.
Check that the painted marks are now at a 90 angle to the front.
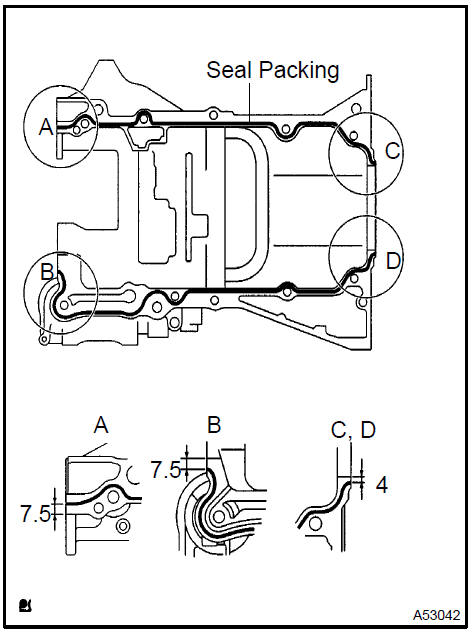
a. Apply seal packing in a continuous bead (diameter: 2.5 to 3 mm (0.098 to 0.118 in.)) to the places shown in the illustration.
Seal packing: Part No. 08826−00080 or equivalent NOTICE:- Remove any oil from the contact surface.
- Install the crankcase within 3 minutes after applying seal packing.
- Do not start the engine for at least 2 hours after installing.
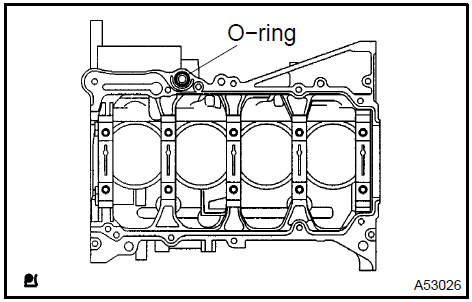
b. Place a new O−ring on the cylinder block, as shown in the illustration.
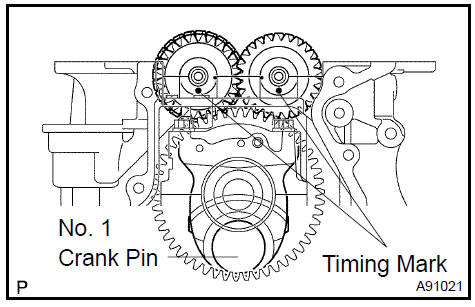
c. With the No. 1 crank pin of the crankshaft placed at 6 o’clock, install the No. 1 and No. 2 balanceshaft and the adjusting hole as shown in the illustration.
d. Uniformly tighten the 11 bolts in the sequence shown in the illustration.
Torque: 33 N·m (332 kgf·cm, 24 ft·lbf
e. Confirm that the timing marks of the balanceshafts are matched when the key groove is placed at 6 o’clock, as shown in the illustration.

a. Apply MP grease to a new oil seal lip.
NOTICE: Keep the lip off the foreign materials.b. Using SST and a hammer, evenly tap the oil seal until its surface is flush with the rear oil seal retainer edge.
SST 09223−15030, 09950−70010 (09951−07100)
NOTICE: Wipe off extra grease on the crankshaft.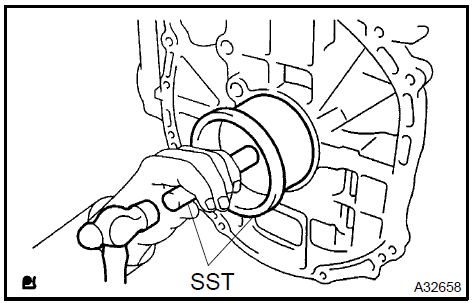 Install engine rear oil seal 58. INSTALL W/HEAD TAPER SCREW PLUG No.1
a. Apply adhesive to the threads of the plug and install it.
Adhesive: Part No. 08833−00070, THREE BOND 1324 or equivalent Torque: 26 N·m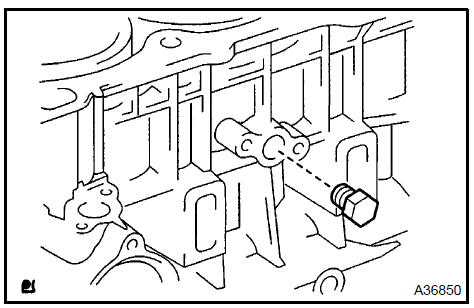 Install W/head taper screw plug No.1 59. INSTALL OIL CONTROL VALVE FILTER
Check that no foreign substance is on the mesh part of the filter.
Using a 6 mm socket hexagon wrench, install a new gasket and the oil control valve filter with the screw plug.
Torque: 30 N·m
 Install oil control valve filter 60. INSTALL CYLINDER BLOCK WATER DRAIN COCK SUB−ASSY
a. Install the water drain cock within the range shown in the illustration.
Torque: 25 N·m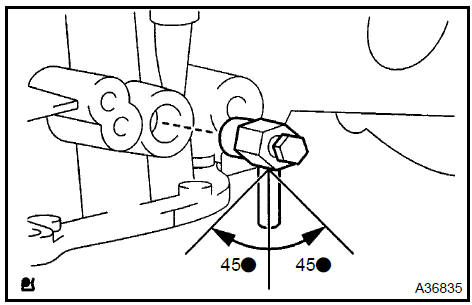 Install cylinder block water drain cock sub-assy 61. INSTALL CYLINDER HEAD GASKET
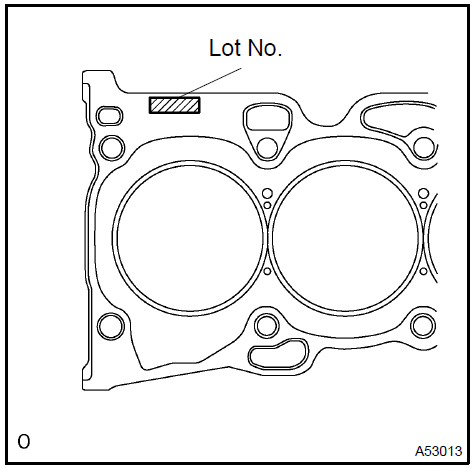
a. Place a new gasket on the cylinder block surface with the Lot No. stamp upward.
NOTICE:- Remove any oil from contact surface.
- Be careful of the installation direction.
- To avoid damage to the gasket, place the cylinder head on the gasket carefully.
 Install cylinder head gasket 62. INSTALL CYLINDER HEAD SUB−ASSY
HINT: The cylinder head bolts are tightened in 2 progressive steps.
Apply a light coat of engine oil on the threads and under the heads of the cylinder head bolts.
Install the 10 bolts and plate washers to the cylinder head.
c. Using a 10 mm bi−hexagon wrench, uniformly tighten the 10 bolts in the sequence shown in the illustration.
Torque: 79 N·m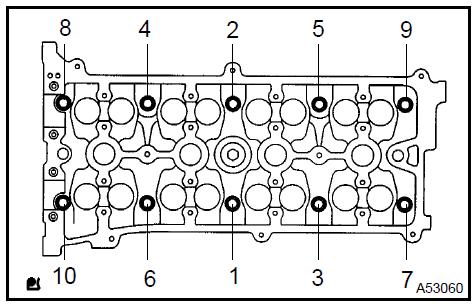
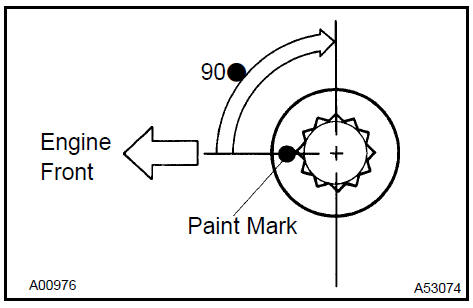
Mark the front side of each cylinder head bolt with paint.
Retighten the cylinder head bolts by 90 in the sequence shown in the illustration.
Check that the painted marks are now at a 90 angle to the front.
- INSTALL CAMSHAFT TIMING OIL CONTROL VALVE ASSY Torque: 9 N·m
- INSTALL CAMSHAFT BEARING No.2
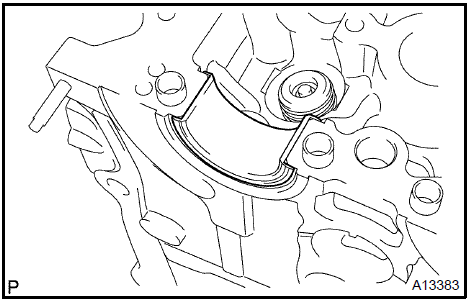
Put the camshaft timing gear and the camshaft together with the straight pin and key groove.
Turn the camshaft timing gear (as shown in the illustration) while pushing it lightly against the camshaft. Push further at the position where the pin enters the groove.
Check that there is no clearance between the gear’s fringe and the camshaft.
Tighten the fringe bolt with the camshaft timing gear fixed.
Torque: 54 N·m
Test yourself
A quick Toyota Camry quiz: every answer comes with an explanation and a link to the manual page.