Master Brake Cylinder
PROCEDURE
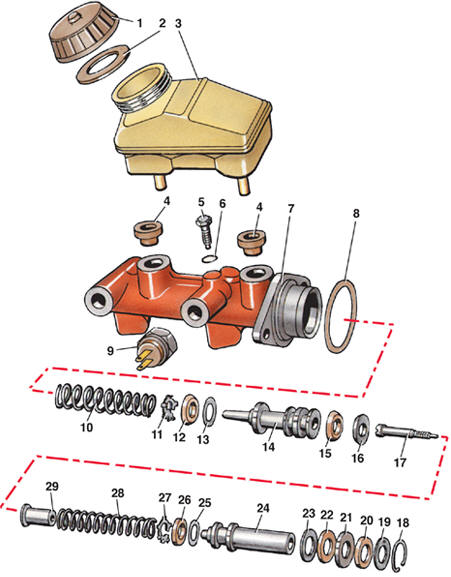
Brake Master Cylinder 1 – cap; 2 – gasket; 3 – reservoir; 4 – bushing; 5 – stop bolt; 6 – gasket; 7 – housing; 8 – gasket; 9 – brake light switch; 10 – spring; 11 – washer; 12 – seal; 13 – valve; 14 – piston; 15, 16 – seals; 17 – adjusting screw; 18 – snap ring; 19 – washer; 20, 22 – outer seals; 21 – spacer washer; 23 – thrust washer; 24 – piston; 25 – valve; 26 – seal; 27 – washer; 28 – spring; 29 – bushing
Removal PROCEDURE 1. Disconnect the wire from the negative battery terminal. 2. Disconnect the wiring (refer to Brake Drive Components illustration) from the brake fluid level sensor 14 located in the cap 13 of the brake fluid reservoir 15. 3. Clean the master cylinder 18, brake booster 21 and brake lines leading from the brake master cylinder of dirt. 4. Press the brake pedal several times firmly to release the vacuum in the brake booster housing. 5. Place a clean container under the brake master cylinder. 6. Disconnect the connectors with the wires of the brake light switches 9 (refer to Brake Master Cylinder illustration), if equipped. 7. Unscrew the brake light switches 9, if equipped. 8. Disconnect the brake lines from the brake master cylinder 18 (refer to Brake Drive Components illustration). 9. Unscrew the nuts 16 securing the brake master cylinder 18 to the brake booster 21. 10. Remove the brake master cylinder 18. 11. Remove the cap 1 (refer to Brake Master Cylinder illustration) of the brake fluid reservoir 3 and drain the brake fluid. 12. Position the brake master cylinder with the reservoir facing down and, pressing the piston 24 of the first chamber several times, expel the brake fluid from the brake master cylinder. 13. Remove the reservoir 3 from the brake master cylinder using a wooden spatula as a lever. 14. Remove the bushings 4 from the cylinder housing. Disassembly PROCEDURE 1. Unscrew the stop bolt 5. 2. Remove the snap ring 18. 3. Remove the piston 24 with seals 20, 22 and 26, washers 19, 21, 23 and valve 25 from the housing 7 by hand, gripping the piston 24 stem. 4. Push the piston 14 out by tapping the end of the cylinder housing 7 against a clean board and remove it with the remaining parts. Assembly WARNING Whenever the brake master cylinder is disassembled, replace the seals with new ones, even if they appear to be in good condition.
PROCEDURE 1. Inspect carefully and make sure the master cylinder bore and piston working surfaces are absolutely clean, free of rust, scratches and other irregularities. 2. Wash all parts with brake fluid. 3. Install valves 13 and 25, seals 12, 15, 16, 26 and washers 11 and 27 onto pistons 14 and 24 (for the orientation of the seal lips, see fig. Brake Master Cylinder). 4. Lubricate the cylinder bore with brake fluid. 5. Install springs 10 and 28 onto pistons 14 and 24, then install bushing 29 with adjusting screw 17 onto spring 28. 6. Lubricate the seals with brake fluid and insert the pistons into cylinder body 7. 7. Install stop bolt 5 with gasket 6, pressing on the stem of piston 24. 8. Install thrust washer 23, outer seals 22 and 20 lubricated with brake fluid, spacer washer 21 between them, and thrust washer 19. 9. Install retaining ring 18. 10. Install bushings 4, lubricated with brake fluid. 11. Install reservoir 3 on the brake fluid reservoir. Installation PROCEDURE 1. Install the master cylinder in the reverse order of removal, taking into account the following. 2. Replace gasket 8 with a new one. 3. Fill the reservoir with brake fluid and wait until brake fluid starts to flow out of the master cylinder ports for the brake lines. Only after this, install the brake lines. 4. Bleed the brake system.
Test yourself
A quick Volkswagen Golf quiz: every answer comes with an explanation and a link to the manual page.