Synchronizer (four-speed gearbox)
PROCEDURE
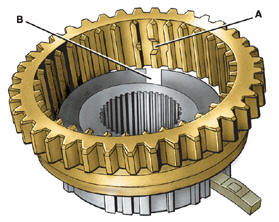
Installing the synchronizer sliding sleeve on the hub A – largest recess in the sliding sleeve splines; B – key slot in the hub
Disassembly. PROCEDURE 1. Mark the position of the hub 20 (refer to figure Output Shaft) and the sliding sleeve 21 relative to each other for reassembly. 2. Remove the sliding sleeve 21 from the hub 20. 3. Remove the springs 18 and the keys 19. Assembly. Caution The synchronizer hub and sliding sleeve are replaced only as a set. When installing new synchronizer blocking rings, it is recommended to replace the keys and springs. If the keys are worn, the clearances between them and the slots in the blocking rings will be too large.
PROCEDURE 1. Install the sliding sleeve 21 onto the hub according to the previously made marks. The largest recess A (refer to figure Installing the Synchronizer Sliding Sleeve on the Hub) on the internal splines of the sliding sleeve must align with the key slots B in the hub. 2. Install the keys 19 (refer to figure Output Shaft).
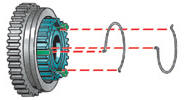
3. Install the springs 18, inserting the ends of the spring into the keys from opposite sides of the synchronizer. The ends of both springs must be positioned at an angle of 120° to each other.
Test yourself
A quick Volkswagen Golf quiz: every answer comes with an explanation and a link to the manual page.