Gear Shift Mechanism (four-speed transmission)
PROCEDURE
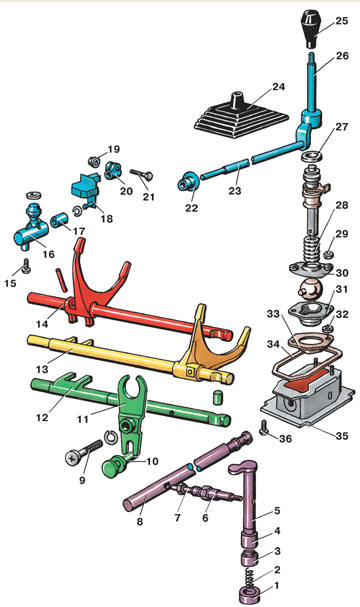
Gear Shift Mechanism 1 – bushing; 2 – spring; 3, 4 – bushing; 5 – gear lever shaft; 6 – gear lever; 7 – shift rod pin; 8 – shift rod; 9 – bolt; 10 – reverse gear shift fork lever; 11 – reverse gear shift fork; 12 – reverse gear shift fork rod; 13 – 1st–2nd gear shift rod with fork; 14 – 3rd–4th gear shift rod with fork; 15 – bolt; 16 – coupling sleeve; 17 – bushing; 18 – connecting end piece; 19 – nut; 20 – clamp; 21 – bolt; 22 – boot; 23 – gear shift mechanism shaft; 24 – boot; 25 – gear lever knob; 26 – gear lever; 27 – washer; 28 – spring; 29 – nut; 30 – upper ball socket; 31 – lower ball socket; 32 – bushing; 33 – plate; 34 – gasket; 35 – housing; 36 – bolt
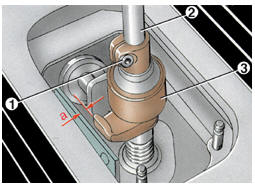
Adjusting Eccentric 1 – bolt; 2 – gear lever; 3 – adjusting eccentric; a – adjustment dimension
Removal PROCEDURE 1. Secure vehicle with parking brake. 2. Set gear lever to neutral position. 3. Unscrew bolt 21 (see illustration Gear Shift Mechanism). 4. Slide clamp 20 back. 5. Unscrew gear lever knob 25 inside the vehicle. 6. Remove boot 24. 7. Unscrew nuts 29. 8. Remove gear lever assembly from the vehicle interior. Installation Install the gear lever in the reverse order of removal, lubricating the ball joint during installation. Adjusting the Gear Shift Mechanism PROCEDURE 1. Set transmission to neutral position. 2. Loosen bolt 21. 3. A second person inside the vehicle must accurately position the gear lever in the position corresponding to transmission neutral and hold it there. Meanwhile, tighten bolt 21 of clamp 20. ADJUSTING ECCENTRIC NOTE From January 1991, adjusting eccentric 3 (see illustration Adjusting Eccentric) is installed on the gear lever instead of the ball joint. PROCEDURE 1. Engage 1st gear. 2. Loosen bolt 1. 3. Turn adjusting eccentric 3 to set dimension “a” to 1–1.5 mm. 4. Tighten bolt 1.
Test yourself
A quick Volkswagen Golf quiz: every answer comes with an explanation and a link to the manual page.