Fuel Level Sensor Replacement
PROCEDURE
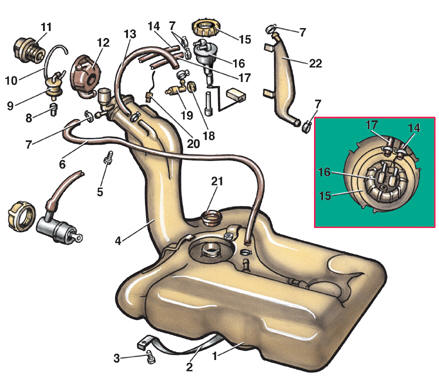
Fuel Tank 1 – fuel tank; 2 – fuel tank mounting clamp; 3 – fuel tank mounting bolt; 4 – filler pipe; 5 – filler pipe mounting bolt; 6 – fuel tank vent hose; 7 – clamp; 8 – bushing; 9 – gravity valve; 10 – spacer ring; 11 – fuel tank cap; 12 – filler neck seal; 13 – hose; 14 – fuel return pipe; 15 – sensor mounting nut; 16 – fuel level sensor; 17 – fuel line to fuel pump; 18 – valve mounting nut; 19 – air valve; 20 – wire from filler pipe to ground; 21 – O-ring; 22 – expansion tank
PROCEDURE 1. Disconnect the wire from the negative battery terminal. 2. Remove the trunk floor mat and the cover over the fuel level sensor. 3. Disconnect the electrical connector from sensor 16.
4. Disconnect hoses 14 and 17 from sensor 16. 5. Unscrew nut 15 and remove sensor 16 from the fuel tank. 6. Remove O-ring 21. 7. Install sensor 16 with a new O-ring 21. Turn the sensor so that the marks on the sensor and the fuel tank align. 8. Tighten nut 15. 9. Connect hoses 14 and 17 to the sensor. 10. Connect the electrical connector. 11. Install the cover in the trunk floor and the trunk floor mat.
Test yourself
A quick Volkswagen Golf quiz: every answer comes with an explanation and a link to the manual page.