Set-up menu
 buttons
and
can be carried out. This gives access to the various selection options and settings (setup) listed below. A submenu is provided for some items (setting the clock and the units).
The set-up menu can be switched on by briefly pressing the MODE button.
By briefly pressing the buttons
orit is
possible to move through the list of the set-up menu. The operating methods differ at this point depending on the characteristics of the selected item.
If the connect nav+ system is fitted, it is only possible to adjust the following functions from the instrument panel display: "Brightness", "Speed warning", "Twilight sensor" (where fitted), "Seat belt buzzer" and "Passenger airbag".
The other functions are shown on the connect nav+ system display, where they can also be adjusted/set.
Selecting an item in the main menu without a submenu:- Briefly press the MODE button to select the setting of the menu to be changed;
- press the buttons
or
(single press) to select the new setting; - briefly press the MODE button to save the setting and return to the previously selected menu item at the same time.
- Briefly press the MODE button to display the first item of the submenu;
- press the buttons
or
(single press) to scroll through all items of the submenu; - briefly press the MODE button to select the displayed submenu item and go to the corresponding setting menu;
- press the buttons
or
(single press) to select the new setting for this submenu item; - briefly press the MODE button to save the setting and return to the previously selected submenu item at the same time.
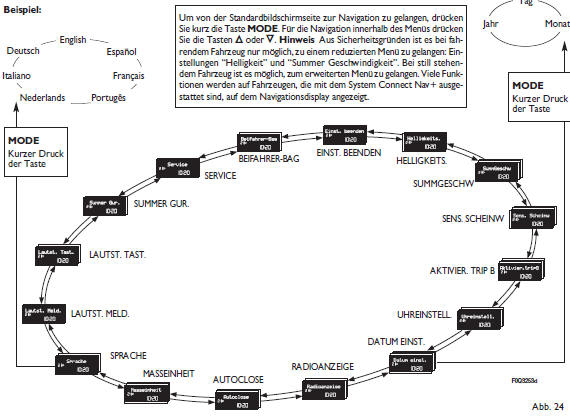
Versions with reconfigurable multifunction display
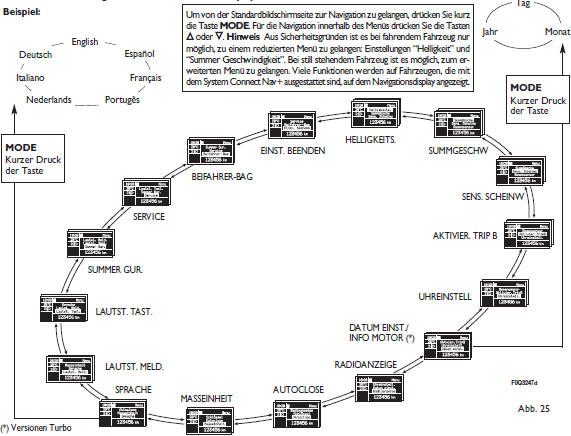
Brightness (cabin lighting brightness setting) (only when parking lights are on)
This function allows the brightness of the instrument panel, radio controls and automatic air conditioning controls (where fitted) to be adjusted (in 8 levels) when the sidelights are on.
To adjust the brightness, proceed as follows:
- briefly press the MODE button; the previously set level flashes on the display;
- press the
 or
 press
to set the brightness level; - briefly press the MODE button to return to the menu screen, or press and hold the MODE button to return to the standard screen without saving.
This function allows a maximum speed to be set for the vehicle (km/h or mph). The driver is warned if it is exceeded (see chapter "Warning lights and indicators").
To set the desired speed limit, proceed as follows:
- briefly press the MODE button; "Speed limit:" appears on the display;
- press theor press
to select switching the speed limit on (on) or off (off); - if the function has been activated (on) by pressing the buttonsor
to select the desired speed, and press MODE to confirm.
Note: a value between 30 and 200 km/h or between 20 and 125 mph can be entered depending on the previously entered unit of measure; see the section "Setting the unit of measure (units)" below. Each press of the button/
increases or decreases the value by 5 units. If the button/
is held down, the value increases or decreases automatically and quickly. When the desired value is almost reached, release the button and complete the setting with a single press.
- Briefly press the MODE button to return to the menu screen, or press and hold it to return to the standard screen without saving.
To delete the setting, proceed as follows:
- briefly press the MODE button; (on) flashes on the display;
- press thepress
; (off) flashes on the display; - briefly press the MODE button to return to the menu screen, or press and hold the MODE button to return to the standard screen without saving.
This function allows the sensitivity of the twilight sensor to be set in 3 levels (level 1 = minimum, level 2 = medium, level 3 = maximum). The higher the sensitivity, the less light is required to switch on the exterior lights.
To set the desired value, proceed as follows:
- briefly press the MODE button; the previously set level flashes on the display;
- press theor press
to make the selection; - briefly press the MODE button to return to the menu screen, or press and hold the MODE button to return to the standard screen without saving.
This function can be used to activate (on) or deactivate (off) the display of trip B (partial trip).
For more information, see the "Trip computer" section.
To switch on/off, proceed as follows:
- briefly press the MODE button; on or off flashes on the display, depending on the previous setting;
- press theor press
to make the selection; - briefly press the MODE button to return to the menu screen, or press and hold the MODE button to return to the standard screen without saving.
This function allows the time to be set via two submenus: "Time" and "Mode".
To set, proceed as follows:
- briefly press the MODE button; the two submenus "Time" and "Mode" appear on the display;
- press theor press
to switch between the two submenus; - after selecting the submenu to be changed, briefly press the MODE button;
- when accessing the "Time" submenu: briefly press the MODE button; the "hours" flash on the display;
- press theor press
to make the adjustment; - briefly press the MODE button; the "minutes" flash on the display;
- press theor Press to make the
setting.
Note: each press of the buttons
orincreases or decreases the value
by one unit. If the button is held down, the value changes automatically and quickly. When the desired value is nearly reached, complete the setting with single presses.
- To access the “MODE” submenu: briefly press the MODE button; the display mode flashes on the display;
- press theor Press to select the
“24-hour” or “12-hour” time format.
After making the setting, briefly press the MODE button to return to the submenu display page, or press and hold the button to return to the main display page without saving.
- Press and hold the MODE button again to return to the standard display page or the main menu, depending on where you are in the menu.
This function allows you to update the date (day - month - year).
To update, proceed as follows:
- briefly press the MODE button; the year flashes on the display;
- press theor press
to make the adjustment; - briefly press the MODE button; the month flashes on the display;
- press theor press
to make the adjustment; - briefly press the MODE button; the day flashes on the display;
- press theor Press to make the
setting.
Note: each press of the buttons
orincreases or decreases the value
by one unit. If the button is held down, the value changes automatically and quickly. When the desired value is nearly reached, complete the setting with single presses.
- Briefly press the MODE button to return to the menu screen, or press and hold it to return to the standard screen without saving.
Engine oil information (pressure) can be displayed instead of the date.
To switch the display on or off (on/off), proceed as follows:
- briefly press the MODE button; “Repeat engine info” appears on the display.
- Press the “▲” button or the “▼” button and select “on” to activate the function, or “off” to deactivate it.
- Briefly press the MODE button to return to the menu display; press and hold the button to return to the standard display without saving.
When the ignition key is turned to the MAR position, the reconfigurable display shows the engine oil information after the start-up check (if previously activated).
Radio display (repeat audio information)This function makes it possible to show radio information on the display.
- Radio: frequency or RDS information of the selected station, activation of automatic station search AUTOSTORE;
- CD audio, CD MP3: track number;
- CD changer: CD number and track title; to show (on) or hide (off) the radio information on the display, proceed as follows:
- briefly press the MODE button; on or off flashes on the display, depending on the previous setting;
- press theor press
to make the selection; - briefly press the MODE button to return to the menu screen, or press and hold the MODE button to return to the standard screen without saving.
When this function is activated (on), the doors lock automatically when the vehicle exceeds 20 km/h.
To switch this function on or off, proceed as follows:
- briefly press the MODE button; a submenu appears on the display;
- briefly press the MODE button; on or off flashes on the display, depending on the previous setting;
- press theor press
to make the selection; - briefly press the MODE button to return to the submenu display page, or press and hold the button to return to the main display page without saving;
- press and hold the MODE button again to return to the standard display page or the main menu, depending on where you are in the menu.
This function allows you to set the units of measure via three submenus: “Distance”, “Consumption” and “Temperature”.
To set the desired unit, proceed as follows:
- briefly press the MODE button; the three submenus appear on the display;
- press theor press to switch between
the three submenus; - after selecting the submenu to be changed, briefly press the MODE button;
- to access the “Distance” submenu: briefly press the MODE button; “km” or “mi” appears on the display, depending on the previous setting;
- press theor press
to make the selection; - to access the “Consumption” submenu: briefly press the MODE button; “km/l”, “l/100km” or “mpg” appears on the display, depending on the previous setting;
If the distance unit is set to “km”, the display allows you to set the consumption unit (km/l or l/100km) for the amount of fuel consumed.
If the distance unit is set to “mi”, the display shows the fuel consumed in “mpg”.
- The buttonor press
to make the selection; - to access the “Temperature” submenu: briefly press the MODE button; “C” or “F” appears on the display,
- depending on the previous setting;
- press theor press
to make the selection;
After making the setting, briefly press the MODE button to return to the submenu display page, or press and hold the button to return to the main display page without saving.
- Press and hold the MODE button again to return to the standard display page or the main menu, depending on where you are in the menu.
If set, the messages on the display can appear in the following languages: Italian, German, English, Spanish, French, Portuguese, Dutch.
To set the desired language, proceed as follows:
- briefly press the MODE button; the previously set “language” flashes on the display;
- press theor press
to make the selection; - briefly press the MODE button to return to the menu screen, or press and hold the MODE button to return to the standard screen without saving.
This function allows you to set the volume (in 8 levels) of the audible signal (buzzer) that accompanies warning messages and notices on the display.
To set the desired volume, proceed as follows:
- briefly press the MODE button; the previously set “volume level” flashes on the display;
- press theor press
to make the adjustment; - briefly press the MODE button to return to the menu screen, or press and hold the MODE button to return to the standard screen without saving.
This function allows you to set the volume (in 8 levels) of the audible signal that accompanies the pressing of the MODEand buttons.
To set the desired volume, proceed as follows:
- briefly press the MODE button; the previously set “volume level” flashes on the display;
- press theor press
to make the adjustment; - briefly press the MODE button to return to the menu screen, or press and hold the MODE button to return to the standard screen without saving.
Buzzer
(Reactivates the buzzer for the S.B.R. indicator)This function can only be displayed after the S.B.R. system has been deactivated by the Fiat service network (see the “Safety” chapter, “S.B.R. system” section).
Service (scheduled maintenance)This function displays reminders for when inspections are due, based on distance.
To look up this information, proceed as follows:
- briefly press the MODE button; the service due date appears on the display in km or mi, depending on the previous setting (see the “Distance unit” section);
- briefly press the MODE button to return to the menu display page, or press and hold the button to return to the standard display page.
Note: The "Scheduled Maintenance Plan" provides for vehicle servicing every 30,000 km (or 18,000 miles). This message appears automatically when the ignition key is turned to MAR, 2,000 km (or the equivalent value in miles) before the due date, and is repeated every 200 km (or the equivalent value in miles). Under 200 km, the messages appear repeatedly at shorter intervals. The display shows km or miles depending on the selected unit of measurement. When the scheduled maintenance ("service") is approaching, the display shows the word "SERVICE" and the number of kilometres/miles remaining until the vehicle's service due date when the ignition key is turned to MAR. Please contact the Fiat Service Network, which not only carries out the maintenance operations of the "Scheduled Maintenance Plan" but also resets the message (reset).
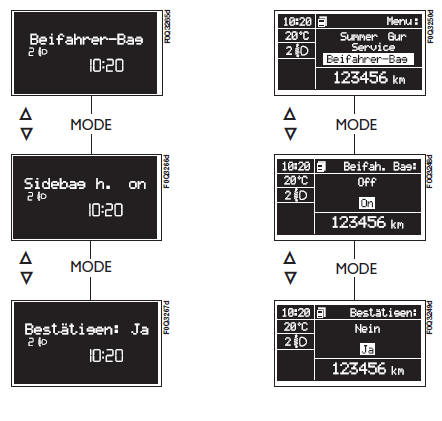
Passenger airbag (activating/deactivating the front and side airbags for upper body/pelvis protection) (side bag) (where fitted)This function allows you to activate/deactivate the passenger-side airbag.
Proceed as follows:
- press the MODE button, and after the message (BAG PASS: OFF) (to deactivate) or the message (BAG PASS: ON) (to activate) appears on the display, by pressing the buttonsand
shown, press the MODE button again; - the confirmation selection message appears on the display;
- select by pressing the buttons
or(YES) (to confirm the
activation/deactivation) or (NO) (to decline); - briefly press the MODE button; a message confirming the selection appears, and you return to the menu screen, or press and hold the MODE button to return to the standard display screen without saving.
Exit settings (leave menu)
The last function completes the setting cycle on the first menu screen.
Briefly pressing the MODE button returns the display to the standard display screen without saving.
Press the buttonto return the
display to the first item of the menu (SUMM SPEED).
Test yourself
A quick Fiat Bravo quiz: every answer comes with an explanation and a link to the manual page.