Engine/Fuel Control System
INJECTOR
In this manual: Engine/Fuel Control System
18steps
~113min
5/5difficulty
1special tools
Done 0 of 18
Description and Operation
Description
Based on data received from various sensors, the ECM calculates the amount of fuel to be injected. The fuel injector is a solenoid valve. The injected fuel quantity is controlled by the injection time. The ECM controls each injector by grounding its control circuit. When the ECM activates the injector by grounding the control circuit, the circuit voltage should be low (theoretically 0 V) and fuel is injected. When the ECM deactivates the injector by opening the control circuit, the injector nozzle closes, and the circuit voltage should be maximum for the specified time and then return to system voltage.
Specifications
Specification
| Item | Specification |
| Coil Resistance ( ) | 1,5 [20 °C] |
Troubleshooting
Signal Waveform

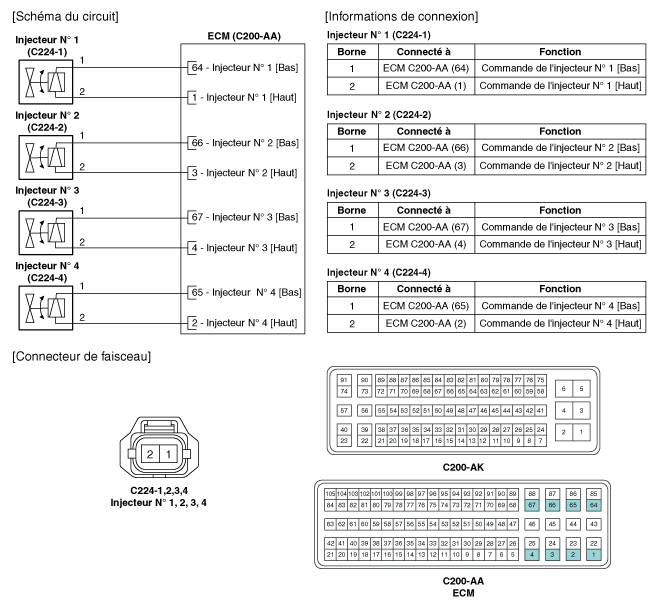
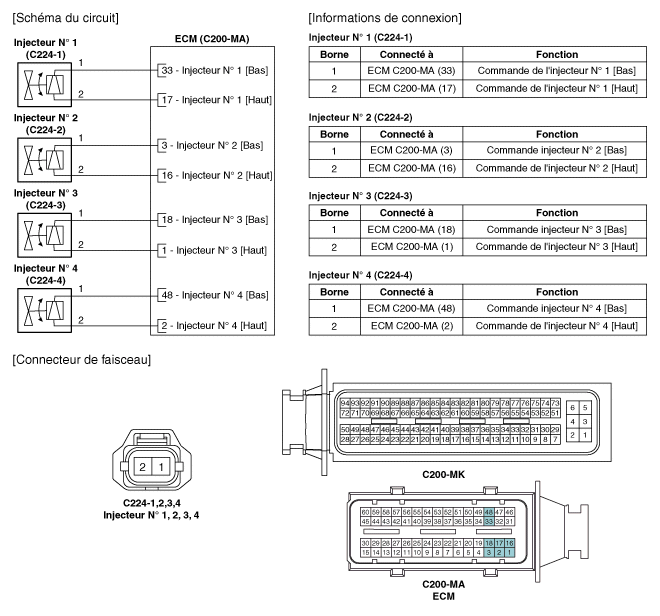
Circuit Diagrams
Wiring Diagram
(B)
(MT)
Repair Procedures
Inspection
- Turn the ignition switch to the OFF position.
- Disconnect the injector connector.
- Measure the resistance between terminals 1 and 2 of the injector.
- Check that the resistance is within specification.
Specification: Refer to "Specifications"
DEPOSIT
- Turn the ignition switch to the OFF position and disconnect the negative (-) battery cable.
- Release the residual pressure in the fuel line. (Refer to Fuel System - Repair Procedures - Releasing Residual Pressure in the Fuel Line)
- Remove the injector outlet pipe (Refer to "Outlet Pipe" in this group).
- Remove the connector (A) and the retaining clip (B), then separate the injector from the fuel supply pipe.


REMEDY

- Combustion Seal
- rubber washer
- Retaining disc
- O-ring

- To install, perform the removal procedure in reverse order.
REPLACEMENT
Replace the injector seal to prevent leakage after removing the injector.- Remove the combustion seal (A) using cutting pliers.

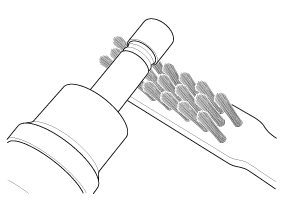
- Before installing the O-ring, clean the groove with a clean cloth. Carefully remove any contamination from the injector sealing surface with a brass brush.
- Place the installation guide (B) (SST #: 09353-2B000) onto the injector nozzle, taking care not to damage the injector nozzle (B). Press the O-ring (C) onto the tapered fitting with your thumb and index finger until it snaps into the groove. The complete assembly should take no more than 2-3 seconds.


- To obtain the correct size O-ring, first insert the injector into the tool (A) (SST No.: 09353-2B000), then press and simultaneously rotate it 180° within the tool.

- Remove the injector from the tool by rotating it in the opposite direction during pressing.
- Check the installation of the combustion chamber seal (A).

Test yourself
A quick Hyundai Tucson quiz: every answer comes with an explanation and a link to the manual page.
Was this page helpful?