Interior Rearview Mirror
Adjust the inside rearview mirror so that the center view through the rear window is visible. Make this adjustment before driving.
WARNING - Rear View
Do not place items on the rear seat or in the cargo area that may obstruct your view through the rear window.
WARNING
Do not adjust the rearview mirror while driving. This could cause loss of vehicle control and an accident, which may result in death, serious injury, or property damage.
WARNING
Do not modify the inside rearview mirror or install a wide-angle mirror. This could result in injury in an accident or in airbag deployment.
Day/Night Rearview Mirror (if equipped)
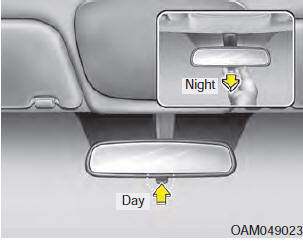 Make this adjustment
before driving and when the day/night switch is in the day position.
Pull the day/night lever toward you to reduce the glare of headlights from vehicles behind you during night driving.
Be aware that rear view clarity is reduced in the night position.
Electrochromic (ECM) Mirror with Compass
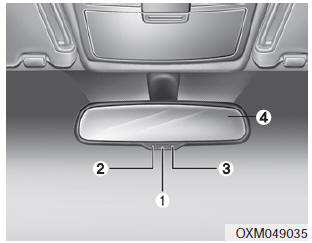
1. Function Control Button
2. Status LED Indicator
3. Rear Light Sensor
4. Display Window
Night Vision Safety™ (NVS®) Auto-Dimming Mirror
The NVS® mirror in your vehicle is the most advanced way to reduce annoying glare in the rearview mirror in any driving situation. For more information about NVS® mirrors and other applications, see the Gentex website: www.gentex.com
CAUTION
The NVS® mirror automatically reduces glare depending on driving conditions, based on light levels monitored at the front and rear of the vehicle. These light sensors are visible through openings at the front and rear of the mirror case. Any object that blocks either light sensor will impair the automatic dimming function.
Auto-Dimming Function
Your mirror automatically dims when it detects glare from vehicles behind you. The automatic dimming function can be controlled by pressing the ON/OFF button:
1. Press the button to turn off the automatic dimming function. The green status indicator LED will go out.
2. Pressing the button again enables the automatic dimming function, indicated by the green status indicator LED illuminating.
✽ NOTICE
The mirror defaults to the ON position each time the vehicle is started.
Z-Nav™ Compass Display
The NVS™ mirror in your vehicle also features a Z-Nav™ compass, which shows the vehicle's direction on the display window using 8 main compass points (N, NE, E, SE, etc.).
Compass Function
The compass can be turned on and off, and it remembers the last state when the ignition is cycled. To turn the display function on or off:
1. Press and release the button to turn off the display function.
2. Press and release the button again to turn the display back on.
Additional settings can be made by pressing and holding the button in sequence, as described in detail below.
There is a difference between magnetic north and true north. The compass in the mirror can compensate for this difference if it knows the Magnetic Zone in which it is operating.
This is set either by the dealer or by the user. The zone numbers for North America are shown in the figure in the following section.

To adjust the zone setting:
1. Determine the desired zone number based on your current location on the Zone Map.
2. Press and hold the button for more than 3 but less than 6 seconds. The current Zone Number will appear on the display.
3. Press and hold the button repeatedly to increase the numbers. (Note: they will cycle through … 13, 14, 15, 1, 2, …). Release the button when the desired Zone Number appears on the display to set the new zone.
4. After approximately 5 seconds, the compass will again begin displaying the compass direction.
Certain conditions can change the vehicle's magnetic field, such as installing a ski rack or CB antenna. Body repair work on the vehicle can also cause changes in the magnetic field. In these cases, the compass will need to be recalibrated to quickly correct these changes. To recalibrate the compass:
1. Press and hold the button for more than 6 seconds. When the compass memory is cleared, "C" appears on the display.
2. To calibrate the compass, drive the vehicle in 2 complete circles at a speed of less than 8 km/h.
Electrochromic Mirror with HomeLink® System (if equipped)
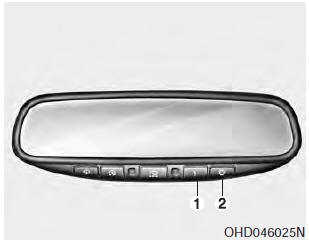
Power Mirror Control
Press button I (1) to turn on the automatic dimming function. The mirror indicator light will illuminate. Press button O (2) to turn off the automatic dimming function. The mirror indicator light will go out.
HomeLink® Wireless Control System
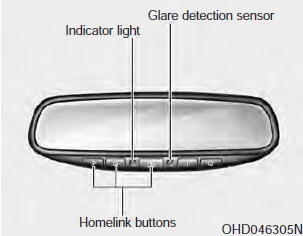
Your new mirror comes with a built-in universal HomeLink transceiver, which allows you to program the mirror to activate garage doors, gate operators, home lighting, etc. The mirror learns the codes from your existing transmitters.
WARNING
- When programming the HomeLink® wireless control system, you may be using a garage door or gate operator. Make sure people and objects are clear of the path of the moving door or gate to prevent potential injury or damage.
- Do not use HomeLink with a garage door opener that does not have the safety stop and reverse features required by federal safety standards. (This includes any garage door opener model manufactured before April 1, 1982.) A garage door opener that cannot detect an object and signal the door to stop and reverse does not meet current federal safety standards. Using a garage door opener without these features increases the risk of serious injury or death. For more information, call 1-800-355-3515 or visit www.homelink.com.
Keep the original transmitter for future programming procedures (e.g., vehicle purchase). It is also recommended that, when selling the vehicle, the programmed HomeLink buttons be erased for security reasons (perform step 1 in the "Programming" section of this text).
Programming
Your vehicle may require the ignition key to be turned to the ACC position to program and/or operate HomeLink. It is also recommended that you replace the battery in the handheld transmitter being programmed to HomeLink for faster learning and accurate radio frequency transmission.
Follow these steps to train the HomeLink mirror:
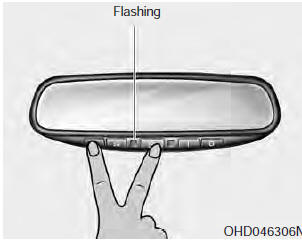
1. When programming the buttons for the first time, press and hold the left and center buttons ( ,
 ) at the same time
until the indicator begins to flash after about 20 seconds. (This procedure erases the factory default codes. Do not perform this step when programming additional HomeLink buttons.)
✽ NOTICE
For fixed-code garage door openers, perform steps 2–3. For rolling-code garage door openers, perform steps 2–6. For Canadian programming, refer to the Canadian Programming section. If you are unsure whether your garage door opener has a fixed code or rolling code, refer to the garage door opener owner's manual or contact HomeLink customer support at 1-800-355-3515.
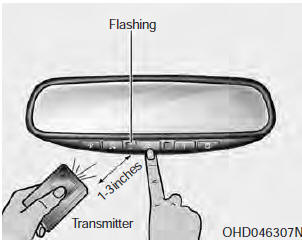
2. Press and hold the HomeLink system button you want to program on the transmitter while holding the transmitter approximately 2–8 cm (1 to 3 inches) from the mirror. Do not release the buttons until step 3 is completed.
3. The HomeLink indicator will flash slowly, then rapidly. When the indicator flashes rapidly, you may release both buttons. (The rapid flashing light indicates that the new radio frequency signal has been successfully programmed.)
✽ NOTICE
Some gate operators and garage door openers may require you to replace step 3 with the "cycling" procedure described in the Canadian Programming section of this document.
Rolling Code Programming
To train a garage door opener (or other devices equipped with rolling code) using the rolling code function, follow these instructions after completing the "Programming" section of this text. (A second person can perform the following training procedures faster and more easily.)
4. Locate the "Learn" or "Smart" button on the HomeLink unit's motor head. The exact location and color of the button may vary depending on the product brand. If you have difficulty finding the "Learn" or "Smart" button, refer to the device's owner's manual or contact HomeLink at 1-800-355-3515 or on the Internet at www.homelink.com.
5. Press and release the "Learn" or "Smart" button on the motor head of the unit. You have 30 seconds to complete step 6.
6. Return to the vehicle and firmly press and release the programmed HomeLink button up to three times. The device equipped with rolling code should now recognize the HomeLink signal and activate when the HomeLink button is pressed. The remaining two buttons can now be programmed if this has not been done previously. Refer to the "Programming" section of this text.
Operating HomeLink
To operate, simply press the programmed HomeLink button.
The trained product (garage door, security system, front door lock, estate gate, or home or office lighting) will now be activated. For convenience, the device's hand-held transmitter can also be used at any time. The HomeLink wireless control system (after programming) or the original hand-held transmitter can be used to activate the device (for example, garage door, front door lock, etc.). If you still have difficulty programming, contact HomeLink at 1-800-355-3515 or on the Internet at www.homelink.com.
Test yourself
A quick Kia Sorento Owner's Manual quiz: every answer comes with an explanation and a link to the manual page.