Crankshaft
Repair Procedures
Disassembly
Remove the engine and transmission assembly.
(See Engine and Transaxle Assembly - Engine and Transaxle Installation)
Remove the automatic transmission.
(Refer to Automatic Transmission System - Automatic Transmission)
Remove the drive plate.
(Refer to Cylinder Block - Drive Plate)
Remove the front drive shaft. (If equipped with all-wheel drive)
(Refer to Drive Shaft and Axle — "Front Propeller Shaft")
Remove the front differential assembly. (If equipped with all-wheel drive)
(Refer to Drive Shaft and Axle - Front Differential Carrier)
Remove the rear oil seal.
(Refer to Cylinder Block - Rear Oil Seal)
Install the engine assembly on an engine stand for disassembly.
Remove the intake manifold.
(See Intake and Exhaust System - Intake Manifold)
Remove the exhaust manifold.
(Refer to Intake and Exhaust System - Turbocharger and Exhaust Manifold)
Remove the timing chain.
(See Timing System - Timing Chain)
Remove the air conditioning compressor.
(See Heating, Ventilation and Air Conditioning - Compressor)
Remove the generator.
(See Engine Electrical System - "Alternator")
Remove the water temperature control assembly.
(See Cooling System - "Water Temperature Control Assembly")
Remove the cylinder head assembly.
(See Cylinder Head Assembly - Cylinder Head)
Remove the balance shaft and oil pump.
(Refer to Lubrication System - Balance Shaft and Oil Pump)
Remove the ladder frame.
(Refer to Cylinder Block - Cylinder Block)
Check the connecting rod side clearance.
Remove the piston and connecting rod assembly.
(Refer to Cylinder Block - Piston and Connecting Rod)
Remove the main bearing cap and check the oil clearance.
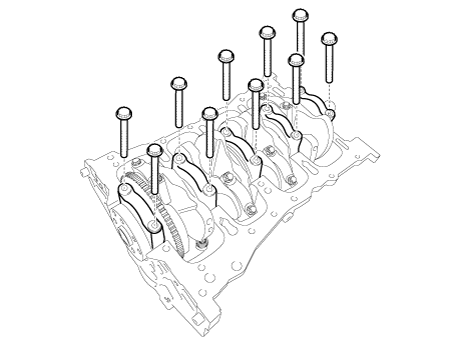
Check the crankshaft end play.
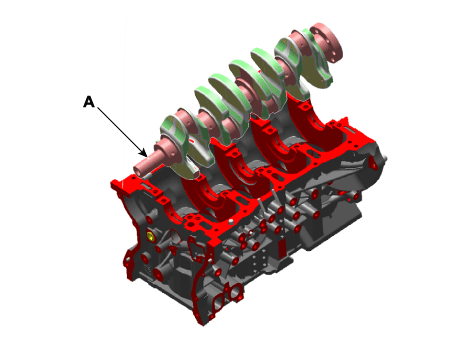
Lift the crankshaft (A) out of the engine, taking care not to damage the journals.
Inspection
Check the crankshaft bearing oil clearance.
To check the oil clearance between the main bearing and journal, remove the main bearing caps and bearing halves.
Clean each main journal and bearing half with a clean shop towel.
Place one strip of Plastigage on each main journal.
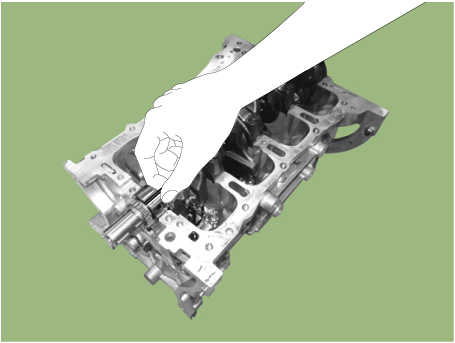
Install the bearings and caps, then tighten the bolts.
Tightening torque:
14.7 N·m + 27,5–31 N·m + 120–125°
Remove the cap and bearing again and measure the widest part of the Plastigage.
Standard oil clearance: 0.020–0.038 mm (0.00079–0.00150 in.)
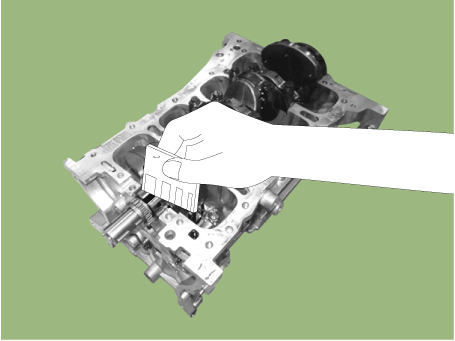
If the Plastigage is too wide or too narrow, remove the upper bearing half, install a new bearing assembly with the same color code (select the color as shown in the following column), and re-check the clearance.
If the Plastigage shows the clearance is still incorrect, try the next larger or smaller bearing (the color above or below the one specified) and recheck the clearance.
Crankshaft main journal bore identification mark
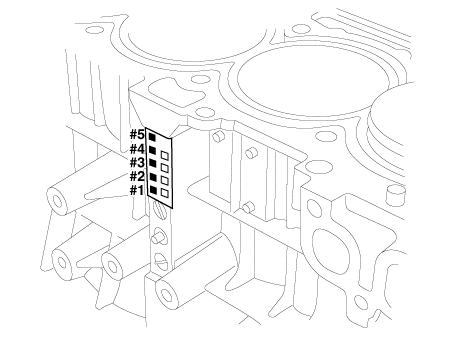
Letters are stamped on the block to indicate the size grade of each of the 5 main bearing bores.
Use these letters, together with the numbers or bar stamped on the crankshaft (main journal size marks), to select the correct bearings.
Cylinder Block Specifications
Grade Mark Inner Diameter a A 56.000 - 56.006 mm
(2.20472 - 2.20496 in.)D B 56.006 - 56.012 mm
(2.20496 - 2.20519 in.)c C 56.012 - 56.018 mm
(2.20519 - 2.20543 in.)
Crankshaft journal identification mark
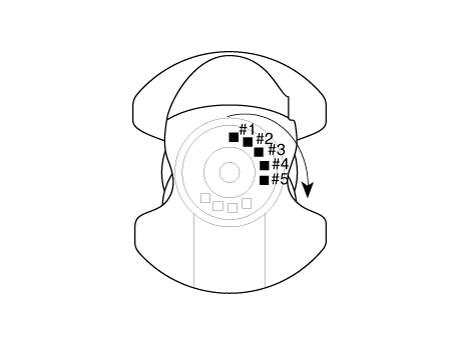
Crankshaft Specifications
Grade Mark Journal Outside Diameter I 1 51.954 - 51.960 mm
(2.04543 - 2.04567 in.)II 2 51.948 - 51.954 mm
(2.04519 - 2.04543 in.)III 3 51.942 - 51.948 mm
(2.04496 - 2.04519 in.)
Crankshaft bearing marking
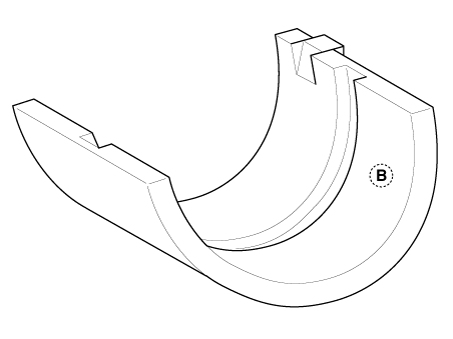
Crankshaft bearing specifications
Grade Mark Bearing Thickness AA Blue 2.026 - 2.029 mm
(0.07976–0.07988 in.)A Black 2.023 - 2.026 mm
(0.07965–0.07976 in.)B None 2.020 - 2.023 mm
(0.07953–0.07965 in.)C Green 2.017 - 2.020 mm
(0.07941–0.07953 in.)D Yellow 2.014 - 2.017 mm
(0.07929–0.07941 in.)
Crankshaft Bearing Selection Table
Crankshaft Marking Crankshaft Bore Identification Mark Bearing Classification Assembly I (1) A (A) D (yellow) B (B) C (green) C (C) B (none) II (2) A (A) C (green) B (B) B (none) C (C) A (black) III (3) A (A) B (none) B (B) A (black) C (C) AA (blue) Check the crankshaft end play.
Using a dial indicator, measure the crankshaft thrust clearance by prying the crankshaft forward and rearward with a screwdriver.
End of Playback
Standard: 0.07–0.25 mm (0.0028–0.0098 in.)
Limit: 0.30 mm (0.0118 in.)
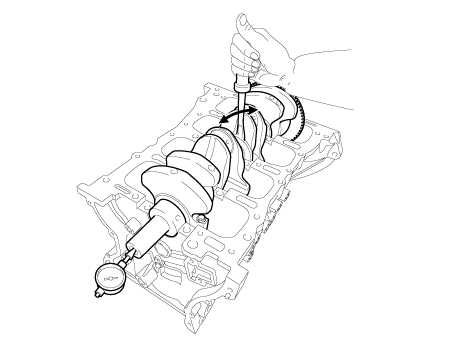
If the end play is greater than the maximum, replace the thrust bearings as a set.
Thrust bearing thickness: 1.925–1.965 mm (0.07579–0.07736 in.)
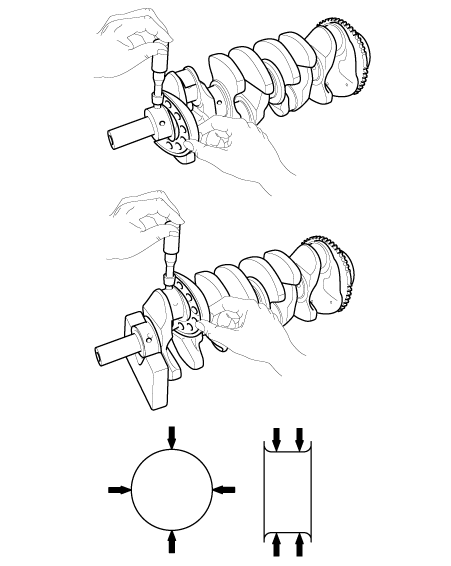
Inspect the main journals and crankpins.
Using a micrometer, measure the diameter of each main journal and crankpin.
Main journal diameter:
51.942–51.960 mm (2.04496–2.04567 in)
Crankpin diameter:
47.954–47.972 mm (1.88795–1.88866 in)
Installation
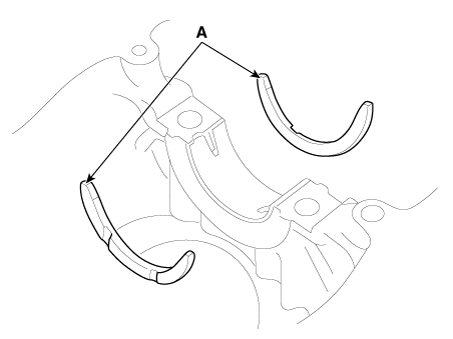
Install the main bearings.
Align the bearing tab with the tab groove of the cylinder block, then install the 5 upper bearings (A).

Align the bearing tab with the tab groove in the main bearing cap, then install the 5 lower bearings.
Install the thrust bearings.
Install the 2 thrust bearings (A) under the No. 3 journal of the cylinder block with the oil grooves facing outward.
Install the crankshaft (A) on the cylinder block.
Install the main bearing caps on the cylinder block.
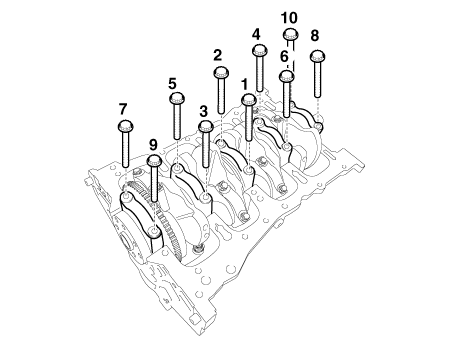
Install the main bearing cap bolts.
Apply a thin coat of engine oil to the threads and under the head of the bearing cap bolts.
Install and evenly tighten the 10 bearing cap bolts in several passes, in the specified sequence.
Tightening torque:
14.7 N·m + 27,5–31 N·m + 120–125°
Make sure the crankshaft rotates smoothly.
Check the crankshaft end play.
Assemble the remaining components in the reverse order of removal.
Test yourself
A quick Kia Stinger CK quiz: every answer comes with an explanation and a link to the manual page.