Front strut assembly
Components and Component Location
Components

| 1. Shock Absorber 2. Spring Lower Pad 3. Coil Spring 4. Dust Cover 5. Bump Stopper |
6. Spring Upper Cover 7. Strut Bearing 8. Insulator Assembly 9. Lock Nut |
Repair Procedures
Removal
[2WD]
Remove the wheel nuts, then remove the front wheel and tire (A) from the hub.
Tightening torque: 107.9–128 N·m

Remove the front wheel guard.

Remove the front stabilizer bar.
(See Suspension System - Front Stabilizer Bar)
Remove the engine room side cover.
D 2.2 R VGT (See Engine Mechanical System - Under Engine Room Cover)
G 2.0 T-GDI THETA II (See Engine Mechanical System - Engine Room). Under Cover")
G 3.3 T-GDI LAMBDA II (See Engine Mechanical System - Engine Room). Under Cover")
Loosen the lower arm pin (A) and nut (B).
Tightening torque: 88.3–108 N·m

Loosen the compression arm pin (A) and nut (B).
Tightening torque: 88.3–108 N·m

Loosen the bolt and nut of the compression arm on the subframe.
Tightening torque: 156.9–176 N·m

Disconnect the wheel speed sensor connector.

Remove the lower arm using a ball joint remover (A).

Remove the compression arm using a ball joint remover (A).

Remove the brake caliper.
(See Brake System - Front Disc Brake)
Remove the tie rod end nut.
Tightening torque: 88.3–108 N·m

Remove the steering knuckle using a ball joint remover (A).
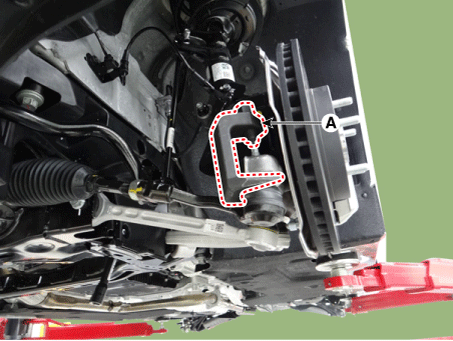
Loosen the wheel speed sensor bracket bolt and remove the wheel speed sensor bracket.
Tightening torque: 6.9–10.8 N·m

Loosen the brake hose bracket bolt from the caliper.
Tightening torque: 6.9–10.8 N·m

Loosen the steering knuckle upper bolt and nut.
Tightening torque: 78.5–98 N·m

Remove the steering knuckle using SST (0K517-J5100).
Reference value: less than 8.0 mm (0.31 in.)

Loosen the upper nuts of the shock absorber and remove the shock absorber.
Tightening torque: 63.7–78 N·m

Install in the reverse order of removal.
Inspect the front wheel alignment.
(See Suspension System - Alignment)
[AWD]
Remove the wheel nuts, front wheel and tire (A) from the front hub.
Tightening torque: 107.9–128 N·m
Remove the brake caliper.
(See Brake System - Front Disc Brake)
Loosen the nut and separate the stabilizer link from the front shock absorber.
Tightening torque: 98.1–118 N·m

Loosen the lower arm pin (A) and nut (B).
Tightening torque: 88.3–108 N·m

Remove the lower arm using a ball joint remover (A).

Loosen the compression arm pin (A) and nut (B).
Tightening torque: 88.3–108 N·m
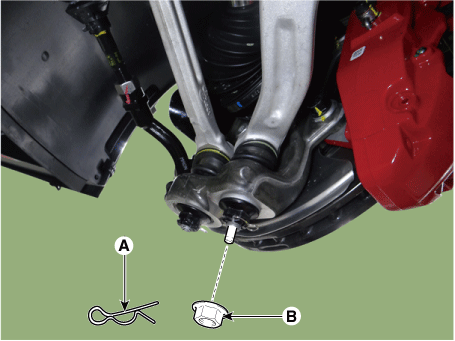
Remove the compression arm using a ball joint remover (A).

Remove the tie rod end nut.
Tightening torque: 88.3–108 N·m
Remove the steering knuckle using a ball joint remover (A).
Remove the brake hose bracket (A).
Tightening torque: 6.9–10.8 N·m

Unstake the drive shaft hub nut lock by tapping a chisel with a hammer.

Loosen the staked nut (A) and separate the hub assembly from the drive shaft.
Tightening torque: 294.2–314 N·m

Loosen the wheel speed sensor mounting bolt (A) and disconnect the wheel speed sensor.
Tightening torque: 6.9–10.8 N·m

Remove the brake cooling shroud (A).
Tightening torque: 7.8 – 11.8 N·m

Remove the wheel speed sensor bracket (A).
Tightening torque: 6.9–10.8 N·m

Loosen the steering knuckle upper bolt and nut.
Tightening torque: 78.5–98 N·m
Remove the steering knuckle using SST (0K517-J5100).
Reference value: less than 8.0 mm (0.31 in.)
Loosen the upper nuts of the shock absorber and remove the shock absorber.
Tightening torque: 63.7–78 N·m
Install in the reverse order of removal.
Inspect the front wheel alignment.
(See Suspension System - Alignment)
Disassembly
Remove the front shock absorber cover.
Compress the coil spring (A) using the strut spring compressor. Do not compress the spring excessively.

Using SST (0K546-F6100), loosen the lock nut.
Tightening torque: 117.7–128 N·m

Gradually turn the bolt on the spring compressor to slowly release the tension from the spring. Then disconnect the components.
Install in the reverse order of removal.
Inspection
Inspect the strut insulator for wear or damage.
Inspect the rubber components for damage or wear.
Compress and extend the piston rod and make sure there is no abnormal resistance or unusual noise during operation.
Test yourself
A quick Kia Stinger CK quiz: every answer comes with an explanation and a link to the manual page.