Electrical System
Audio unit
In this manual: Electrical System
8steps
~48min
3/5difficulty
Done 0 of 8
Components and Components Location
COMPONENTS LOCATION
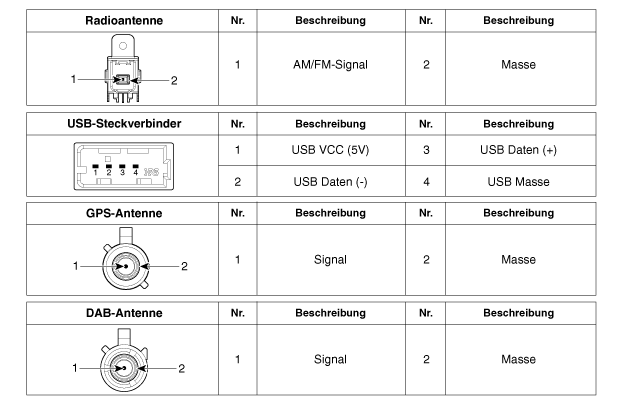
[Radio/Bluetooth/MP3 (Type A)]

CONNECTOR PIN ASSIGNMENT
| No. | CONNECTOR A | PLUG B |
| 1 | Speaker (-) rear left door | - |
| 2 | Speaker (-) rear left door | MIC (-) |
| 3 | - | - |
| 4 | - | - |
| 5 | - | Antenna current |
| 6 | Camera current | Illumination Lamps (-) |
| 7 | Video camera | Multimedia CAN (High) |
| 8th | - | - |
| 9 | - | ALT output signal left (+) |
| 10 | AUX audio, right input | Battery (+) |
| 11 | AUX Detection | Battery (+) |
| 12 | Steering Wheel Remote Control | Dimensions |
| 13 | Speaker (-) left front door | Dimensions |
| 14 | Speaker (-) left front door | Microphone (ground) |
| 15 | Speaker (+) right front door | MIC (-) |
| 16 | Speaker (+) right front door | - |
| 17 | - | - |
| 18 | - | - |
| 19 | - | Illumination Lamps (-) |
| 20 | Ground camera shield | Multimedia CAN (Low) |
| 21 | Video camera ground | - |
| 22 | - | Battery |
| 23 | - | - |
| 24 | AUX audio, left input | - |
| 25 | AUX audio ground | Reverse gear |
| 26 | Steering wheel remote control (ground) | Door Open |
| 27 | Speaker (+) right rear door | Door unlock |
| 28 | Speaker (+) right rear door | Parking Brake |
| 29 | - | P Position |
| 30 | - | AV Tail Light |
| 31 | - | - |
| 32 | RVM Camera: - | - |
| Without RVM camera: Ground | ||
| 33 | - | IGN1 |
| 34 | - | - |
| 35 | - | - |
| 36 | - | |
| 37 | - | |
| 38 | Vehicle speed |
[Radio/Bluetooth/MP3 (Type B)]
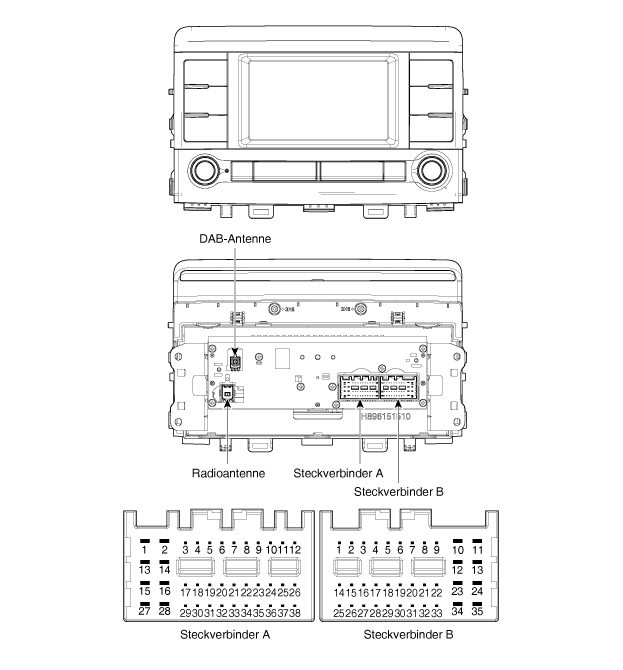
CONNECTOR PIN ASSIGNMENT
| No. | CONNECTOR A | PLUG B |
| 1 | Speaker (-) rear left door | - |
| 2 | Speaker (-) rear left door | MIC (-) |
| 3 | USB ground | - |
| 4 | USB Data (-) | - |
| 5 | USB Data (-) | REMOTE CONTROL / ANTENNA |
| 6 | USB power supply | Illumination Lamps (-) |
| 7 | Camera VIN code | - |
| 8th | - | - |
| 9 | - | - |
| 10 | AUX input right | Battery (+) |
| 11 | AUX Detection | Battery (+) |
| 12 | Steering Wheel Remote Control | Dimensions |
| 13 | Speaker (-) left front door | Dimensions |
| 14 | Speaker (-) left front door | - |
| 15 | Speaker (+) right front door | MIC (-) |
| 16 | Speaker (+) right front door | - |
| 17 | - | - |
| 18 | - | Vehicle speed |
| 19 | - | Illumination Lamps (-) |
| 20 | Camera current | - |
| 21 | Camera VIN ground | - |
| 22 | - | Battery |
| 23 | - | - |
| 24 | AUX input left | - |
| 25 | Auxiliary Ground | Reverse gear |
| 26 | Steering wheel remote control (ground) | Door Open |
| 27 | Speaker (+) right rear door | - |
| 28 | Speaker (+) right rear door | Parking Brake |
| 29 | - | P Position |
| 30 | - | Vehicle light |
| 31 | - | - |
| 32 | Camera ground | IGN1 |
| 33 | Camera VIN screen | - |
| 34 | - | - |
| 35 | - | - |
| 36 | Camera bracket | |
| 37 | - | |
| 38 | - |
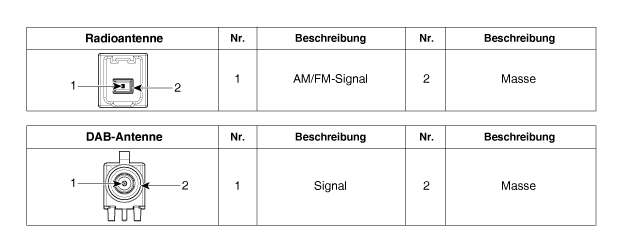
repair procedures
expansion
Disconnect the battery ground cable.
Remove the center console duct.
(Refer to Body - "Center Console Panel")
Loosen the mounting screws, then remove the audio head unit (A).
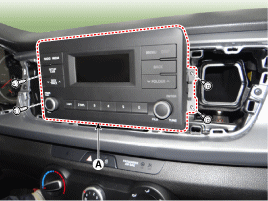
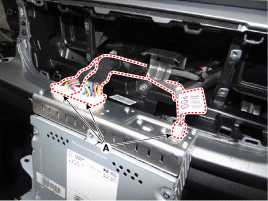
Remove the audio head unit after disconnecting the connector and antenna cable (A).
Installation
Connect the audio head unit connectors and antenna cable.
Install the audio head unit.
Install the center console duct.
Connect the negative (-) battery terminal.
Test yourself
A quick Kia Stonic quiz: every answer comes with an explanation and a link to the manual page.
Was this page helpful?