Pre-driving checks and adjustments - Fuel-filler door

In this manual: Pre-driving checks and adjustments - Fuel-filler door
Air bags, seat belts and child restraints — 1Exterior front — 1Exterior rear — 1Passenger compartment — 1Instrument panel — 1Engine compartment check locations — 1Warning and indicator lights — 1Basic Information — 1Basic Information — 1Precautions on Seat Belt Usage — 1Safety - Seats, Seat Belts and Supplemental Restraint System - Child safety — 1Precautions on child restraints — 1Precautions on SRS — 1Instruments and Controls - Instrument Panel — 1Basic Information — 1Warning & Indicator Lights — 1Basic Information — 1Instruments and Controls - Security Systems — 1Instruments and Controls - Wiper and Washer Switch — 1Headlight Control Switch — 1Instruments and Controls - Horn — 1Instruments and Controls - Heated Seat Switches — 1Instruments and Controls - Heated Steering Wheel Switch — 1Instruments and Controls - Vehicle Dynamic Control (VDC) OFF Switch — 1Instruments and Controls - Hill Descent Control Switch — 1Instruments and Controls - Warning systems switch — 1Instruments and Controls - Electronic locking rear differential (E-Lock) system switch — 1Instruments and Controls - Power inverter switch — 1Instruments and Controls - Parking Aids system switch — 1Instruments and Controls - Tow mode switch — 1Instruments and Controls - Emergency Call (SOS) button — 1Instruments and Controls - USB charging ports — 1Instruments and Controls - Wireless charger — 1Instruments and Controls - Rear Door Alert — 1Instruments and Controls - Power outlets — 1Instruments and Controls - Extended storage switch — 1Front-door pockets — 1Instruments and Controls - Windows — 1Instruments and Controls - Moonroof — 1Instruments and Controls - Interior lights — 1Instruments and Controls - HomeLink Universal Transceiver — 1Pre-driving checks and adjustments - Keys — 1Basic information — 1Basic information — 1Basic information — 1Pre-driving checks and adjustments - Hood — 1Pre-driving checks and adjustments - Fuel-filler door — 1Pre-driving checks and adjustments - Steering wheel — 1Pre-driving checks and adjustments - Sun visors — 1Pre-driving checks and adjustments - Mirrors — 1Pre-driving checks and adjustments - Truck box — 1Monitor, climate, audio, phone and voice recognition systems - NissanConnect Owner's Manual — 1Monitor, climate, audio, phone and voice recognition systems - Safety Note — 1Basic Information — 1Basic Information — 1Basic Information — 1Basic Information — 1Basic Information — 1Monitor, climate, audio, phone and voice recognition systems - Servicing air conditioner — 1Monitor, climate, audio, phone and voice recognition systems - Car phone or CB radio — 1Basic Information — 1Basic Information — 1Starting and driving - Starting the engine — 1Engine protection mode — 1Starting and driving - Parking brake — 1Starting and driving - Terrain Mode Selector — 1Starting and driving - Traffic Sign Recognition (TSR) — 1Basic Information — 1Basic Information — 1Basic Information — 1Basic Information — 1Basic Information — 1Basic Information — 1Basic Information — 1Basic Information — 1Starting and driving - Intelligent Driver Alertness (I-DA) — 1Starting and driving - Break-in schedule — 1Starting and driving - Using 4-Wheel Drive (4WD) — 1Starting and driving - Electronic locking rear differential (E-Lock) system — 1Starting and driving - Parking/parking on hills — 1Starting and driving - Brake system — 1Starting and driving - Active Brake Limited Slip (ABLS) system — 1Starting and driving - Vehicle Dynamic Control (VDC) system — 1Starting and driving - Hill descent control system — 1Starting and driving - Hill start assist system — 1Basic Information — 1Basic Information — 1Starting and driving - Cold weather driving — 1In case of emergency - Hazard warning flasher switch — 1In case of emergency - Flat tire — 1In case of emergency - Jump starting — 1In case of emergency - If your vehicle overheats — 1In case of emergency - Towing your vehicle — 1Appearance and care - Cleaning exterior — 1Appearance and care - Cleaning interior — 1Appearance and care - Corrosion protection — 1Do-it-yourself - Maintenance precautions — 1Do-it-yourself - Engine compartment check locations — 1Basic information — 1Checking engine oil level — 1Do-it-yourself - Automatic Transmission Fluid (ATF) — 1Do-it-yourself - Brake fluid — 1Do-it-yourself - Windshield-washer fluid — 1Do-it-yourself - Battery — 1Do-it-yourself - Variable voltage control system — 1Do-it-yourself - Drive belt — 1Do-it-yourself - Spark plugs — 1Do-it-yourself - Air cleaner — 1Do-it-yourself - Windshield wiper blades — 1Do-it-yourself - Brakes — 1Do-it-yourself - Fuses — 1Do-it-yourself - Intelligent Key battery replacement — 1Do-it-yourself - Lights — 1Tire pressure — 1Maintenance and schedules — 5Technical and consumer information — 14
~4min read

Fuel-filler cap

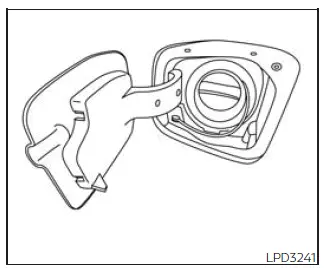
Nissan Frontier fuel filler door and fuel cap location

Basic information

WARNING

  • Gasoline is highly flammable and can become extremely explosive under certain conditions.

    Improper handling of fuel may result in severe burns, serious injury, or significant property damage.

    Always stop the Nissan Frontier engine before refueling, and never smoke or allow sparks, open flames, or ignition sources near the vehicle during the refueling process.

  • Do not continue adding fuel after the fuel pump automatically shuts off. Attempting to top off the fuel tank may cause fuel overflow, fuel spray, or vapor release, increasing the risk of fire or injury.
  • Always replace the fuel-filler cap with an original-equipment type cap specifically designed for the Nissan Frontier. The cap contains an integrated safety valve required for proper fuel-system operation and emissions control. Using an incorrect cap may cause system malfunctions, trigger warning lights, and potentially result in injury. It could also cause the Nissan Frontier malfunction indicator light icon Malfunction Indicator Light (MIL) to illuminate.
  • Never attempt to start the Nissan Frontier by pouring fuel directly into the throttle body or intake system.
  • Do not fill portable fuel containers while they are inside a vehicle or trailer. Static electricity can ignite fuel vapors and create an explosion hazard. To help reduce the risk of injury or death:
    • Always place portable fuel containers on the ground before filling them.
    • Avoid using mobile phones or other electronic devices while refueling.

CAUTION

  • Do not use fuel containing more than 15% ethanol in your Nissan Frontier. Fuels exceeding this concentration may negatively affect engine performance and fuel-system components.
  • The LOOSE FUEL CAP warning message may appear in the vehicle information display if the fuel-filler cap is not tightened correctly after refueling. The warning may not appear immediately and can require several driving cycles before being displayed. Failure to properly tighten the fuel cap after receiving the warning may cause the Nissan Frontier malfunction indicator light warning Malfunction Indicator Light (MIL) to illuminate.
  • Improperly tightening the fuel-filler cap may also cause the Nissan Frontier check engine indicator Malfunction Indicator Light (MIL) to come on.

    If the Nissan Frontier malfunction indicator light light illuminates because the fuel-filler cap is loose or missing, install or tighten the cap and continue driving the Nissan Frontier normally. The Nissan Frontier warning light reset indicator light should turn off after several driving trips. If the Nissan Frontier check engine light light remains illuminated, have the vehicle inspected. It is recommended that you visit an authorized NISSAN dealer for diagnosis and service.

  • If fuel is spilled onto the painted surfaces of the Nissan Frontier, immediately rinse the affected area with water to help prevent paint damage or discoloration.
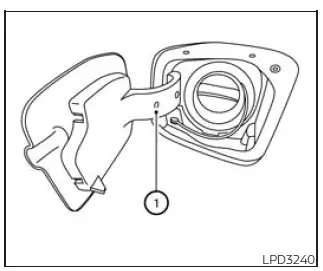
Nissan Frontier fuel filler cap removal and tether strap hook

To remove the fuel-filler cap:

1. Turn the fuel-filler cap counterclockwise until it can be removed from the filler neck.

2. During refueling, loop the tether strap around the retaining hook 1 to keep the cap secure and prevent contamination.

To install the fuel-filler cap:

1. Insert the fuel-filler cap straight into the fuel-filler tube.

2. Turn the fuel-filler cap clockwise until a single click is heard, confirming proper installation.

Correct installation of the fuel cap helps maintain proper fuel-system pressure and ensures accurate operation of the Nissan Frontier emissions-control system.

Nissan Frontier loose fuel cap warning display

Loose Fuel Cap warning

The Loose Fuel Cap warning message appears in the Nissan Frontier vehicle information display whenever the fuel-filler cap is not properly tightened following a refueling event. In some cases, several driving cycles may be required before the message appears.

To clear the warning message, perform the following procedure:

1. Remove and reinstall the fuel-filler cap according to the instructions provided above as soon as possible.

2. Tighten the fuel-filler cap until a single click is heard.

After several normal driving trips, the Nissan Frontier system should automatically clear the warning message if the cap has been installed correctly and no fuel-system faults are present.

next pagenext pageHoodSteering wheelnext pagenext page

Nissan Frontier 2022-2026 Owner's Manual

More Nissan Vehicles

More Nissan Manuals

More Owner's Manuals

© 2023-2026 - Nissan Frontier technical manuals - www.nifrontier.com/