Basic Information

In this manual: Basic Information
Air bags, seat belts and child restraints — 1Exterior front — 1Exterior rear — 1Passenger compartment — 1Instrument panel — 1Engine compartment check locations — 1Warning and indicator lights — 1Basic Information — 1Basic Information — 1Precautions on Seat Belt Usage — 1Safety - Seats, Seat Belts and Supplemental Restraint System - Child safety — 1Precautions on child restraints — 1Precautions on SRS — 1Instruments and Controls - Instrument Panel — 1Basic Information — 1Warning & Indicator Lights — 1Basic Information — 1Instruments and Controls - Security Systems — 1Instruments and Controls - Wiper and Washer Switch — 1Headlight Control Switch — 1Instruments and Controls - Horn — 1Instruments and Controls - Heated Seat Switches — 1Instruments and Controls - Heated Steering Wheel Switch — 1Instruments and Controls - Vehicle Dynamic Control (VDC) OFF Switch — 1Instruments and Controls - Hill Descent Control Switch — 1Instruments and Controls - Warning systems switch — 1Instruments and Controls - Electronic locking rear differential (E-Lock) system switch — 1Instruments and Controls - Power inverter switch — 1Instruments and Controls - Parking Aids system switch — 1Instruments and Controls - Tow mode switch — 1Instruments and Controls - Emergency Call (SOS) button — 1Instruments and Controls - USB charging ports — 1Instruments and Controls - Wireless charger — 1Instruments and Controls - Rear Door Alert — 1Instruments and Controls - Power outlets — 1Instruments and Controls - Extended storage switch — 1Front-door pockets — 1Instruments and Controls - Windows — 1Instruments and Controls - Moonroof — 1Instruments and Controls - Interior lights — 1Instruments and Controls - HomeLink Universal Transceiver — 1Pre-driving checks and adjustments - Keys — 1Basic information — 1Basic information — 1Basic information — 1Pre-driving checks and adjustments - Hood — 1Pre-driving checks and adjustments - Fuel-filler door — 1Pre-driving checks and adjustments - Steering wheel — 1Pre-driving checks and adjustments - Sun visors — 1Pre-driving checks and adjustments - Mirrors — 1Pre-driving checks and adjustments - Truck box — 1Monitor, climate, audio, phone and voice recognition systems - NissanConnect Owner's Manual — 1Monitor, climate, audio, phone and voice recognition systems - Safety Note — 1Basic Information — 1Basic Information — 1Basic Information — 1Basic Information — 1Basic Information — 1Monitor, climate, audio, phone and voice recognition systems - Servicing air conditioner — 1Monitor, climate, audio, phone and voice recognition systems - Car phone or CB radio — 1Basic Information — 1Basic Information — 1Starting and driving - Starting the engine — 1Engine protection mode — 1Starting and driving - Parking brake — 1Starting and driving - Terrain Mode Selector — 1Starting and driving - Traffic Sign Recognition (TSR) — 1Basic Information — 1Basic Information — 1Basic Information — 1Basic Information — 1Basic Information — 1Basic Information — 1Basic Information — 1Basic Information — 1Starting and driving - Intelligent Driver Alertness (I-DA) — 1Starting and driving - Break-in schedule — 1Starting and driving - Using 4-Wheel Drive (4WD) — 1Starting and driving - Electronic locking rear differential (E-Lock) system — 1Starting and driving - Parking/parking on hills — 1Starting and driving - Brake system — 1Starting and driving - Active Brake Limited Slip (ABLS) system — 1Starting and driving - Vehicle Dynamic Control (VDC) system — 1Starting and driving - Hill descent control system — 1Starting and driving - Hill start assist system — 1Basic Information — 1Basic Information — 1Starting and driving - Cold weather driving — 1In case of emergency - Hazard warning flasher switch — 1In case of emergency - Flat tire — 1In case of emergency - Jump starting — 1In case of emergency - If your vehicle overheats — 1In case of emergency - Towing your vehicle — 1Appearance and care - Cleaning exterior — 1Appearance and care - Cleaning interior — 1Appearance and care - Corrosion protection — 1Do-it-yourself - Maintenance precautions — 1Do-it-yourself - Engine compartment check locations — 1Basic information — 1Checking engine oil level — 1Do-it-yourself - Automatic Transmission Fluid (ATF) — 1Do-it-yourself - Brake fluid — 1Do-it-yourself - Windshield-washer fluid — 1Do-it-yourself - Battery — 1Do-it-yourself - Variable voltage control system — 1Do-it-yourself - Drive belt — 1Do-it-yourself - Spark plugs — 1Do-it-yourself - Air cleaner — 1Do-it-yourself - Windshield wiper blades — 1Do-it-yourself - Brakes — 1Do-it-yourself - Fuses — 1Do-it-yourself - Intelligent Key battery replacement — 1Do-it-yourself - Lights — 1Tire pressure — 1Maintenance and schedules — 5Technical and consumer information — 14
8steps
~48min
2/5difficulty
Done 0 of 8

Basic Information Nissan Frontier SUV

WARNING

Head restraints and headrests are designed to work together with the other safety systems in your Nissan Frontier. They provide additional support for the head and neck and can help reduce the risk of injury during certain rear-end collisions and other impact situations.

Adjustable head restraints/headrests must always be positioned correctly according to the recommendations in this section. Verify the adjustment whenever another person has used the seat. Never attach accessories, clothing, or other objects to the head restraint/headrest supports, and do not remove the head restraint/headrest unless necessary. Operating the Nissan Frontier without properly installed and adjusted head restraints/headrests may reduce occupant protection and increase the risk of serious injury or death during a collision. If a head restraint/headrest has been removed, it must be reinstalled and adjusted correctly before the seating position is occupied.
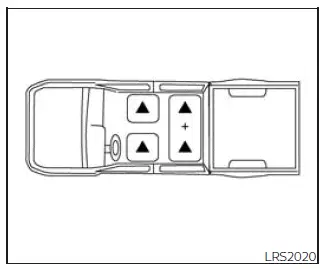
Nissan Frontier Crew Cab head restraint seating positions
Crew Cab

Nissan Frontier King Cab head restraint seating positions
King Cab

The illustrations above identify the seating positions in the Nissan Frontier that are equipped with head restraints or headrests. Understanding these seating configurations helps ensure that every occupant benefits from the intended safety features.

Nissan Frontier head restraint symbol Indicates that the seating position is equipped with a head restraint.

Nissan Frontier headrest symbol Indicates that the seating position is equipped with a headrest.

+ Indicates that the seating position is not equipped with a head restraint or headrest (if applicable).

  • Your Nissan Frontier may be equipped with integrated, adjustable, or non-adjustable head restraints/headrests depending on the seating position and vehicle configuration.
  • Adjustable head restraints/headrests feature multiple locking notches along the support stalks, allowing precise positioning for improved comfort and protection.
  • Non-adjustable head restraints/headrests utilize a single locking notch that secures the component to the seat structure.
  • Proper Adjustment:
    • For adjustable designs, position the center of the head restraint/headrest approximately level with the center of your ears.
    • If your ears remain above the recommended alignment point, raise the head restraint/headrest to its highest available position.
  • If a head restraint/headrest has been removed from the Nissan Frontier, ensure it is fully reinstalled and securely locked before anyone occupies that seating position.

Correctly adjusted head restraints/headrests are an important part of the overall occupant protection system and can significantly improve comfort during long journeys.

Adjustable Head Restraint/Headrest Components Nissan Frontier 2022
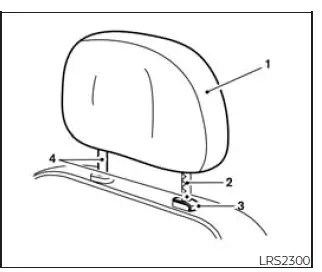
Nissan Frontier adjustable head restraint components
  1. Removable head restraint/headrest
  2. Multiple adjustment notches
  3. Lock knob
  4. Support stalks

Non-adjustable Head Restraint/Headrest Components
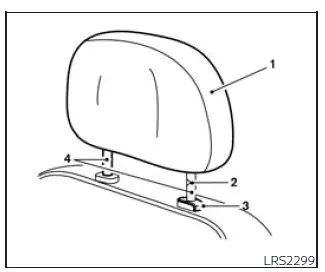
Nissan Frontier non adjustable head restraint components
  1. Removable head restraint/headrest
  2. Single locking notch
  3. Lock knob
  4. Support stalks

Remove

Nissan Frontier head restraint removal procedure

Use the following procedure to remove the head restraint/headrest from your Nissan Frontier:

1. Raise the head restraint/headrest to its highest available position.

2. Press and hold the lock knob.

3. Carefully lift the head restraint/headrest out of the seat.

4. Store the removed component securely so that it cannot move freely inside the vehicle during driving.

5. Before the seating position is used again, reinstall and properly adjust the head restraint/headrest.

Always handle removed safety components carefully to avoid damage and maintain proper operation.

Install
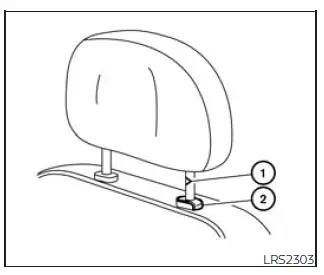
Nissan Frontier head restraint installation procedure

1. Align the head restraint/headrest stalks with the openings in the seat. Ensure the head restraint/headrest is facing the correct direction. The stalk containing the notch or notches 1 must be inserted into the opening equipped with the lock knob 2.

2. Press and hold the lock knob while pushing the head restraint/headrest downward into the seat.

3. Adjust the head restraint/headrest correctly before the seating position is occupied.

Proper installation helps ensure that the Nissan Frontier safety system functions as intended during everyday driving and unexpected impact situations.

Adjust
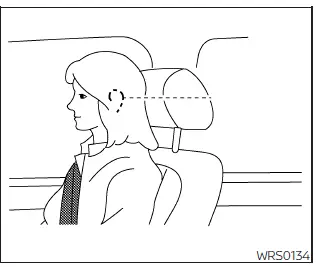
Nissan Frontier adjustable head restraint positioning

Basic Information

For adjustable head restraints/headrests:

Position the head restraint/headrest so that its center aligns approximately with the center of your ears. If your ears remain above the recommended alignment point, raise the head restraint/headrest to the highest available setting.

Proper positioning helps maximize the effectiveness of the Nissan Frontier occupant protection system while also improving comfort.
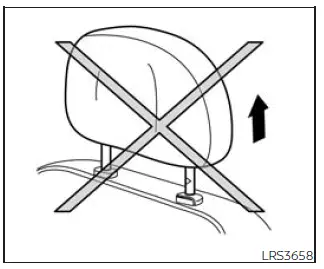
Nissan Frontier non adjustable head restraint positioning

For non-adjustable head restraints/headrests:

Verify that the lock knob is fully engaged in the locking notch before using the seating position.

Always confirm that the component is securely locked and cannot move unexpectedly.
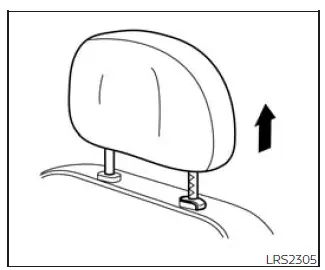
Nissan Frontier raising head restraint

Raise

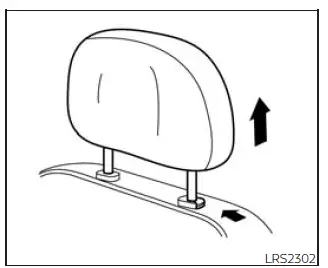
To raise the head restraint/headrest, simply pull it upward until the desired position is reached.

Make sure the locking mechanism engages properly before operating the Nissan Frontier.

Correct height adjustment helps provide improved support for the head and neck area.
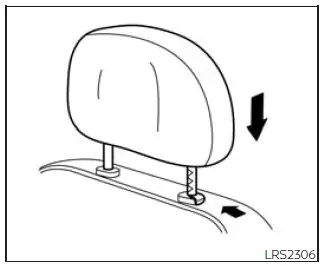
Nissan Frontier lowering head restraint

Lower

To lower the head restraint/headrest, press and hold the lock knob while pushing the assembly downward.

After adjustment, verify that the lock knob is securely engaged in the selected notch.

Regularly checking head restraint/headrest positioning helps ensure that every Nissan Frontier occupant benefits from the highest possible level of comfort and safety.

next pagenext pageSeatsSeat Beltsnext pagenext page

Nissan Frontier 2022-2026 Owner's Manual

Head Restraints/Headrests

More Nissan Vehicles

More Nissan Manuals

More Owner's Manuals

© 2023-2026 - Nissan Frontier technical manuals - www.nifrontier.com/