Basic Information
Basic Information Nissan Frontier SUV
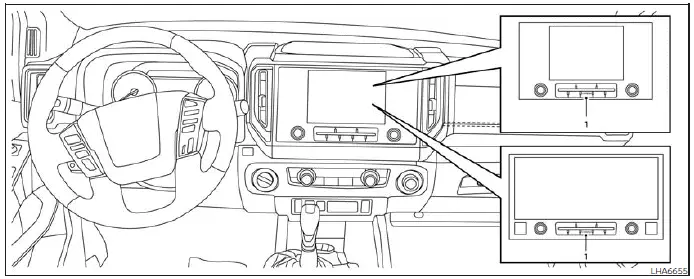
- CAMERA button
WARNING
- Failure to follow all instructions and warnings related to the Nissan Frontier RearView Monitor system may result in serious injury or death.
- The RearView Monitor is intended as a driver-assistance feature only and is not a replacement for safe driving practices. Always look around the vehicle, check all mirrors, and verify that the area behind the Nissan Frontier is clear before backing up. Always reverse slowly and cautiously.
- The Nissan Frontier RearView Monitor is designed primarily to assist in detecting larger stationary objects located directly behind the vehicle and to help reduce the likelihood of vehicle damage while reversing.
- The displayed distance guidelines and vehicle-width markers should be used for reference purposes only and are most accurate when the Nissan Frontier is parked on a level, paved surface. Actual distances may differ from those shown on the display screen.
CAUTION
When removing dirt, mud, snow, ice, or debris from the rear camera area, avoid scratching or damaging the camera lens. A damaged lens may reduce image quality and affect RearView Monitor performance.
The Nissan Frontier RearView Monitor automatically displays a rear-facing image whenever the transmission is shifted into the R (Reverse) position.
While the Nissan Frontier remains in Reverse, pressing the CAMERA button allows the driver to cycle through available guideline display options, depending on vehicle equipment.
The audio system, radio, media playback, and connected audio sources continue operating normally while the RearView Monitor is active.
The Nissan Frontier RearView Monitor provides additional confidence during parking and reversing maneuvers, but drivers should always rely on direct observation and safe driving practices as their primary source of information.
RearView Monitor system operation Nissan Frontier 3rd Gen
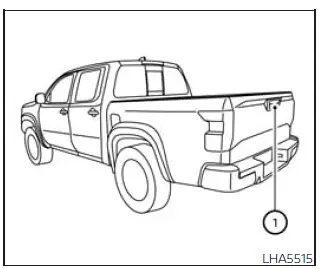
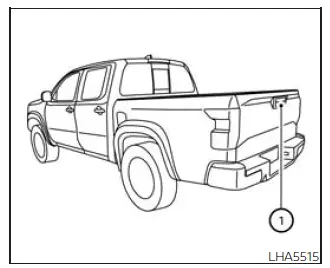
The Nissan Frontier RearView Monitor system uses a rear-mounted camera positioned directly above the vehicle's license plate 1 on the tailgate. This camera captures a live image of the area behind the vehicle and displays it on the center screen to assist the driver during reversing and parking maneuvers.
The system is designed to improve rearward visibility and help drivers identify obstacles, parking-space boundaries, and other objects located behind the Nissan Frontier.
How to read the displayed lines
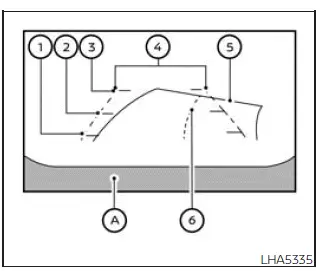
With the ignition switch in the ON position, move the shift lever into the R (Reverse) position to activate the Nissan Frontier RearView Monitor.
The monitor image includes reference guidelines that help estimate vehicle position, distance, and alignment while backing up. These guide lines should always be used as a visual aid only and not as a substitute for direct observation.
Difference between predicted and actual distances Nissan Frontier
Basic Information
The Nissan Frontier RearView Monitor displays guide lines that provide approximate distance references. Actual distances may differ from those shown on the display depending on terrain, road conditions, vehicle position, and surrounding objects.
Objects located on steep inclines, declines, or protruding surfaces may appear closer or farther away than they actually are. Whenever uncertainty exists, always turn around, check mirrors, and visually inspect the area behind the Nissan Frontier before continuing to reverse.
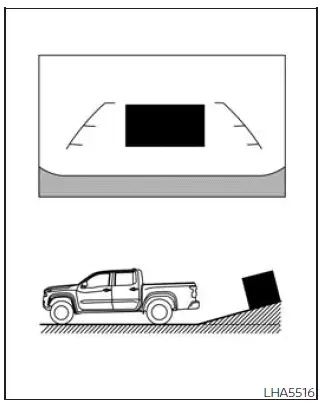
Backing up on a steep uphill
When reversing uphill, the Nissan Frontier distance guide lines and vehicle-width guide lines may appear closer than the actual distance to nearby objects.
As a result, obstacles located on the hill may actually be farther away than they appear on the monitor display.
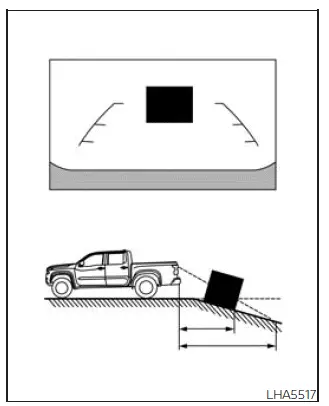
Backing up on a steep downhill
When reversing downhill, the displayed Nissan Frontier guide lines may appear farther away than the true distance.
In this situation, nearby objects may actually be closer than they appear on the screen, requiring additional caution during reversing.
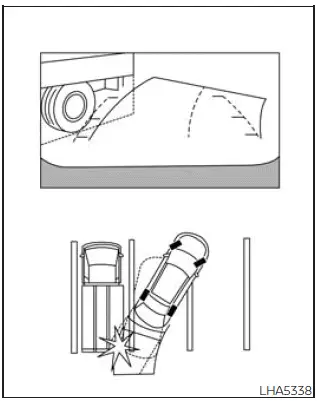
Backing up near a projecting object
The Nissan Frontier may appear to clear an obstacle based on the display image. However, if the object extends outward over the actual reversing path, contact with the object may still occur.
Drivers should always verify surrounding clearance visually rather than relying exclusively on the monitor image.
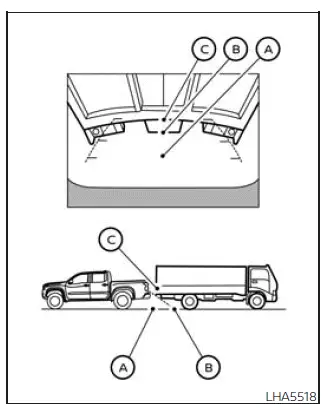
Backing up behind a projecting object
The position C may appear farther away than position B on the Nissan Frontier display. In reality, position C may be located at the same distance as position A.
If an object projects into the vehicle's actual backing path, the Nissan Frontier could make contact with the obstacle while reversing toward position A, even if the display appears to indicate adequate clearance.
How to park with predicted course lines Nissan Frontier 2026
WARNING
- If different tire sizes are installed on the Nissan Frontier, the predicted course lines may no longer accurately represent the vehicle's actual path.
- On snow-covered, icy, muddy, or slippery surfaces, differences may exist between the displayed predicted course lines and the vehicle's actual travel path.
- If the vehicle battery is disconnected or becomes fully discharged, the predicted course lines may appear incorrectly.
If this occurs, perform the following procedures:
- Turn the steering wheel from full left lock to full right lock while the Nissan Frontier engine is running.
- Drive the vehicle in a straight line for more than five minutes.
- If the steering wheel is turned while the ignition switch is in the ACC position, the Nissan Frontier predicted course lines may not display correctly.
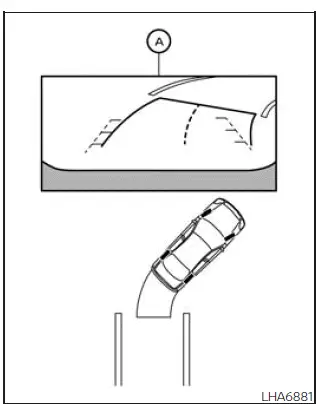
1. Visually inspect the parking space and surrounding area to confirm that it is safe before attempting to park the Nissan Frontier.
2. Shift the transmission into R (Reverse). The rear view image will appear on the display screen A.
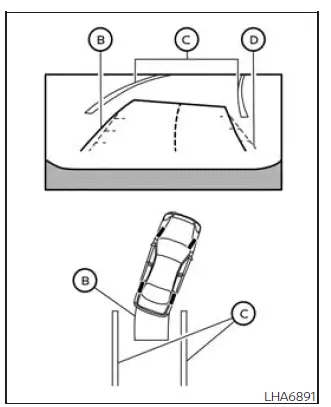
3. Slowly reverse the Nissan Frontier while turning the steering wheel as needed so the predicted course lines B move into the parking space C.
4. Continue adjusting the steering wheel until the vehicle-width guide lines D become parallel with the parking-space boundaries C while monitoring the predicted course lines.
5. Once the Nissan Frontier is completely positioned within the parking space, move the shift lever to P (Park) and firmly apply the parking brake.
The predicted course lines are intended to help improve parking accuracy and confidence, especially when maneuvering in tight parking areas.
Adjusting the screen
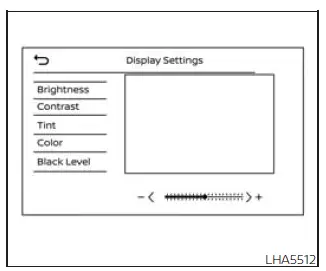
1. Press the CAMERA button.
2. Touch the "Display Settings" key on the screen.
3. Select the "Brightness", "Contrast", "Tint", "Color", or "Black Level" setting.
4. Adjust the selected item by pressing the "+" or "-" controls on the touch-screen display.
These settings allow drivers to optimize image quality according to personal preference and changing lighting conditions.
NOTE:
Never attempt to adjust Nissan Frontier RearView Monitor display settings while driving. Always perform display adjustments when the vehicle is safely parked.
How to turn on and off predicted course lines
To switch the Nissan Frontier predicted course lines ON or OFF while the transmission is in the P (Park) position:
1. Press the CAMERA button.
2. Touch the "Predicted Course Lines" key to enable or disable the feature.
To toggle the predicted course lines or the center guide line (if equipped) while the Nissan Frontier is in the R (Reverse) position, simply press the CAMERA button repeatedly to cycle through the available display modes.
The ability to customize guideline visibility allows drivers to configure the Nissan Frontier RearView Monitor according to individual driving preferences and parking requirements.
RearView Monitor system limitations Nissan Frontier 2026
WARNING
The following limitations apply to the Nissan Frontier RearView Monitor system. Failure to understand and follow these limitations may increase the risk of a collision, resulting in serious injury, property damage, or death.
- The Nissan Frontier RearView Monitor is designed as a driving aid only and cannot completely eliminate blind spots or display every object behind the vehicle.
- Due to the camera's viewing-angle limitations, areas directly beneath the rear bumper and near the bumper corners cannot be fully monitored.
Small objects positioned below the bumper, close to the tailgate, or directly on the ground may not appear on the display screen.
- Because the Nissan Frontier RearView Monitor uses a wide-angle camera lens, objects shown on the display may appear farther away or closer than their actual distance.
- Objects displayed on the RearView Monitor screen appear differently than when viewed through the rearview mirror or exterior mirrors. Always verify surroundings visually.
- Displayed guide lines should be used only as reference markers.
The accuracy of these lines may be affected by passenger load, cargo weight, fuel level, suspension position, road surface conditions, and vehicle inclination.
- Always verify that the Nissan Frontier tailgate is fully closed and properly latched before reversing.
- Do not attach stickers, accessories, covers, or other objects to the rear camera area. The camera is integrated into the Nissan Frontier tailgate and requires a clear field of view.
- When washing the Nissan Frontier with a pressure washer, avoid directing high-pressure water toward the camera assembly. Water intrusion may cause condensation inside the lens, electrical malfunction, fire, or electric shock.
- Do not strike, drop, or apply excessive force to the rear camera. It is a precision electronic component and damage may lead to malfunction, fire hazards, or electrical failure.
The following conditions are considered normal operating characteristics of the Nissan Frontier RearView Monitor and do not indicate a system malfunction:
- When ambient temperatures are extremely high or extremely low, displayed images may lose clarity or appear distorted.
- Strong sunlight or direct illumination shining into the rear camera may reduce image visibility and make objects more difficult to identify.
- Vertical streaks or lines may appear on the display when strong reflected light is present. This is a normal optical effect and does not indicate a defect.
- The screen may flicker when exposed to certain fluorescent or LED lighting environments.
- Colors displayed by the Nissan Frontier RearView Monitor may vary slightly from the actual colors of surrounding objects.
- Objects may appear less distinct during nighttime driving or in areas with limited illumination.
- A brief delay may occur when switching between camera views or activating the RearView Monitor system.
- If rain, dirt, mud, snow, road salt, or ice accumulates on the camera lens, image quality may be reduced. Clean the camera lens whenever visibility becomes impaired.
- Do not apply wax directly to the camera lens. If wax residue is present, remove it using a clean cloth lightly dampened with a diluted mild cleaning solution and then wipe dry.
Environmental conditions, lighting changes, and weather factors may temporarily affect image quality. The Nissan Frontier RearView Monitor should always be used together with direct visual observation and proper mirror checks.
System maintenance
CAUTION
- Do not use alcohol, benzine, paint thinner, abrasive cleaners, or harsh chemicals to clean the Nissan Frontier rear camera lens. These substances may cause discoloration, lens damage, or deterioration of camera performance.
- Avoid scratching, striking, or damaging the rear camera assembly, as image quality and monitor performance may be adversely affected.
If dirt, water spots, rain droplets, mud, snow, or road debris accumulate on camera 1, the Nissan Frontier RearView Monitor may not display objects clearly or accurately.
To clean the camera, gently wipe the lens using a soft cloth dampened with a diluted mild cleaning solution. After cleaning, use a dry, lint-free cloth to remove any remaining moisture.
Regular inspection and cleaning of the Nissan Frontier rear camera lens will help ensure optimal image quality and reliable RearView Monitor performance during parking and reversing maneuvers.
 Safety NoteIntelligent Around View Monitor