In case of emergency - Jump starting

In this manual: In case of emergency - Jump starting
Air bags, seat belts and child restraints — 1Exterior front — 1Exterior rear — 1Passenger compartment — 1Instrument panel — 1Engine compartment check locations — 1Warning and indicator lights — 1Basic Information — 1Basic Information — 1Precautions on Seat Belt Usage — 1Safety - Seats, Seat Belts and Supplemental Restraint System - Child safety — 1Precautions on child restraints — 1Precautions on SRS — 1Instruments and Controls - Instrument Panel — 1Basic Information — 1Warning & Indicator Lights — 1Basic Information — 1Instruments and Controls - Security Systems — 1Instruments and Controls - Wiper and Washer Switch — 1Headlight Control Switch — 1Instruments and Controls - Horn — 1Instruments and Controls - Heated Seat Switches — 1Instruments and Controls - Heated Steering Wheel Switch — 1Instruments and Controls - Vehicle Dynamic Control (VDC) OFF Switch — 1Instruments and Controls - Hill Descent Control Switch — 1Instruments and Controls - Warning systems switch — 1Instruments and Controls - Electronic locking rear differential (E-Lock) system switch — 1Instruments and Controls - Power inverter switch — 1Instruments and Controls - Parking Aids system switch — 1Instruments and Controls - Tow mode switch — 1Instruments and Controls - Emergency Call (SOS) button — 1Instruments and Controls - USB charging ports — 1Instruments and Controls - Wireless charger — 1Instruments and Controls - Rear Door Alert — 1Instruments and Controls - Power outlets — 1Instruments and Controls - Extended storage switch — 1Front-door pockets — 1Instruments and Controls - Windows — 1Instruments and Controls - Moonroof — 1Instruments and Controls - Interior lights — 1Instruments and Controls - HomeLink Universal Transceiver — 1Pre-driving checks and adjustments - Keys — 1Basic information — 1Basic information — 1Basic information — 1Pre-driving checks and adjustments - Hood — 1Pre-driving checks and adjustments - Fuel-filler door — 1Pre-driving checks and adjustments - Steering wheel — 1Pre-driving checks and adjustments - Sun visors — 1Pre-driving checks and adjustments - Mirrors — 1Pre-driving checks and adjustments - Truck box — 1Monitor, climate, audio, phone and voice recognition systems - NissanConnect Owner's Manual — 1Monitor, climate, audio, phone and voice recognition systems - Safety Note — 1Basic Information — 1Basic Information — 1Basic Information — 1Basic Information — 1Basic Information — 1Monitor, climate, audio, phone and voice recognition systems - Servicing air conditioner — 1Monitor, climate, audio, phone and voice recognition systems - Car phone or CB radio — 1Basic Information — 1Basic Information — 1Starting and driving - Starting the engine — 1Engine protection mode — 1Starting and driving - Parking brake — 1Starting and driving - Terrain Mode Selector — 1Starting and driving - Traffic Sign Recognition (TSR) — 1Basic Information — 1Basic Information — 1Basic Information — 1Basic Information — 1Basic Information — 1Basic Information — 1Basic Information — 1Basic Information — 1Starting and driving - Intelligent Driver Alertness (I-DA) — 1Starting and driving - Break-in schedule — 1Starting and driving - Using 4-Wheel Drive (4WD) — 1Starting and driving - Electronic locking rear differential (E-Lock) system — 1Starting and driving - Parking/parking on hills — 1Starting and driving - Brake system — 1Starting and driving - Active Brake Limited Slip (ABLS) system — 1Starting and driving - Vehicle Dynamic Control (VDC) system — 1Starting and driving - Hill descent control system — 1Starting and driving - Hill start assist system — 1Basic Information — 1Basic Information — 1Starting and driving - Cold weather driving — 1In case of emergency - Hazard warning flasher switch — 1In case of emergency - Flat tire — 1In case of emergency - Jump starting — 1In case of emergency - If your vehicle overheats — 1In case of emergency - Towing your vehicle — 1Appearance and care - Cleaning exterior — 1Appearance and care - Cleaning interior — 1Appearance and care - Corrosion protection — 1Do-it-yourself - Maintenance precautions — 1Do-it-yourself - Engine compartment check locations — 1Basic information — 1Checking engine oil level — 1Do-it-yourself - Automatic Transmission Fluid (ATF) — 1Do-it-yourself - Brake fluid — 1Do-it-yourself - Windshield-washer fluid — 1Do-it-yourself - Battery — 1Do-it-yourself - Variable voltage control system — 1Do-it-yourself - Drive belt — 1Do-it-yourself - Spark plugs — 1Do-it-yourself - Air cleaner — 1Do-it-yourself - Windshield wiper blades — 1Do-it-yourself - Brakes — 1Do-it-yourself - Fuses — 1Do-it-yourself - Intelligent Key battery replacement — 1Do-it-yourself - Lights — 1Tire pressure — 1Maintenance and schedules — 5Technical and consumer information — 14
~4min read

To start the Nissan Frontier engine using a booster battery, carefully follow the procedures and safety precautions below. Jump starting must be performed correctly to protect the vehicle’s electrical system and to prevent personal injury.

WARNING

  • If jump starting is performed incorrectly, the battery may explode, which can result in severe injury or death. Incorrect procedures may also cause serious damage to your Nissan Frontier.
  • Explosive hydrogen gas is always present near the battery.

    Keep sparks, open flames, cigarettes, and other ignition sources away from the battery at all times.

  • Do not allow battery fluid to contact your eyes, skin, clothing, or painted surfaces. Battery fluid contains corrosive sulfuric acid and can cause severe burns. If battery fluid contacts any surface or part of the body, immediately flush the affected area with plenty of clean water.
  • Keep the battery out of the reach of children.
  • The booster battery must be rated at 12 volts. Using a battery with an incorrect voltage rating can damage the Nissan Frontier electrical system.
  • Whenever working on or near a battery, always wear proper eye protection, such as safety goggles or industrial safety glasses. Remove rings, watches, metal bands, and other jewelry before handling jumper cables. Do not lean over the battery while jump starting.
  • Do not attempt to jump start a frozen battery. A frozen battery can explode and cause serious injury.
  • Your Nissan Frontier is equipped with an automatic engine cooling fan. The fan may start operating at any time. Keep hands, clothing, tools, and other objects away from the fan and moving engine components.
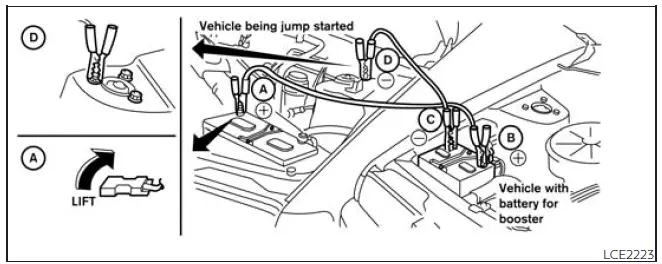
Nissan Frontier jump starting cable connection sequence

WARNING

Always follow the instructions below exactly.

Failure to follow the correct procedure may damage the charging system and may result in personal injury.

1. If the booster battery is installed in another vehicle, position both vehicles so their batteries are close enough for the jumper cables to reach safely.

Do not allow the two vehicles to touch each other.

2. Apply the parking brake firmly. Move the shift lever to P (Park). Turn off all unnecessary electrical systems, including lights, heater, air conditioner, audio system, and other accessories.

3. Place the ignition switch in the LOCK or OFF position.

4. Connect the jumper cables in the order shown in the illustration ( A , B , C , D ).

CAUTION

  • Always connect positive (+) to positive (+), and connect negative (−) to a suitable body ground, such as a strut mounting bolt, engine lift bracket, or other approved ground point. Do not connect the negative cable directly to the battery.
  • Make sure the jumper cables do not contact moving parts in the engine compartment, and ensure that the cable clamps do not touch any unintended metal surfaces.

5. Start the engine of the booster vehicle and allow it to run for several minutes.

6. Keep the booster vehicle engine speed at approximately 2,000 rpm, then start the engine of the Nissan Frontier being jump started.

CAUTION

Do not operate the starter motor for more than 10 seconds at a time. If the engine does not start immediately, turn the ignition switch to the OFF position and wait 3 to 4 seconds before trying again.

7. After the Nissan Frontier engine starts, carefully disconnect the negative cable first, followed by the positive cable. Remove the cables in a controlled manner so the clamps do not touch each other or any metal parts.

After jump starting, allow the engine to run for a period of time so the charging system can help restore battery voltage. If the battery repeatedly becomes discharged, have the battery and charging system inspected.

Push starting

CAUTION

  • Do not push start the Nissan Frontier. Push starting may damage the three-way catalyst.
  • Automatic transmission models cannot be push-started or tow-started.

    Attempting to do so may cause serious transmission damage.

NOTE:

On automatic transmission models, the Malfunction Indicator Light (MIL) may illuminate when low voltage is detected.

This does not affect normal driving functions.

The MIL will turn off after battery voltage returns to a normal value (>12V) and the engine has been started three or more times.

next pagenext pageFlat tireIf your vehicle overheatsnext pagenext page

Nissan Frontier 2022-2026 Owner's Manual

More Nissan Vehicles

More Nissan Manuals

More Owner's Manuals

© 2023-2026 - Nissan Frontier technical manuals - www.nifrontier.com/