Pre-driving checks and adjustments - Liftgate
- Basic Information
- Motion-Activated Liftgate
Basic Information Nissan Pathfinder Fifth generation
WARNING
- Always be sure the liftgate has been closed securely to prevent it from opening while driving.
- Do not drive with the liftgate open.
This could allow dangerous exhaust gases to be drawn into the vehicle.
- To help avoid risk of injury or death through unintended operation of the vehicle and/or its systems, including entrapment in windows or inadvertent door lock activation, do not leave children, people who require the assistance of others or pets unattended in your vehicle. Additionally, the temperature inside a closed vehicle on a warm day can quickly become high enough to cause a significant risk of injury or death to people and pets.
- Always be sure that hands and feet are clear of the door frame to avoid injury while closing the liftgate.
CAUTION Do not use accessory carriers that attach to the liftgate. Doing so will cause damage to the vehicle.
Operating the manual liftgate
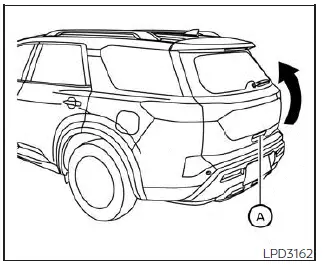
The power door lock system allows you to lock or unlock all doors including the liftgate simultaneously.
To open the liftgate, push the liftgate opener switch A and pull up on the handle.
To close, lower and push the liftgate down securely.
Operating the power liftgate
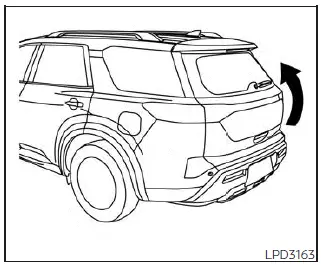
WARNING
- Make sure that all passengers have their hands, etc., inside the vehicle before closing the liftgate.
- Do not leave children unattended inside the vehicle. They could unknowingly activate switches or controls.
Unattended children could become involved in serious accidents.
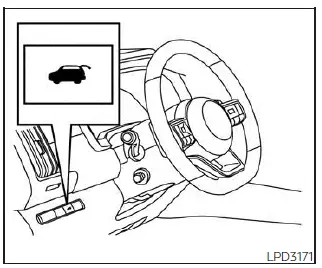
Instrument panel switch
NOTE: To open, close or reverse the power liftgate, the shift position must be in P (Park) position. Also, the power liftgate will not operate if battery voltage is low.
Power Open: The power liftgate automatically moves from the fully closed position to the fully open position in approximately 5 - 8 seconds.
The power open feature can be activated by the button on the Intelligent Key (if so equipped), the instrument panel switch or the liftgate open switch. A chime sounds to indicate the power open sequence has been started.
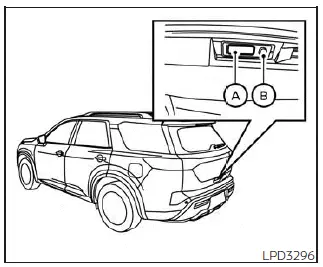
Liftgate opener switch and request switch
- When the vehicle is locked, the liftgate can be opened by the instrument panel switch, button on the Intelligent Key (if so equipped) or liftgate opener switch A (with Intelligent Key in liftgate range). The liftgate will individually unlock and open.
Once the liftgate is closed, the vehicle will remain in the unlock status. To lock the liftgate, push the liftgate request switch B (with the Intelligent Key in liftgate operation range) or press the
 button on the Intelligent Key.
- The Intelligent Key button (if so equipped) must be held for 1 second before the liftgate opens.
- The liftgate must be unlocked to open it with the liftgate opener switch A and without the Intelligent Key in liftgate range.
- The switch on the liftgate A can only be used to open the liftgate if the Power Back Door feature is switched to ON using the "Vehicle Settings" menu in the vehicle information display.
A warning chime will sound for 15 seconds if the shift position is moved out of P (Park) position and the vehicle is beginning to move when the door is open.
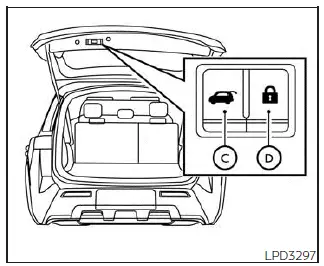
Liftgate close switch
Power Close:
The power liftgate automatically moves from the fully open position to the secondary position. When the liftgate reaches the secondary position, the cinching motor engages and pulls the liftgate to its primary latch position. Power close takes approximately 7 - 10 seconds. The power close feature can be activated by the button on the Intelligent Key (if so equipped), the instrument panel, the liftgate close switch C and the liftgate lock switch D . A chime sounds to indicate the power close sequence has been started.
- If the liftgate opener switch A is activated while the cinching motor is engaged, the cinching motor will disengage and release the latch.
- The Intelligent Key button (if so equipped) must be held for 1 second before the liftgate closes.
- The liftgate close switch C can only be used to close the liftgate if the Power Back Door feature is switched to ON.
- If the liftgate lock switch D is activated the liftgate will begin to close and all doors will lock.
Stop - Reverse:
During an open/close movement, the liftgate can be stopped, if the Intelligent Key button (if so equipped), instrument panel or liftgate opener switch A , liftgate close switch C or liftgate lock switch D is pushed. The liftgate can be reversed if the Intelligent Key button (if so equipped), instrument panel, liftgate opener switch A or liftgate lock switch D is pushed again.
Auto Reverse:
If an obstacle is detected during power open or power close, a warning chime will sound and the liftgate will reverse direction and return to the full open or full close position.
A pinch strip is mounted on each side of the liftgate. If an obstacle is detected by a pinch strip during power close, the liftgate will reverse direction and return to the full open position.
NOTE: If the pinch strip is damaged or removed, the power close function will not operate.
WARNING There are some small distances immediately before the closed position which cannot be detected. Make sure that all passengers have their hands, etc., inside the vehicle before closing the liftgate.
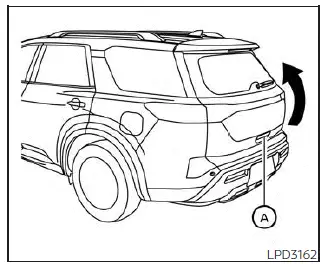
Manual Mode:
If power operation is not available, the liftgate may be operated manually. Power operation may not be available if multiple obstacles have been detected in a single power cycle or if battery voltage is low.
If the power liftgate opener switch A is pushed during power open or close, the power operation will be canceled and the liftgate can be operated manually.
To open the liftgate manually, push the liftgate opener switch A and lift the liftgate.
To close, lower and push the liftgate down securely.
Motion-Activated Liftgate Nissan Pathfinder 5th Gen
Basic Information
The liftgate can be operated using a quick kicking motion under the center of the rear bumper.
To operate, the Intelligent Key must be within 31.5 in (80 cm) of the liftgate.

Activation zone
Proper operation technique
- While at the rear of the vehicle, begin making a quick forward kicking motion.
- Raise your foot straight under the center of the rear bumper then immediately return your foot to the ground in a continuous motion.
- The kicking motion should be straight, smooth and consistent.
- After your kick motion is complete, step back and allow the liftgate to open/close.
- Three beeps will sound and the liftgate will begin moving within two seconds after the kick.
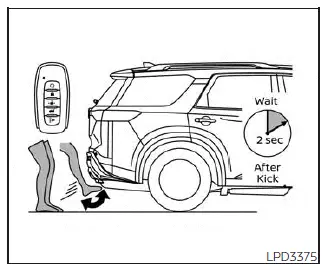
DO: Quick forward kick and return while the key fob is within range
CAUTION Before performing the kicking motion, steady your stance to prevent any loss of balance. Also, while making the kicking motion, take caution around hot exhaust system parts. Otherwise, there may be danger of injury.
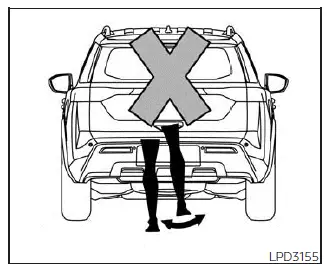
DO NOT: Swing foot side to side or pause during kick
WARNING Prevent unintentional liftgate opening/ closing. There may be conditions when opening/closing the liftgate is not desired.
Keep the Intelligent Key out of range of the liftgate, (31.5 in or 80 cm), when washing or working around the back of the vehicle.
CAUTION
- Interference or malfunction can be caused by parking in close proximity to radio or satellite towers.
- Intelligent Key interference could be caused if you have your key fob stored next to your cell phone or any RF-enabled smart card.
Liftgate release
Basic Information
WARNING
- Always be sure the liftgate has been closed securely to prevent it from opening while driving.
- Do not drive with the liftgate open.
This could allow dangerous exhaust gases to be drawn into the vehicle.
- To avoid personal injury, do not attempt to activate the power liftgate if one or both of the liftgate struts are removed.
CAUTION
- If the power liftgate does not stay open or if the liftgate unexpectedly closes at any time while a continuous warning chime sounds, do not operate the liftgate. There may be a pressure loss in one or both of the liftgate struts. It is recommended that you have the liftgate inspected. It is recommended that you visit a NISSAN dealer for this service.
- Do not activate the power liftgate if one or both of the liftgate struts are removed. Damage to the liftgate or power liftgate mechanisms may occur.
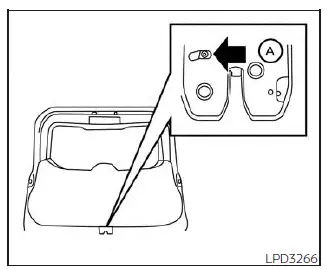
Liftgate release (manual and power)
If the liftgate cannot be opened with the instrument panel switch, liftgate opener switch or key fob due to a discharged battery, follow these steps:
1. Move the lever A as illustrated to open the liftgate.
It is recommended that you visit a NISSAN dealer as soon as possible for repair.
Liftgate position setting

The liftgate can be set to open to a specific height by performing the following:
1. Open the liftgate using the liftgate opener switch or the Intelligent Key.
2. Pull the liftgate down to the desired position and hold the liftgate (the liftgate will have some resistance when being manually adjusted).
3. While holding the liftgate in position, push and hold the liftgate switch C located on the liftgate for approximately 5 seconds or until two beeps are heard.
The liftgate will open to the selected position setting. To change the position of the liftgate, repeat steps 1-3 for setting the position of the liftgate.