Tyre inflation kit
Tyre inflation kit
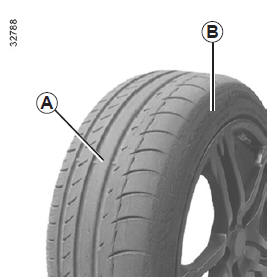
! The kit repairs tyres damaged on the tread A by objects smaller than 4 millimetres. It does not repair all types of punctures, such as cuts larger than 4 millimetres or cuts on the tyre sidewall B. Also make sure your rim is in good condition. Do not remove the foreign object that caused the puncture if it is still in the tyre. ! Do not use the inflation kit if the tyre has been damaged by driving on a punctured tyre. Therefore, carefully check the tyre sidewalls before any work. Likewise, driving with deflated tyres, or even flat (punctured) tyres, can compromise safety and may make the tyre impossible to repair.This repair is temporary
A punctured tyre must always be inspected (and repaired if possible) by a specialist as soon as possible.
When replacing a tyre repaired with this kit, you must inform the specialist.
When driving, a vibration may be felt due to the presence of the product inside the tyre.
! The kit is approved only for inflating the tyres of the vehicle it was originally fitted to. Under no circumstances must it be used to inflate tyres of another vehicle or any other inflatable object (ring, boat, etc.). Avoid splashes on the skin when handling the repair liquid bottle. If droplets do escape, rinse thoroughly. Keep the repair kit out of reach of children. Do not dispose of the empty bottle in the environment. Return it to a brand representative or to an organisation responsible for its collection. The bottle has a limited service life shown on its label. Check the expiry date. Visit a brand representative to replace the inflation hose and the repair product bottle.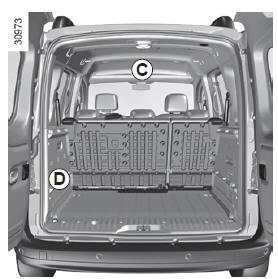
Tyre inflation kit E
Depending on the vehicle, in the event of a puncture, use the kit located in the glove box or in the upper cabin storage compartment at the front C, or in the boot, in the rear wheel well D.
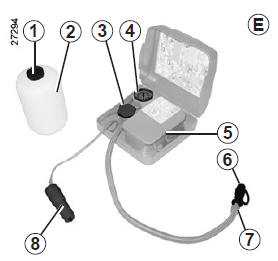
Open the kit, remove caps 1 and 3 (it is essential not to remove the seal of the bottle), then screw bottle 2 onto its holder 3.
Engine running, parking brake applied,
- unscrew the valve cap of the affected wheel and screw the inflation nozzle 6 onto the valve;
- plug connector 8 into the accessory socket on the vehicle dashboard;
- press switch 5 to inflate the tyre to the recommended pressure (refer to the label on the driver's door edge);
- after 5 minutes maximum, stop inflating to read the pressure (on pressure gauge 4);
Note: while the bottle empties (approximately 30 seconds), pressure gauge 4 briefly indicates a pressure of up to 6 bar, then the pressure drops.
- Adjust the pressure: to increase it, continue inflating with the kit; to decrease it, turn knob 7 located on the inflation nozzle.
If a minimum pressure of 1.8 bar is not reached after 15 minutes, the repair is not possible. Do not drive the vehicle; contact a Brand Representative.
Once the tyre is correctly inflated:
- stop the kit;
- close the integrated cap of the bottle;
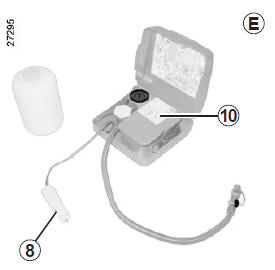
- disconnect plug 8;
- stick driving recommendation label 10 in a location visible to the driver on the dashboard;
- store the kit;
- at the end of the first inflation operation the tyre will still leak, so it is essential to drive the vehicle to seal the hole;
- start immediately and drive at between 20 and 60 km/h so as to distribute the product evenly inside the tyre, then after 3 km of driving, stop to check the pressure;
- if the pressure is above 1.3 bar but below the recommended pressure, readjust it (refer to the label affixed to the driver's door edge); otherwise, contact a Brand Representative: the repair is not possible.
Note: after using the inflation kit, be sure to visit a Brand Representative to replace the inflation hose and the repair product bottle.
Precautions for using the kit
The kit must not operate for more than 15 consecutive minutes.
! Warning: a missing or incorrectly tightened valve cap may compromise tyre sealing and cause pressure loss. Always keep valve caps identical to the original ones and fully tightened. ! After a repair using the kit, do not drive more than 200 km. In addition, reduce your speed and, in all cases, do not exceed 80 km/h. The label that you must stick in a visible location on the dashboard reminds you of this.Depending on the country or local legislation, a tyre repaired with the tyre inflation kit may have to be replaced.Inflation kit F
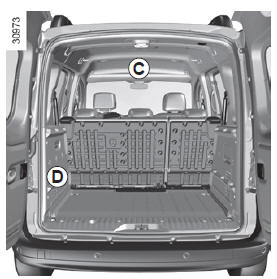
Depending on the vehicle, in the event of a puncture, use the kit located in the glove box or in the upper cabin storage compartment at the front C, or in the boot, in the rear wheel well D.
Engine running, parking brake applied:
- unroll the bottle hose;
- connect hose 13 of the compressor to the outlet of bottle 18;
- depending on the vehicle, connect or screw bottle 18 onto the compressor at bottle recess 17;
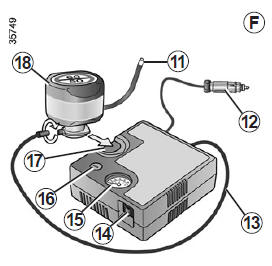
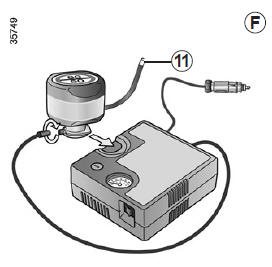
- unscrew the valve cap of the affected wheel and screw on the inflation nozzle of bottle 11;
- connect plug 12 necessarily into the vehicle's accessory socket;
- press switch 14 to inflate the tyre to the recommended pressure (refer to the paragraph "Tyre inflation pressure");
- after 15 minutes at most, stop inflating to read the pressure (on gauge 15).
Note: while the bottle empties (about 30 seconds), gauge 15 briefly indicates a pressure of up to 6 bar, then the pressure drops.
- Adjust the pressure: to increase it, continue inflating with the kit; to decrease it, press button 16.
If a minimum pressure of 1.8 bar is not reached after 15 minutes, the repair is not possible. Do not drive the vehicle; contact a Brand Representative.
! No objects must be placed at the driver's feet: in the event of sudden braking, these objects may slide under the pedal box and prevent its use.Once the tyre is correctly inflated, remove the kit: slowly unscrew inflation nozzle 11 so as to avoid spraying of product, and store the bottle in a plastic bag to prevent the product from leaking.
- Stick the driving recommendation label in a location visible to the driver on the dashboard.
- Stow the kit.
- At the end of the first inflation operation, the tyre will still leak; it is essential to drive the vehicle to seal the hole.
- Start immediately and drive between 20 and 60 km/h to distribute the product evenly inside the tyre. After 3 kilometres of driving, stop and check the pressure.
- If the pressure is above 1.3 bar but below the recommended pressure, readjust it (refer to the label affixed to the driver's door edge); otherwise, contact a Brand Representative: the repair is not possible.
Precautions for using the kit
The kit must not operate for more than 15 consecutive minutes.
! Warning: a missing or incorrectly tightened valve cap may compromise tyre sealing and cause pressure loss. Always keep valve caps identical to the original ones and fully tightened. ! After a repair using the kit, do not drive more than 200 km. In addition, reduce your speed and, in all cases, do not exceed 80 km/h. The label that you must stick in a visible location on the dashboard reminds you of this. Depending on the country or local legislation, a tyre repaired with the tyre inflation kit may have to be replaced.Test yourself
A quick Renault Kangoo quiz: every answer comes with an explanation and a link to the manual page.