Automatic transmission / trans
Automatic transaxle assy (U250E)
In this manual: Automatic transmission / trans
45steps
~270min
4/5difficulty
Done 0 of 45
COMPONENTS 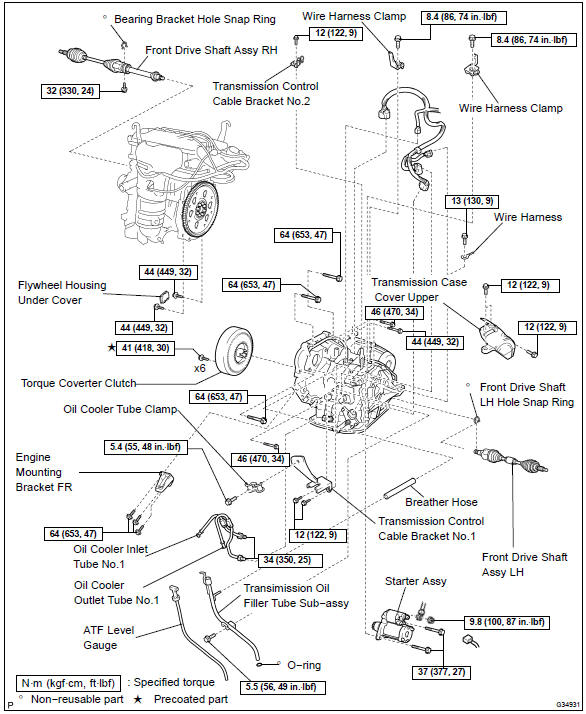 Components REPLACEMENT
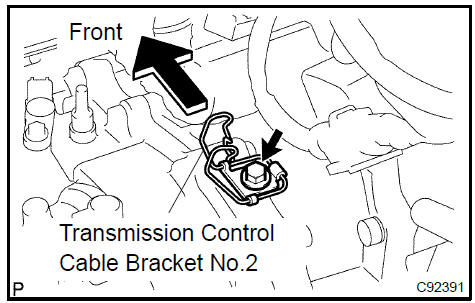
Remove transmission control cable bracket No.2 5. REMOVE WIRE HARNESS CLAMP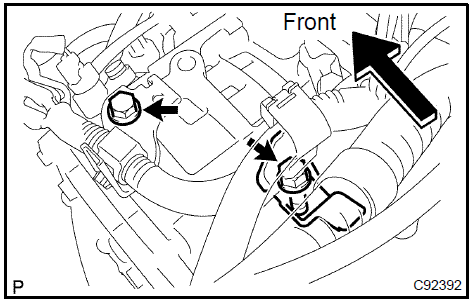
Remove wire harness clamp 6. DISCONNECT WIRE HARNESS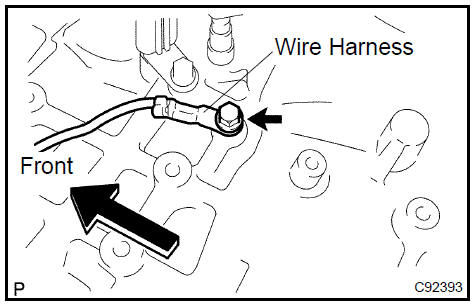
Disconnect wire harness 7. REMOVE STARTER ASSY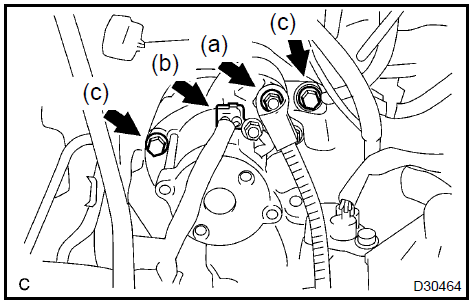
Remove starter assy 8. DISCONNECT CONNECTOR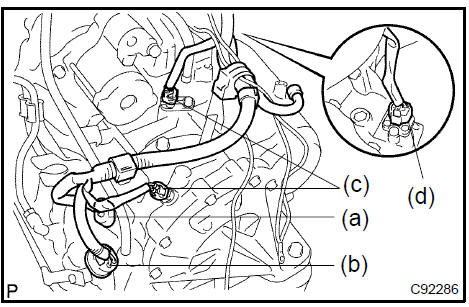
Disconnect connector 9. REMOVE TRANSMISSION CONTROL CABLE BRACKET No.1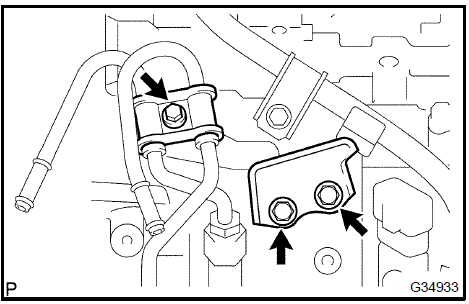
Remove transmission control cable bracket No.1 10. REMOVE TRANSMISSION OIL FILLER TUBE SUB−ASSY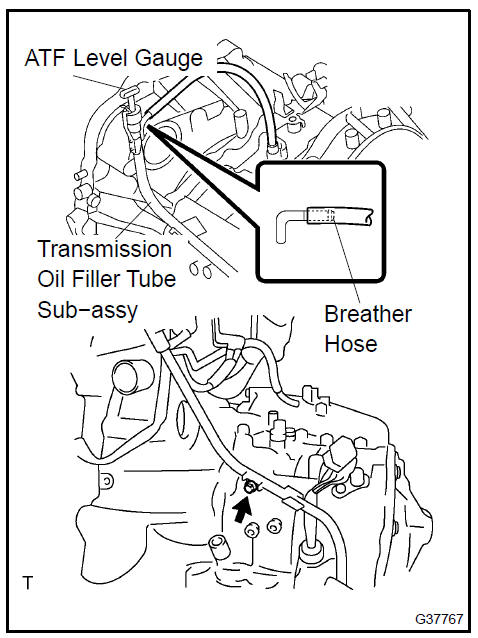 Remove transmission oil filler tube sub-assy 11. REMOVE OIL COOLER INLET TUBE No.1
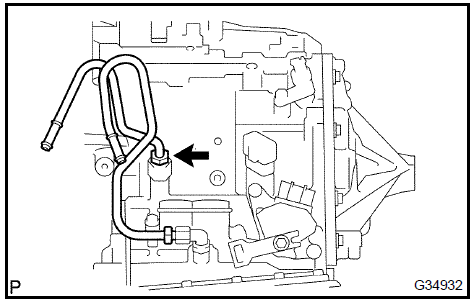
Remove oil cooler inlet tube No.1 12. REMOVE OIL COOLER OUTLET TUBE No.1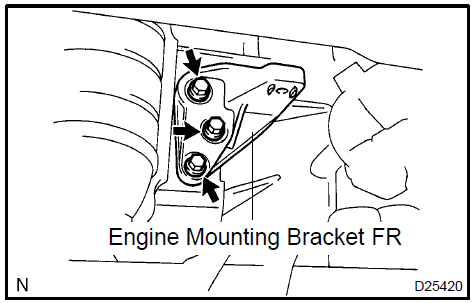 Remove engine mounting bracket FR 14. REMOVE FLYWHEEL HOUSING UNDER COVER
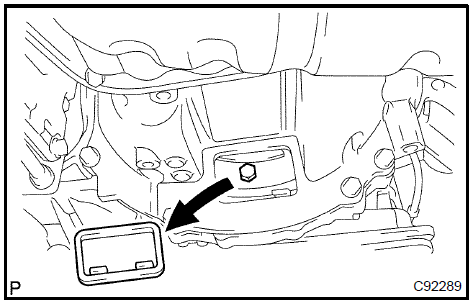
Remove flywheel housing under cover 15. REMOVE AUTOMATIC TRANSAXLE ASSY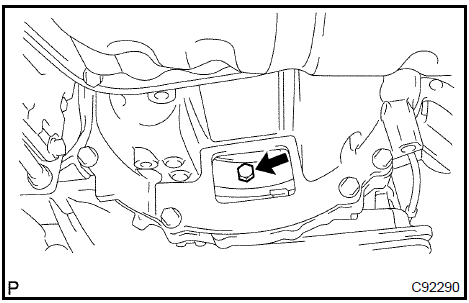

Remove transaxle case cover upper 19. INSTALL TRANSAXLE CASE COVER UPPER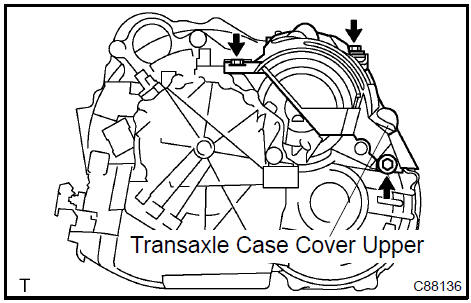 Install transaxle case cover upper 20. INSTALL TORQUE CONVERTER CLUTCH ASSY
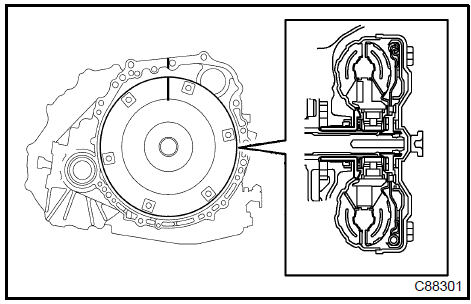
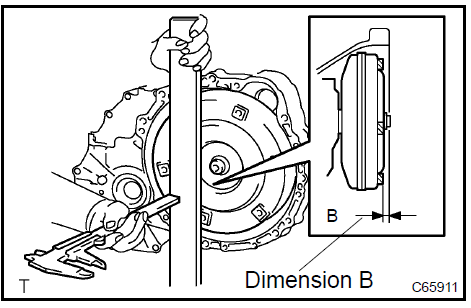
Apply a few drops of adhesive to 2 threads on the tip of the 6 torque converter clutch mounting bolts. Adhesive: Part No. 08833−00070, THREE BOND 1324 or equivalent 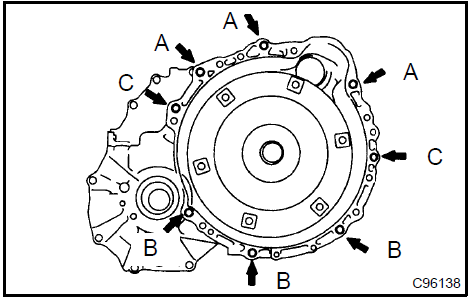

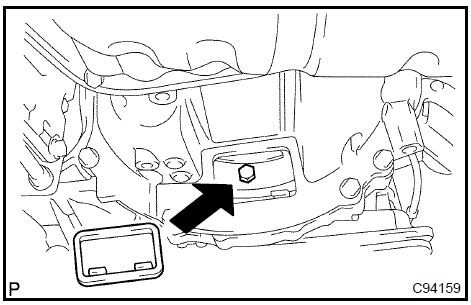
Install flywheel housing under cover 23. INSTALL ENGINE MOUNTING BRACKET FR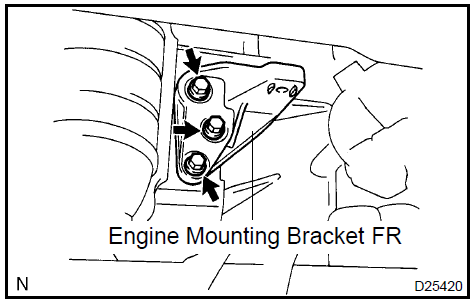 Install engine mounting bracket FR 24. INSTALL TRANSMISSION OIL FILLER TUBE SUB−ASSY
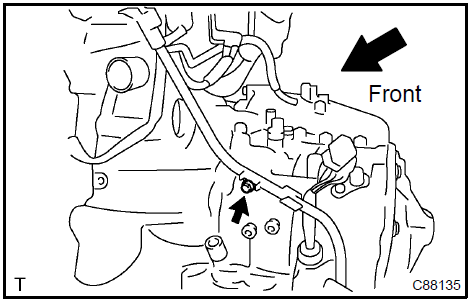
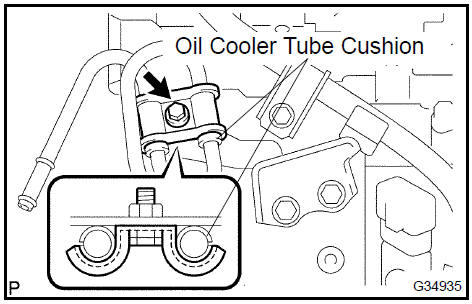
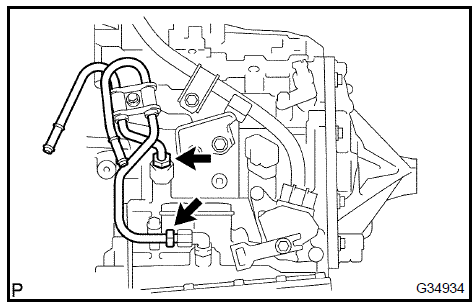
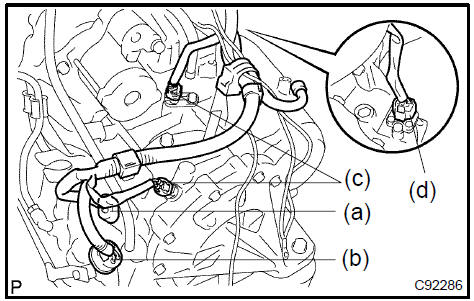
Install oil cooler outlet tube No.1 29. INSTALL STARTER ASSYConnect the connecter.
Connect the starter wire with the nut. Torque: 9,8 N·m 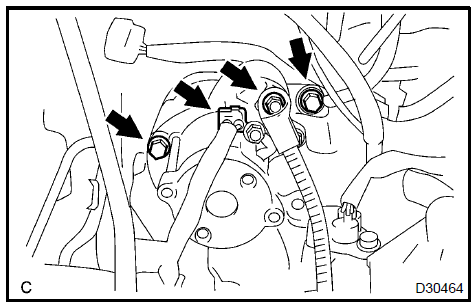
Install starter assy 30. CONNECT WIRE HARNESS
Connect wire harness 31. INSTALL WIRE HARNESS CLAMP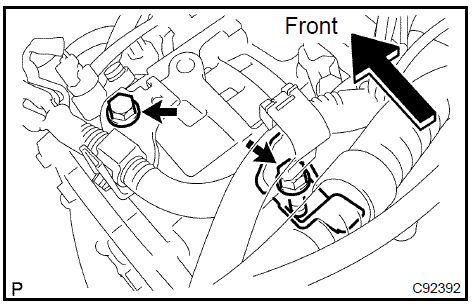
Install wire harness clamp 32. INSTALL TRANSMISSION CONTROL CABLE BRACKET No.2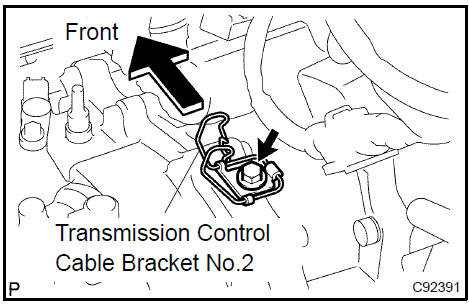 Install transmission control cable bracket No.2
Components REPLACEMENT
- REMOVE ENGINE ASSEMBLY WITH TRANSAXLE
- REMOVE FRONT DRIVE SHAFT ASSY RH
- REMOVE FRONT DRIVE SHAFT ASSY LH
SST 09520−01010, 09520−24010 (09520−32040)
4. REMOVE TRANSMISSION CONTROL CABLE BRACKET No.2- Remove the bolt and transmission control cable bracket No.2.
Remove transmission control cable bracket No.2 5. REMOVE WIRE HARNESS CLAMP
- Disconnect the wire harnesses from the 2 clamps.
- Remove the 2 bolts and 2 clamps.
Remove wire harness clamp 6. DISCONNECT WIRE HARNESS
- Remove the bolt and disconnect the wire harness.
Disconnect wire harness 7. REMOVE STARTER ASSY
- Remove the nut and disconnect the starter wire.
- Disconnect the connector.
- Remove the 2 bolts and starter assy.
Remove starter assy 8. DISCONNECT CONNECTOR
- Disconnect the transmission wire connector.
- Disconnect the park/neutral position switch connector.
- Disconnect the 2 speed connectors.
- Disconnect the speedometer driven gear connector.
Disconnect connector 9. REMOVE TRANSMISSION CONTROL CABLE BRACKET No.1
- Remove the bolt and oil cooler tube clamp.
- Remove the 2 bolts and transmission control cable bracket No.1.
Remove transmission control cable bracket No.1 10. REMOVE TRANSMISSION OIL FILLER TUBE SUB−ASSY
- Remove the ATF level gauge.
- Remove the breather hose from the automatic transaxle.
- Remove the bolt and transmission oil filler tube sub−assy.
- Remove the O−ring from the oil filler tube.
Remove transmission oil filler tube sub-assy 11. REMOVE OIL COOLER INLET TUBE No.1
- Remove the oil cooler inlet tube No.1.
Remove oil cooler inlet tube No.1 12. REMOVE OIL COOLER OUTLET TUBE No.1
- Remove the oil cooler outlet tube No.1.
- Remove the 3 bolts and engine mounting bracket FR.
Remove engine mounting bracket FR 14. REMOVE FLYWHEEL HOUSING UNDER COVER
- Remove the flywheel housing under cover.
Remove flywheel housing under cover 15. REMOVE AUTOMATIC TRANSAXLE ASSY
- Turn the crankshaft to gain access and remove the 6 bolts while holding the crankshaft pulley bolt with a wrench.
HINT: There will be one green colored bolt.
- remove the 8 bolts.
- separate and remove the automatic transaxle.
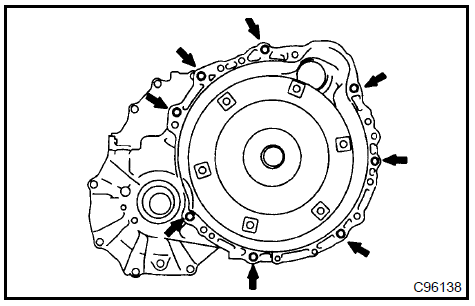
- REMOVE TORQUE CONVERTER CLUTCH ASSY
- INSPECT TORQUE CONVERTER CLUTCH ASSY
SST 09350−32014 (09351−32010, 09351−32020)
18. REMOVE TRANSAXLE CASE COVER UPPER- Remove the 3 bolts and transmission case cover upper.
Remove transaxle case cover upper 19. INSTALL TRANSAXLE CASE COVER UPPER
- Install the transmission case cover upper with the 3 bolts.
Install transaxle case cover upper 20. INSTALL TORQUE CONVERTER CLUTCH ASSY
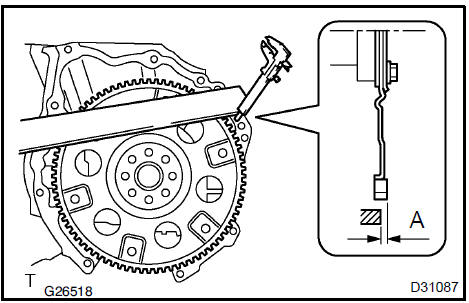
- Using vernier calipers and a straight edge, measure the dimension ”A” between the transaxle fitting part of the engine and the converter fitting part of the drive plate.
- Set the key of the front oil pump drive gear to the top and put a mark on the housing.
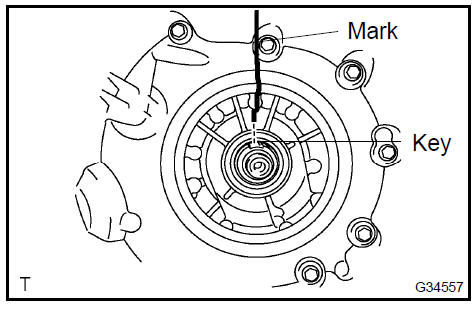
- Put a mark on the torque converter clutch so that its groove can be clearly indicated.
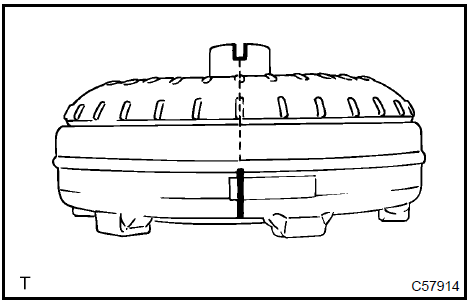
- Match the 2 marks on the transaxle case and the torque converter clutch and fit the splined part of the input shaft to the spline part of the turbine runner.
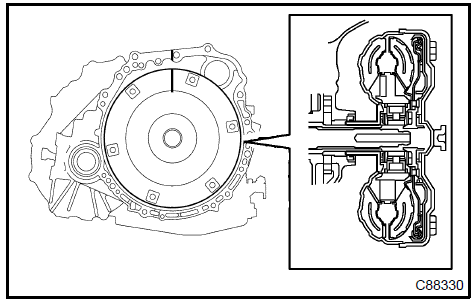
- Rotating the torque converter clutch, fit the spline part of the stator shaft with the spline part of the stator.
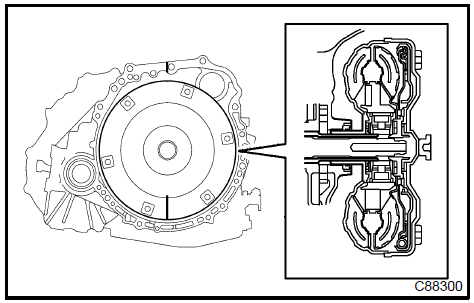
- Rotating the torque converter clutch, match the 2 marks on the case and the torque converter clutch again and fit the key of the oil pump drive gear into the key way of the torque converter clutch.
- Using vernier calipers and a straight edge, measure the dimension B shown in the illustration and check that B is greater than A measured in step a.
- Install the automatic transaxle to the engine with the 8 bolts.
- Install the 6 torque converter clutch mounting bolts.
- Install the flywheel housing under cover.
Install flywheel housing under cover 23. INSTALL ENGINE MOUNTING BRACKET FR
- Install the engine mounting bracket FR with the 3 bolts to the automatic transaxle.
Install engine mounting bracket FR 24. INSTALL TRANSMISSION OIL FILLER TUBE SUB−ASSY
- Coat a new O−ring with ATF, and install it to the oil filler tube.
- Install the oil filler tube to the automatic transaxle with the bolt.
- Install the breather hose to the automatic transaxle.
- Install the ATF level gauge.

- Install the control cable bracket No.1 with the 2 bolts.
- Temporarily install the oil cooler outlet tube No.1.
- Temporarily install the oil cooler inlet tube No.1.

- Install the oil cooler tube clamp with the bolt.
HINT: Install them so that the oil cooler tube cushion is positioned as shown in the illustration.
- Torque the oil cooler inlet tube No.1.
- Torque the oil cooler outlet tube No.1.
- Connect the transmission wire connector.
- Connect the park/neutral position switch connector.
- Connect the 2 speed connectors.
- Connect the speedometer driven gear connector.
Install oil cooler outlet tube No.1 29. INSTALL STARTER ASSY
- Install the starter assy with the 2 bolts.
Install starter assy 30. CONNECT WIRE HARNESS
- Connect the wire harness with the bolt.
Connect wire harness 31. INSTALL WIRE HARNESS CLAMP
- Install the 2 clamps with the 2 bolts. Torque: 8,4 N·m
- Connect the wire harnesses to the clamps
Install wire harness clamp 32. INSTALL TRANSMISSION CONTROL CABLE BRACKET No.2
- Install the transmission control cable bracket No.2 with the bolt. Torque: 12 N·m
Install transmission control cable bracket No.2
- INSTALL FRONT DRIVE SHAFT ASSY LH
- INSTALL FRONT DRIVE SHAFT ASSY RH
- INSTALL ENGINE ASSEMBLY WITH TRANSAXLE
- RESET MEMORY
HINT: RESET MEMORY can not be completed by only disconnecting the battery terminal.
Test yourself
A quick Toyota Camry quiz: every answer comes with an explanation and a link to the manual page.
Was this page helpful?