Evaporator and Expansion Valve
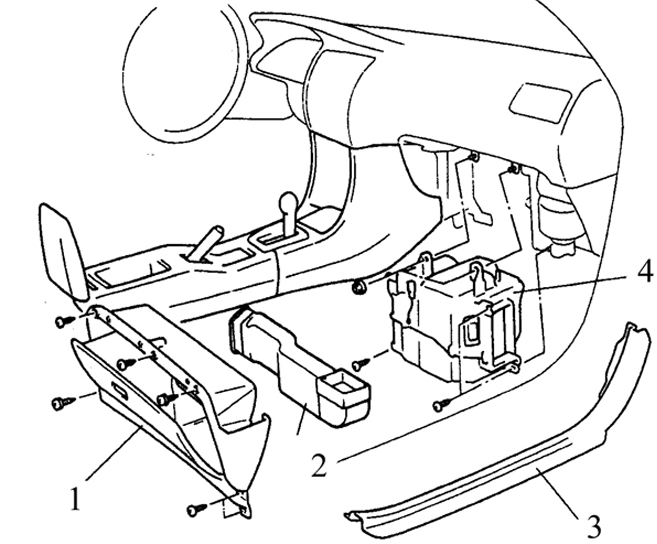
Parts to be removed before evaporator removal 1. Glove box
2. Air duct
3. Front door sill trim
4. Cooling unit

Evaporator removal
1. Air conditioner amplifier and interconnector
2. Blower resistor unit
3. Thermistor
4. Lower case half
5. Expansion valve
6. Drain tube
7. Refrigerant supply and discharge lines
8. Evaporator
9. Upper case half
Removal
PROCEDURE
1. Discharge the air conditioner and recover the refrigerant at a Toyota service station or at a specialized workshop.
2. Remove the glove box assembly. Disconnect the air conditioner lines on the engine compartment bulkhead. Loosen the fittings while holding the mating part with a wrench, so that the line is not twisted. Plug the disconnected lines to prevent moisture ingress.
3. Remove the two nuts and three bolts securing the evaporator to the engine compartment bulkhead, and remove the evaporator from the vehicle.
4. Place the evaporator on a bench, remove the screws and clips, remove the upper and lower evaporator case halves, and take out the evaporator.
5. Remove the thermistor from the evaporator, remove the bolts securing the expansion valve and the two short refrigerant supply and discharge tubes (see Evaporator Removal figure).
6. Clean the evaporator with a special comb and blow it out with compressed air. Select a comb with a tooth spacing matching the fin pitch of the evaporator.
Installation
PROCEDURE
1. If a new evaporator is installed, add approximately 1 g of fresh oil of the type recommended for your air conditioner.
2. Install in the reverse order of removal. Replace the O-ring and the expansion valve gaskets.
3. Charge the air conditioner with refrigerant at the same workshop where the refrigerant was discharged and recovered.
Test yourself
A quick Toyota Corolla quiz: every answer comes with an explanation and a link to the manual page.