Condenser
Removal
PROCEDURE
1. Discharge the air conditioner and recover the refrigerant at a Toyota service station
or at a specialized workshop.
2. Remove the radiator (see sub-section 4.9).
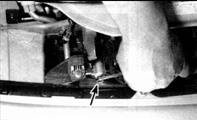
3. Remove the radiator grille (see sub-section 11.26) and the right headlamp (see sub-section 12.14). Disconnect the refrigerant supply and discharge line fittings. To disconnect the right line, remove the flange bolt (indicated by the arrow). Plug the disconnected lines to prevent moisture ingress.
* The left joint is connected to the receiver (see sub-section 4.11).
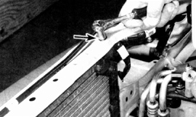
4. Remove the two condenser mounting bolts, one on each side (the right bolt is shown). Move the condenser rearward and remove it from the vehicle.
Installation
PROCEDURE
1. Install the condenser and brackets, and tighten the bolts. Make sure the rubber cushions on the condenser are securely seated.
2. Connect the refrigerant lines and replace the O-rings. If a new condenser is installed, add 4–6 g of fresh oil of the recommended type.
3. Install the remaining parts in the reverse order of removal.
4. Charge the air conditioner with refrigerant at the same workshop where the refrigerant was discharged and recovered.
Test yourself
A quick Toyota Corolla quiz: every answer comes with an explanation and a link to the manual page.