Air Conditioning System
* The air conditioning refrigerant line is under high pressure. Do not disconnect any hoses or remove any air conditioning components until the refrigerant has been completely discharged. Refrigerant must be discharged only at a dealer service shop or a specialized workshop. Even after the refrigerant has been discharged, wear protective goggles before disconnecting hoses from the air conditioner line.
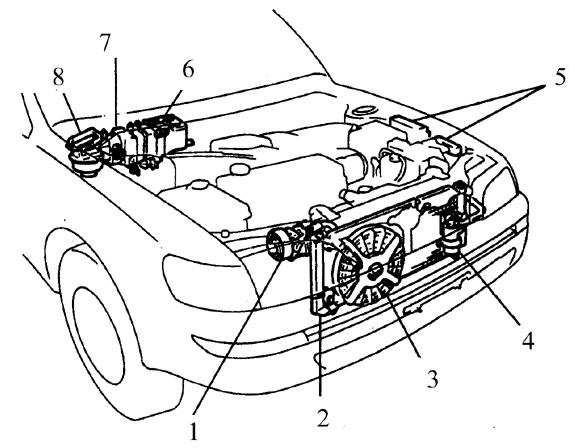
Air Conditioning System Components
1. Compressor, magnetic clutch, compressor temperature switch
2. Condenser
3. Condenser electric fan
4. Receiver (dehydrator)
5. Relay
6. Heater, heater core
7. Cooling unit, expansion valve, evaporator, resistor block, thermistor
8. Blower unit, blower unit electric motor
The following is a list of air conditioning maintenance procedures that ensure the system continues to operate normally over a long period.
PROCEDURE
1. Check the condition of the air conditioner compressor drive belt. If signs of wear or damage are found, replace the belt (see subsection 2.6.4).
2. Check the belt tension and adjust if necessary (see subsection 2.6.4).
3. Check the condition of the air conditioner hoses for cracks, bulges, hardening, mechanical damage, swelling from oil contamination and delamination. Check the reliability of the connections. If leaks or obvious signs of damage are found, replace the hoses.
4. Inspect the condenser fins and remove leaves, insects and other foreign objects from between the fins. Blow out the condenser with compressed air or clean it with a special comb.
It is recommended to run the air conditioner for at least ten minutes at least once a month. This is especially important in winter, since prolonged inactivity causes seals and gaskets to harden and subsequently deteriorate.
Leaks in the air conditioning system are best detected when pressure and temperature rise to operating levels. To detect a leak, run the engine for five minutes with the air conditioner on. Stop the engine and inspect the air conditioner hoses and connections. Oily traces indicate refrigerant leakage.
Due to the complexity of the air conditioning system, and because special equipment is required for system diagnosis, all service and inspection work must be performed by suitably trained personnel.
If the air conditioner does not work at all, check the fuse panel (see subsection 12.1) and the air conditioner relay, located in the relay box inside the engine compartment. The most common cause of poor air conditioner performance is insufficient refrigerant charge. If the air temperature from the air conditioner rises noticeably, check the refrigerant charge as described below.
Refrigerant Charge Check
PROCEDURE
1. Warm up the engine to normal operating temperature.
2. Set the air temperature control lever to the coldest position and set the fan speed to the highest setting. Open the doors (to prevent the air conditioner from switching off automatically after the cabin has cooled).
3. Check that the compressor engages. When the compressor engages, a click is heard from the electromagnetic clutch, and the center part of the clutch begins to rotate. After the system temperature reaches normal operating level, compare by touch the temperature of the two evaporator tubes on the engine compartment bulkhead. The evaporator outlet tube (larger diameter) should be slightly warmer than the inlet tube (smaller diameter).
4. The tube leading from the condenser to the evaporator (smaller diameter tube) should be cold, and the tube from the evaporator to the compressor should be slightly colder (approximately 2–6° C). If the evaporator outlet tube is significantly warmer than the inlet tube, the refrigerant charge is insufficient.
5. With the air conditioner operating, place a thermometer at the center of the air outlet. The air temperature at the outlet should be 17–20° C lower than the ambient temperature (and should not exceed 20° C). If the ambient air temperature is very high, for example 45° C, the air temperature at the air conditioner outlet may reach 15° C; however, as a rule, the cooled air temperature is 17–20° C lower than the ambient temperature. If the cooled air temperature is higher than normal, the air conditioner must be recharged with refrigerant. Further work on the air conditioner is beyond the scope of this manual and must be performed by qualified personnel.
6. Check the refrigerant condition through the sight glass. The sight glass is located at the top of the receiver (indicated by the arrow). If bubbles are observed in the sight glass with the air conditioner operating, the refrigerant quantity is insufficient.
7. At high ambient temperatures, bubbles may be observed in the sight glass even with a normal refrigerant charge. When the air conditioner is switched off and the refrigerant quantity is normal, slight foaming may be observed in the sight glass, which then disappears.
8. If the checks show that the refrigerant charge is insufficient, take the vehicle to a dealer service department or a specialized workshop for refrigerant recharging.
Heater
If there is no heating from the heater, the causes may be as follows: either the thermostat does not close, as a result of which the coolant heats up insufficiently and poorly warms the heater core (in this case, replace the thermostat (see subsection 4.3)), or the heater hose is clogged, which prevents coolant flow through the heater core. In this case, flush the hose:
PROCEDURE
1. Check by touch the temperature of the hoses on the engine compartment bulkhead. The hoses should be hot. If one of the hoses is cold, this indicates a blockage in the hose or heater core, or that the control valve is closed.
2. Disconnect the hoses and flush the heater core with a stream of water from the hose. If water flows freely through the heater core, remove both hoses and flush them with a stream of water.
3. If water does not pass through the heater core, the core is clogged and must be replaced (see subsection 4.5).
If the fan speed does not correspond to the switch position, check the fuses, wiring, switch, resistor block or blower motor (see subsection 3.3.14).
If no air comes out of the air duct outlets, proceed as follows:
PROCEDURE
1. Turn the ignition key to the ON position and turn on the fan. Listen at the air duct outlet. The sound of the operating blower motor should be audible.
2. If the blower motor hum is not heard, or if the check shows that the switch and resistor block are serviceable, the cause may be a faulty blower motor (see subsection 3.3.14). If the carpet is damp, or coolant vapor enters through the ventilation openings, there is a leak in the heater core. Replace the heater core (see subsection 4.5), as heater cores are generally not accepted for repair.
Check that the heater/air conditioner drain hose, located on the right side of the engine compartment bulkhead, is not clogged.
Test yourself
A quick Toyota Corolla quiz: every answer comes with an explanation and a link to the manual page.