Heater and Air Conditioner Control Panel
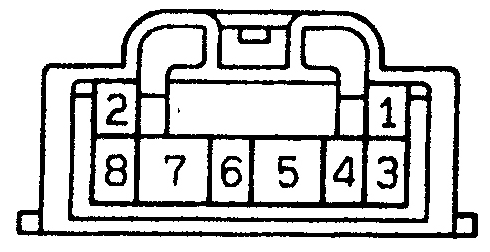
Blower Fan Speed Switch Contact Continuity Check
Switch in "Low" position – contacts 3 and 7 closed
In "M1" position – contacts 3, 7 and 8 closed
In "M2" position – contacts 3, 6 and 7 closed
In "HI" position – contacts 3, 7 and 8 closed
Removal and installation
PROCEDURE
1. Disconnect the battery ground cable.
2. Remove the decorative trim panels of the center control panels (see Subsection 11.21).
3. Remove the control knobs.
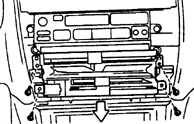
4. Remove the mounting screws from the front side of the control panel. Disconnect the connectors.

5. Gently pull the panel toward you. Turn the tabs (indicated by the arrows) at the control cable sheath retaining points. Disconnect the cables from the control panel. Disconnect the connectors.
6. Installation is the reverse of removal.
7. Start the engine, check for leaks and check the operation of the heating and air conditioning systems (if equipped).
Control Cable Adjustment
PROCEDURE
1. After securing the cables to the control panel and after installing the control panel itself, adjust the cable tension. Move the control levers to the RECIRC, COOL and DEF positions.
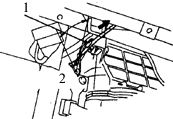
2. To adjust the intake air door control cable, move the air door control lever to the RECIRC position (2). Secure the cable clip and the cable sheath clamp (1) in place.
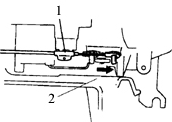
3. To adjust the air temperature control door cable, move the door to the COOL position (2). Secure the cable clip and the cable sheath clamp (1) in place, while lightly tensioning the sheath.
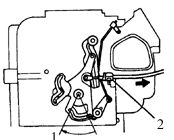
4. To adjust the mode (distribution) door control cable, set the door to the DEF position (1). Secure the cable clip and the cable sheath clamp (2) in place.
Inspection
PROCEDURE

1. Check the air conditioner switch. When the switch button is pressed (ON), contacts 5 and 6, as well as 1 and 3, must be closed (shorted).
2. Check the operation of the blower fan speed switch (see the figure, Blower Fan Speed Switch Contact Continuity Chart). If the switch contacts do not close in accordance with the chart, replace the control panel assembly.
Test yourself
A quick Toyota Corolla quiz: every answer comes with an explanation and a link to the manual page.