Removal and Installation of Engine
PROCEDURE

View of the transmission from the engine compartment 1 – transmission mount bolt; 2 – transmission; 3 – clutch cable
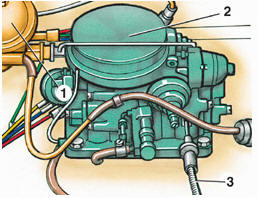
Carburetor and vacuum reservoir 1 – vacuum reservoir; 2 – carburetor; 3 – accelerator linkage
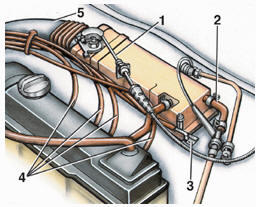
Accelerator linkage of a vehicle with fuel injection system 1 – accelerator linkage; 2 – vacuum hose; 3 – cold start valve; 4 – fuel lines to injectors; 5 – air duct
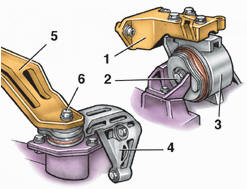
Rear engine mount and transmission mount 1 – engine mount bracket; 2 – rear engine mount bolt; 3 – rear engine mount; 4 – transmission mount; 5 – transmission mount bracket; 6 – transmission mount bracket-to-mount bolt
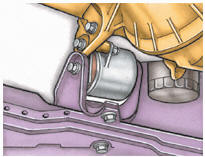
Front engine mount
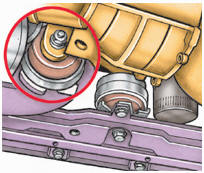
Hydraulic engine mount (vehicles produced from January 1985)
The engine is removed together with the transmission. PROCEDURE 1. Disconnect the negative battery cable. 2. Drain the coolant. 3. Remove the air filter together with the hoses. 4. Unscrew bolt 1 (see figure View of the transmission from the engine compartment) securing the transmission to the mount and, after releasing it from the spring clips, pull forward and remove the radiator splash guard.
5. Remove the radiator grille. 6. Disconnect the electrical connectors from the headlamps. 7. Unscrew the bolts securing the radiator brackets. 8. Disconnect the hood lock cable from the latch and disconnect the cable retainer from the front panel. 9. Unscrew the bolts securing the front panel and remove the panel together with the headlamps. 10. Disconnect the engine cooling system hoses from the cylinder head, water pump and expansion tank. 11. Disconnect the electrical wires from the electric cooling fan and the thermal switch. 12. Remove the radiator together with the fan shroud and fan. 13. Disconnect the wiring from the alternator, oil pressure sensor, starter, intake manifold heater switch, ignition coil, distributor, transmission, coolant temperature sensor, cold start valve, auxiliary air valve, glow plugs, fuel pump shut-off valve, etc. 14. Disconnect the fuel lines from the fuel pump. 15. Disconnect the ground wire from the transmission. 16. Remove the starter. 17. Disconnect the cooling system lines from the cylinder head. 18. Disconnect the clutch linkage. 19. Unscrew the bolt securing the transmission to the mount. 20. Disconnect the vacuum hoses from the brake booster and vacuum reservoir 1 (see illustration Carburetor and Vacuum Reservoir). 21. Remove the vacuum reservoir. 22. Disconnect the accelerator rod. 23. On vehicles with fuel injection, remove the cold start valve 3 (see illustration Accelerator Drive of Vehicle with Fuel Injection System) without disconnecting the fuel line; disconnect the vacuum hoses 2; unscrew the warm-up regulator without disconnecting the fuel line; remove the air duct 5; remove the injectors without disconnecting the fuel lines 4. 24. Unscrew bolts 2 (see illustration Rear Engine Mount and Transmission Mount) securing the rear engine mount 3. 25. Unscrew the bolts securing the transmission mounts. 26. Disconnect the front wheel drive shafts from the transmission and tie them to the body with wire. 27. Disconnect the tailpipe from the exhaust manifold. 28. Disconnect the gear shift rods from the transmission.
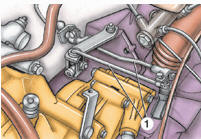
29. On vehicles with automatic transmission, disconnect the gear selector cable (the selector lever must be in the "P" position), release the accelerator rod from the transmission bracket, and disconnect rods 1. 30. Disconnect the speedometer drive from the transmission. 31. Attach the engine to a hoist or lifting tackle and carefully raise it to unload the front engine mounts. 32. Unscrew the bolts securing the front engine mount. 33. Carefully lift the engine out upward. 34. Installation is performed in the reverse order. When installing the powertrain, first tighten the rear engine mount to a torque of 25 N·m, then tighten the transmission mount to a torque of 60 N·m, then tighten the front engine mount to a torque of 50 N·m. Tighten the hydraulic mount to a torque of 30 N·m.
Test yourself
A quick Volkswagen Golf quiz: every answer comes with an explanation and a link to the manual page.