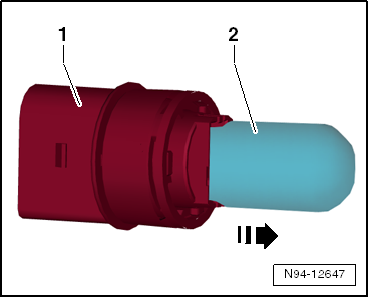
Headlight
Assembly overview - Headlight

- Inner headlight mounting bolt to body
- Tightening torque: 4 N·m
- Bracket mounting bolts to body
- Bracket
- Front left turn signal lamp -M5- or front right turn signal lamp -M7-
- Lamp 12V, PY21W
- Remove and install
- Lamp socket with handle
- for front left turn signal lamp -M5- or front right turn signal lamp -M7-
- Daytime running light/parking light lamp
- Left lamp with the functions of left parking light -M1- and left daytime running light -L174-
- Right lamp with the functions of right parking light -M3- and right daytime running light -L175-
- Lamp 12V, 21/5W
- Remove and install
- Lamp socket with handle
- for daytime running light/parking light lamp
- Rear mounting bolt, headlight to body
- Tightening torque: 4 N·m
- Upper mounting bolt, headlight to bracket
- Tightening torque: 4 N·m
- Adapter
- Left headlight range control actuator -V48- or right headlight range control actuator -V49-
- Remove and install
- Cover cap
- Bulb for low beam and high beam
- Left bulb with the functions of left low beam headlight bulb -M29- and left high beam headlight bulb -M30-
- Right bulb with the functions of right low beam headlight bulb -M31- and right high beam headlight bulb -M32-
- H4 bulb 12V, 60/55W
- Remove and install
- Left front headlight -MX1- or right front headlight -MX2-
- Remove and install
- Correcting headlight installation position
- Installing repair kit for headlight housing
- Converting headlights from right-hand traffic to left-hand traffic
- Converting headlights from left-hand traffic to right-hand traffic
Removing and installing headlight
Required Special Tools, Test and Measuring Equipment and Auxiliary Items
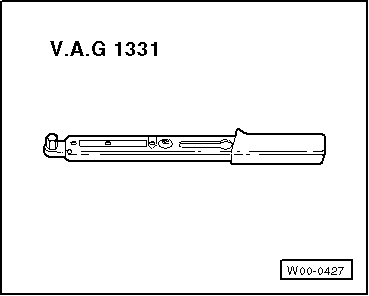
- Torque Wrench -V.A.G 1331-

Note
- It is not necessary to disconnect the battery negative cable.
- The illustrations show removal and installation of the left headlight. Removal and installation of the right headlight is carried out in the same way.
- If a headlight has been removed, it must always be adjusted after installation → Booklet 35.1.
Removing
- Switch off ignition and all electrical consumers and remove the ignition key.
- Remove front bumper cover → Body assembly work, exterior.
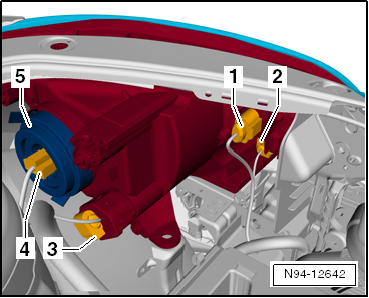
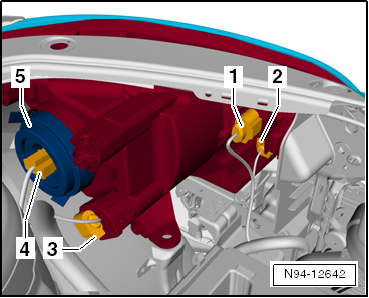
- Unlock and disconnect connectors -1-, -2-, -3- and -4-.
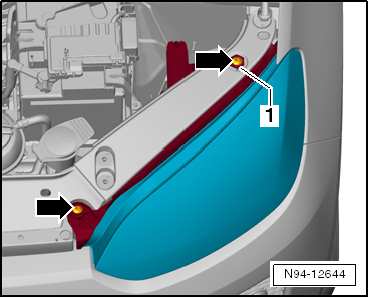
- Unscrew the inner and upper mounting bolts -arrows- and remove adapter -1- from under the upper mounting bolt.
- Unscrew the rear mounting bolt -arrow-.
- Remove headlight forward from the body opening.
Installing
Installation is carried out in the reverse order, observing the following:
- Check the headlight installation position for even gap dimensions. If the headlight shows uneven gaps to the body, the installation position must be corrected.
- Check headlight functions.
- Check headlight adjustment and adjust headlight if necessary → Booklet 35.1, "Instandhaltung genau genommen".
Tightening torques
- "Assembly overview - headlight"
Adjusting headlight
Adjusting headlight "Instandhaltung genau genommen": → Booklet 35.1.
Correcting headlight installation position
Required Special Tools, Test and Measuring Equipment and Auxiliary Items
- Torque Wrench -V.A.G 1331-

Note
- If the headlight shows uneven gaps to the body after installation, the installation position must be corrected.
- To correct the headlight installation position, the front bumper does not need to be removed.
- Switch off ignition and all electrical consumers and remove the ignition key.
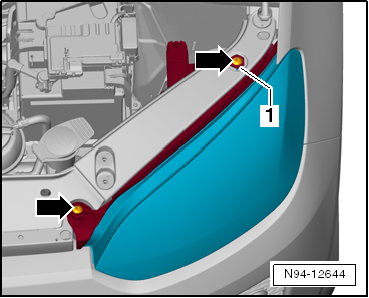
- Loosen rear mounting bolt -arrow-.
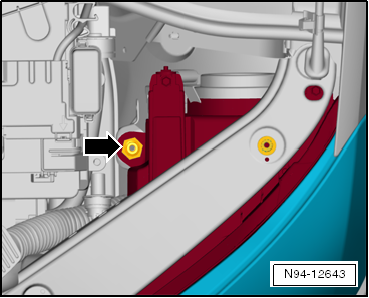
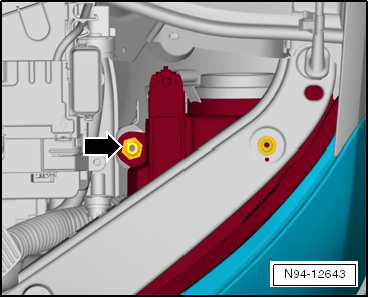
- Loosen inner and upper mounting bolts -arrows-.
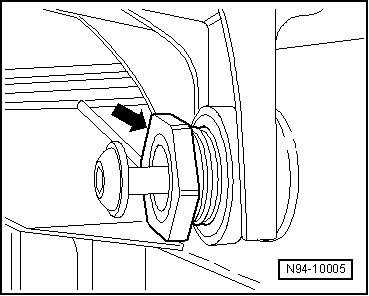
- Adjust flushness to the body by screwing the adjusting sleeves -arrow- on the headlight in or out.
- Tighten bolts.
- Check the headlight installation position for even gap dimensions and correct again if necessary.
- Check headlight functions.
- Check headlight adjustment and adjust headlight if necessary → Booklet 35.1, "Instandhaltung genau genommen".
Tightening torques
- "Assembly overview - headlight"
Removing and installing front indicator bulb -M5-/-M7-

Caution!
Bulbs and gas discharge lamps are under pressure!
Risk of injury from bursting bulbs and gas discharge lamps!
- Remove bulbs and gas discharge lamps carefully.
- Wear safety goggles and gloves when removing and installing bulbs and gas discharge lamps.
- Avoid contact with broken glass envelopes.

Note
The removal and installation described is for the left side. Removal and installation on the right side is carried out in the same way.
Removing
- Switch off ignition and all electrical consumers and remove the ignition key.
- Unlock and disconnect connector -2-.
- Turn bulb holder -1- in the direction of the arrow as far as it will go and remove it together with the front indicator bulb from the rear of the headlight.

- Press front indicator bulb -2- into the holder, turn it in the direction of the arrow at the same time and pull it out of holder -1-.
Front indicator bulb: 12V, PY21W
Installing
Installation is carried out in the reverse order, observing the following:

Caution!
Risk of damage to the headlight.
- Do not touch the glass envelope of the bulb with bare fingers. Fingers leave grease deposits on the glass envelope which evaporate when the bulb is switched on and cloud the glass envelope.
- When inserting bulbs, use clean cloth gloves, for example.
- When installing the bulb holder, make sure it is seated correctly. Water entering the headlight will destroy it.
- Check headlight functions.
- Check headlight adjustment and adjust headlight if necessary "Instandhaltung genau genommen": → Booklet 35.1.
Installing repair kit for headlight housing
Repairing the upper mounting point
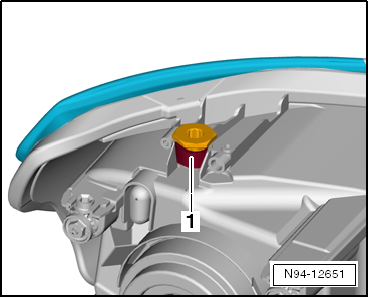
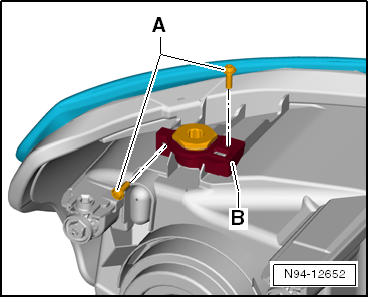
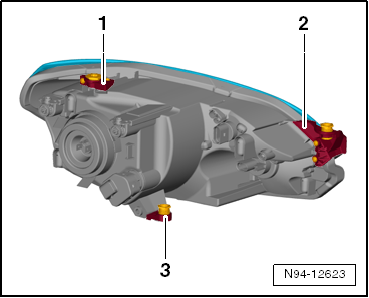
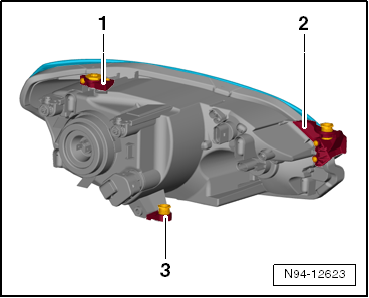
If the upper mounting point -1- is damaged or broken off, it can be repaired by installing a repair kit. It is therefore not necessary to replace the entire headlight.

Note
- Check whether there is further damage to the headlight which would make installing the repair kit unnecessary.
- The repair kits for the left and right headlights are different → ETKA (Electronic Parts Catalogue).
- Switch off ignition and all electrical consumers and remove the ignition key.
- Remove headlight.

- Remove the old mounting point -1- until the new mounting point rests flat.
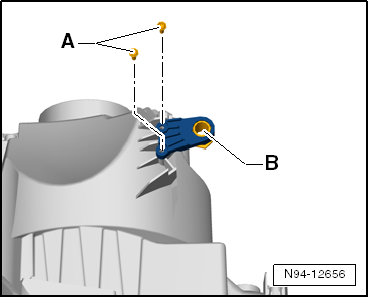
- Fit repair bracket -B- onto the base of the old mounting bracket on the headlight with a positive fit and secure with the two mounting bolts -A-.
- Install headlight.
- Check headlight adjustment and adjust if necessary "Instandhaltung genau genommen": → Booklet 35.1.
Tightening torques

Repairing the inner mounting bracket
If the inner mounting bracket -2- is damaged or broken off, it can be repaired by installing a repair kit. It is therefore not necessary to replace the entire headlight.

Note
- Check whether there is further damage to the headlight which would make installing the repair kit unnecessary.
- The repair kits for the left and right headlights are different → ETKA (Electronic Parts Catalogue).
- Switch off ignition and all electrical consumers and remove the ignition key.
- Remove headlight.
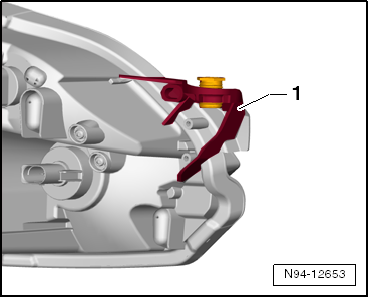
- Remove the old mounting bracket -1- until the repair bracket can be fitted.
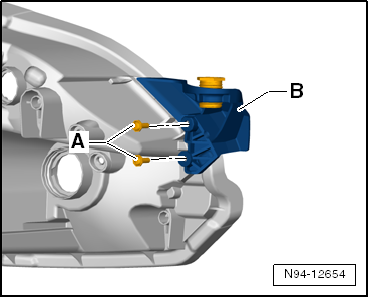
- Fit repair bracket -B- onto the base of the old mounting bracket on the headlight with a positive fit and secure with the two mounting bolts -A-.
- Install headlight.
- Check headlight adjustment and adjust if necessary "Instandhaltung genau genommen": → Booklet 35.1.
Tightening torques

Repairing the rear mounting bracket
If the rear mounting bracket -3- is damaged or broken off, it can be repaired by installing a repair kit. It is therefore not necessary to replace the entire headlight.

Note
- Check whether there is further damage to the headlight which would make installing the repair kit unnecessary.
- The repair kits for the left and right headlights are different → ETKA (Electronic Parts Catalogue).
- Switch off ignition and all electrical consumers and remove the ignition key.
- Remove headlight.
- Remove the old mounting bracket -1- until the repair bracket can be fitted.

- Fit repair bracket -B- onto the base of the old mounting bracket on the headlight with a positive fit and secure with the two mounting bolts -A-.
- Install headlight.
- Check headlight adjustment and adjust if necessary "Instandhaltung genau genommen": → Booklet 35.1.
Tightening torques

Converting headlights from right-hand traffic to left-hand traffic

Note
- To prevent glare from the asymmetric low beam, both headlights normally must be converted to the traffic direction prescribed in the relevant country.
- The asymmetric low beam of the headlights in the up! remains below the legally prescribed glare values even without masking the headlight lenses.
- For this reason, converting the headlights for short-term use in countries where traffic drives on the other side of the road is not necessary.
Converting headlights from left-hand traffic to right-hand traffic

Note
- To prevent glare from the asymmetric low beam, both headlights normally must be converted to the traffic direction prescribed in the relevant country.
- The asymmetric low beam of the headlights in the up! remains below the legally prescribed glare values even without masking the headlight lenses.
- For this reason, converting the headlights for short-term use in countries where traffic drives on the other side of the road is not necessary.
Removing and installing headlight range control actuator -V48-/-V49-
The left headlight range control actuator -V48- or right headlight range control actuator -V49- is installed in the headlight and can be replaced.

Note
The removal and installation described is for the left side. Removal and installation on the right side is carried out in the same way.
Removing
- Remove headlight.
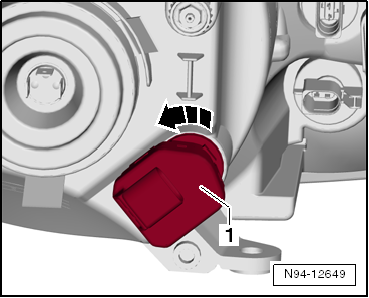
- Turn the headlight range control actuator -1- in the direction of the arrow until it stops.
- Swivel the ball head of the actuator -2- to the right out of the socket in the headlight -1- and remove the actuator -3- from the headlight housing.
Installing
Installation is carried out in the reverse order, observing the following:

Caution!
Risk of damage to the headlight.
When installing the left headlight range control actuator -V48-, make sure it is seated correctly. Water entering the headlight will destroy it.
- Insert the headlight range control actuator into the headlight in the removal position.
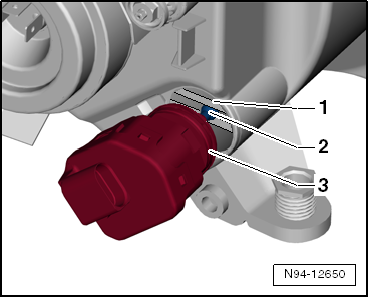
- Swivel the ball head of the headlight range control actuator -2- from the right into the socket in the headlight -1- and pull the reflector towards the rear.
- Insert the actuator -3- into its seat on the headlight housing and lock it by turning it to the right until it stops.
- Check headlight functions.
- Check the headlight adjustment and adjust if necessary → Booklet 35.1.
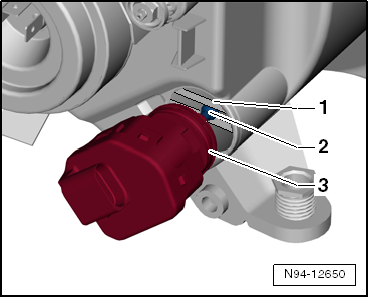
Removing and installing low beam headlight bulb

Caution!
Bulbs and gas discharge lamps are under pressure!
Risk of injury from bursting bulbs and gas discharge lamps!
- Remove bulbs and gas discharge lamps carefully.
- Wear safety goggles and gloves when removing and installing bulbs and gas discharge lamps.
- Avoid contact with broken glass envelopes.
The low beam and high beam bulb combines the functions of the left low beam headlight bulb -M29- and left high beam headlight bulb -M30-, or the right low beam headlight bulb -M31- and right high beam headlight bulb -M32-, into one component.

Note
- The illustrations show the removal and installation of the low beam and high beam bulb on the left headlight. The removal and installation of the low beam and high beam bulb on the right headlight is carried out in the same way.
- The headlight does not need to be removed to remove and install the low beam and high beam bulb.
Removing
- Switch off ignition and all electrical consumers and remove the ignition key.
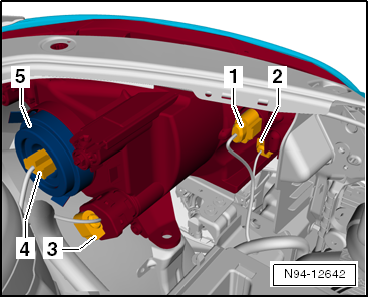
- Unlock and disconnect connector -4-.
- Pull cover cap -5- off the rear of the headlight.
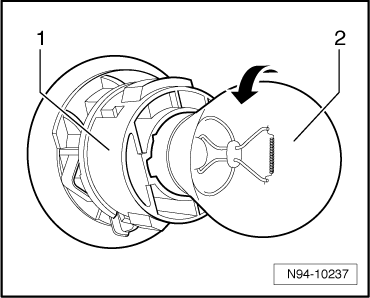
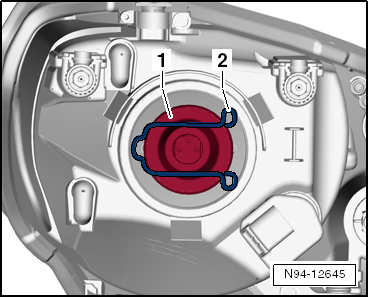
- Unlock retaining clip -2- and swivel it to the side.
- Remove the low beam and high beam bulb -1- from the reflector.
Low beam and high beam bulb: H4 12V, 60/55W
Installing
Installation is carried out in the reverse order, observing the following:

Caution!
When installing the cover cap, make sure the cap is seated correctly. Water entering the headlight will destroy it.

Note
When installing a bulb, do not touch the glass envelope. Fingers leave grease marks on the glass envelope, which evaporate when the bulb is switched on and cloud the glass envelope.
- Check headlight functions.
- Check headlight adjustment and adjust headlight if necessary "Instandhaltung genau genommen": → Booklet 35.1.
Removing and installing parking light/daytime running light bulb

Caution!
Bulbs and gas discharge lamps are under pressure!
Risk of injury from bursting bulbs and gas discharge lamps!
- Remove bulbs and gas discharge lamps carefully.
- Wear safety goggles and gloves when removing and installing bulbs and gas discharge lamps.
- Avoid contact with broken glass envelopes.

Note
The illustrations show the removal and installation of the left parking light/daytime running light bulb. The removal and installation of the right parking light/daytime running light bulb is carried out in the same way.
Removing
- Switch off ignition and all electrical consumers and remove the ignition key.
- Unlock connector -1- and disconnect it.
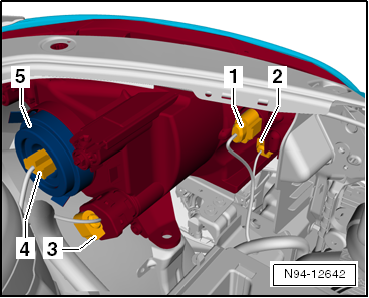
- Turn bulb holder -1- in the direction of the arrow until it stops, then remove it together with the parking light/daytime running light bulb from the rear of the headlight.
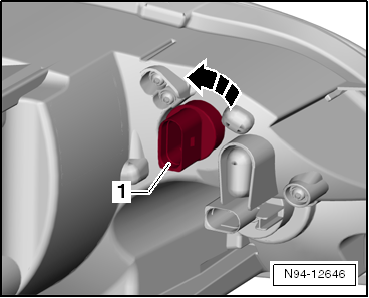
- Pull the parking light/daytime running light bulb -2- straight out of the bulb holder -1-.
Parking light/daytime running light bulb: 12V, 21/5W
Installing
Installation is carried out in the reverse order, observing the following:

Caution!
Risk of damage to the headlight.
- Do not touch the glass envelope of the bulb with bare fingers. Fingers leave grease deposits on the glass envelope which evaporate when the bulb is switched on and cloud the glass envelope.
- When inserting bulbs, use clean cloth gloves, for example.
- When installing the bulb holder, make sure it is seated correctly. Water entering the headlight will destroy it.
- Check headlight functions.
- Check headlight adjustment and adjust headlight if necessary "Instandhaltung genau genommen": → Booklet 35.1.