Interior
Removing the Left Parcel Shelf

To remove the left parcel shelf, loosen bolts 2 through 5. When installing, insert the shelf into the guides at the front (position 1 shows one of them).
The lower left part of the instrument panel trim, integrated with the parcel shelf, must be removed in almost all cases where access to the back of the instrument panel is required.
PROCEDURE
Using a narrow socket wrench, unscrew the four screws around the parcel shelf.
Fold the parcel shelf slightly downward and pull it toward you.
When installing, insert the front edge of the trim panel into both guides on the vehicle floor and near the pedals.
Do not overtighten the screws.
Removal of Glove Box
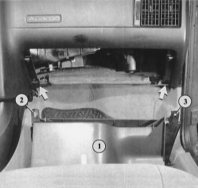
The glove box (1) is attached to the instrument panel by its hinges (2 and 3) (arrows). The illustration shows the glove box disassembled.
PROCEDURE
Remove both hinge mounting screws of the glove box from the lower edge of the instrument panel.
Slightly press the glove box stops inward and pivot the glove box downward.
Removal of Lower Center Console

Removal of rear center console: remove the strip (1), disconnect the parking brake lever boot trim (3), disconnect the link (arrows) on the lever (2) from the retainer.
PROCEDURE
Apply the parking brake.
Using a screwdriver, pry out the retaining clips of the parking brake lever boot and separate it from the floor.
Lift the trim slightly at the front, press the link of the lever upward and pull the lever forward.
Lift the decorative panel in front of the parking brake lever. Pry up the upper edge with a small screwdriver.
Remove the six mounting bolts located under the panel.
Remove the rear ashtray.
Remove the two hex bolts under the ashtray.
Pull the console section up by the front edge and remove it forward over the parking brake lever.
Removal of Front Center Console

Removal of front center console: unscrew the shift lever knob (2), loosen the bolt on the lever boot (1). (3) – front guides.
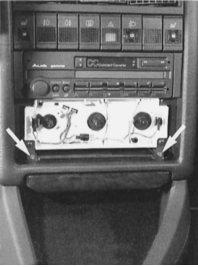
Arrows indicate the two bolts located in the heater panel cutout that must be loosened to remove the center console.
PROCEDURE
Disconnect the battery ground cable.
Completely remove the rear section of the center console.
Remove the shift lever or selector lever.
Remove the Phillips-head bolt at the rear edge of the console and remove the shift lever boot or trim.
Disconnect all three heating/ventilation controls.
Remove the two screws of the heater panel and remove the panel.
On vehicles equipped with automatic air conditioning, completely remove the control unit.
Remove one screw each at the bottom right and left in the heater panel cutout.
Press the console with the ashtray downward; on versions with additional instruments, remove the narrow decorative plate downward.
Disconnect the console from the instrument panel by pulling it rearward.
If necessary, disconnect the wiring.
When installing, the guides on the instrument panel and center console must engage with each other.
Test yourself
A quick Audi 80 quiz: every answer comes with an explanation and a link to the manual page.