Hood
Removal
Installation of the hood is easier if the hinge positions are marked before removal. This is best done with a waterproof marker.
PROCEDURE
Disconnect the engine compartment light wiring, the windshield washer nozzle heater wiring where equipped, and the flexible jumper.
Tip: if the same hood will be reinstalled, attach a cord to the end of the wire when pulling it through. Pull the cord with the wire through the hood. Leave the cord in the hood; it will help when routing the wire back into place during installation.
Disconnect the windshield washer hose.
If necessary, disconnect the engine compartment light wiring or the heated washer nozzle wiring.
Remove the retaining clips from the upper mounting bolt of the gas strut.
Remove the hinge protector (where equipped).
Loosen the bolts in the hinges on the right and left.
The hood is too heavy to remove alone. Therefore, ask helpers to support it on the right and left.
Now press out the gas strut mounting pin and remove the strut.
Unscrew the already loosened bolts by hand and remove the hood.
If necessary, the hood hinges can now be removed.
Note: do not discard old gas struts; it is better to take them to an Audi workshop for recycling.
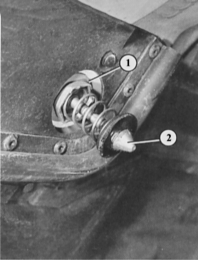
Adjust the front edge of the hood by loosening the sheet-metal nut (1) and turning the lock striker (2) out or in.
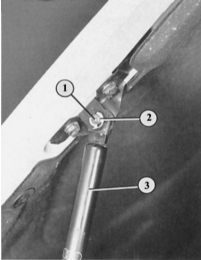
Right side: to remove the gas strut (3), remove the retaining clip (2) and press out the mounting pin (1).
Hood Adjustment
The gap between the closed hood and the left and right fenders must be even, and the front edge of the hood must also be flush with the fenders. The height adjustment must also match. The hood must not stand proud of the top edge of the fenders or sit below them (height adjustment).
PROCEDURE
For longitudinal adjustment, loosen the upper bolts between the hinge and the hood.
For lateral adjustment, loosen the bolts between the hinges and the body.
Move the hood panel in the required direction and tighten the bolts.
Height adjustment at the front edge of the hood is made using the hood latch.
Loosen the lock nuts on the stop buffers on the right and left and screw them fully into the body panel.
Loosen the lock nut with pliers and screw the lock striker in or out with a screwdriver until the upper edge of the hood is flush with the fenders.
Check the installation at the front (right and left!) with the hood closed.
Retighten the lock nuts.
Make sure the lock striker is aligned exactly with the hole in the front body panel. If not, it can be shifted longitudinally and transversely after loosening the lock nut.
Screw the bumper stop in until the hood does not rattle after closing. Several attempts may be required.
Test yourself
A quick Audi 80 quiz: every answer comes with an explanation and a link to the manual page.