Front Bumpers

After disconnecting both radiator grille sections on the right and left, both bumper mounting bolts become accessible in the bumper. Now unscrew them with a 6 mm internal hex key (arrow).

The position of the bracket (1) securing the bumper side panels can be changed after loosening the bolts indicated by arrows in the illustration.
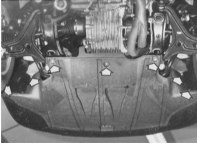
The arrows show the bolted connections that must be loosened to remove the engine compartment lower cover.
Removal
PROCEDURE
Open the hood.
Remove the engine compartment lower cover.
Unscrew the Phillips-head bolt in the center, behind the bumper from below.
Detach and remove the small insert elements of the radiator grille at the right and left lower sections of the bumper.
A 6 mm internal hex bolt is located beneath them. Unscrew it.
Remove the plastic dowels at the right and left rear lower ends of the bumper.
Detach the end sections of the bumper from the body brackets on the fender. To do this, press the side of the bumper downward while pulling it away from the body.
Pry the bumper ends up over the wheel arches and remove them by pulling forward.
Now remove the bumper by pulling it forward.
Vehicles with fog lights and/or turn signals in the bumper: disconnect the cable connections to the lights in the bumper.
Vehicles with headlight washers: disconnect the hoses from the nozzles and plug them to avoid draining the reservoir.
The front bumper trim pieces can be removed individually.
The license plate holder in the center of the front bumper is secured with two bolts.
After removing the license plate holder, both side trim pieces can be removed from the retainers individually using a flat plastic trim tool. To do this, press down both small locating wedges while carefully separating the trim piece by hand.
Installation
PROCEDURE
Connect the wiring harness and water hoses.
First engage the bumper in the brackets.
Now install the bumper side covers so that the ends of the bumper do not collide with the wheel housing trim.
First hook the side covers by their lower edge onto the mounts on the fender. Then press the bumper in from the side; this secures the upper edge.
Bumper Alignment
PROCEDURE
After installing the bumper, check that the gap between the metal strip located just below the headlights and the bumper is even everywhere.
However, the dimension between the lower edge of the hood and the bumper is decisive.
This dimension must be 6 mm.
Otherwise, remove the bumper again, loosen its brackets and move them slightly within the elongated holes.
Note: Audi 80 plastic bumpers return almost completely to their original shape even after severe impacts. Therefore, accident damage to components located behind the bumper may remain undetected. After a collision, be sure to check (for damage or its absence) the following parts: the front side of the bumper under the trim (transverse cracks), the supports behind the bumper, the headlight housing fasteners, the lower edge of the hood, and the radiator grille.
Test yourself
A quick Audi 80 quiz: every answer comes with an explanation and a link to the manual page.