Clutch Component Installation
PROCEDURE
1. Before installation, wipe the machined surfaces of the flywheel and pressure plate with a rag moistened with acetone. It is extremely important to completely degrease the contact surfaces of the components as well as the clutch disc friction facings. Handle the components only with clean, washed hands.
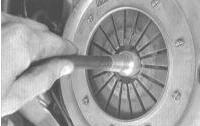
2. Press the clutch cover assembly (with the clutch disc and alignment tool installed and secured) against the flywheel. Make sure the clutch disc is installed with the side marked “flywheel side” facing the flywheel. If there is no marking, remember that the clutch disc is always installed with the torsion springs/dampers facing the transmission.
3. Tighten the clutch cover bolts to the flywheel by hand.
4. Center the clutch components. Insert the special tool through the clutch disc hub and into the pilot bearing recess in the end of the crankshaft. Move the tool up/down and left/right to align the components. Tighten the cover bolts in a diagonal sequence, in several stages, to the specified torque. Remove the clutch alignment tool.
5. Pack the inner groove of the release bearing with high-melting-point grease (refer to Release Bearing and Release Fork Inspection and Installation section). Also lubricate the contact surfaces of the release lever and the transmission input shaft bearing retainer.
6. Install the release bearing (refer to Release Bearing and Release Fork Inspection and Installation section).
7. Install the transmission and all components removed to gain access.
Test yourself
A quick Honda Accord quiz: every answer comes with an explanation and a link to the manual page.