Release Bearing and Release Fork Inspection and Installation
INSPECTION
PROCEDURE
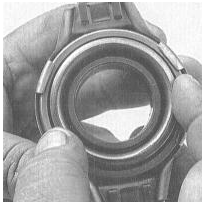
1. Hold the bearing by the outer race, press the inner race and rotate it. The bearing must rotate smoothly and quietly; otherwise, replace it. Wipe the bearing with a clean rag and inspect for signs of wear, cracks and other mechanical damage. The release bearing is generally replaced each time clutch components are serviced. Never wash the bearing in solvent, as this may damage its sealing.
2. Inspect the release lever for cracks and signs of deformation.
INSTALLATION
PROCEDURE

1. Pack the inner groove of the release bearing with high-melting-point grease. Lightly lubricate the splines of the transmission input shaft and its front bearing retainer with the same grease.
2. Lubricate the ball stud seat on the back side of the release fork and the seat for the slave cylinder pushrod with the same grease.

3. Engage the release bearing with the release fork.
4. Slide the release bearing onto the front bearing retainer of the transmission input shaft, while passing the end of the release fork through the opening in the clutch housing. Seat the release fork firmly on the ball stud of the pivot.
5. Lightly apply high-melting-point grease to the release bearing surface that contacts the diaphragm spring fingers.
6. Install the remaining components in the reverse order of removal.
Test yourself
A quick Honda Accord quiz: every answer comes with an explanation and a link to the manual page.