Honda TRK Tire Repair Kit
For vehicles equipped with the Honda TRK Tire Repair Kit
Your vehicle does not have a spare tire.
A tire repair kit is provided instead (Honda TRK: TERRA S® temporary tire repair kit). This kit is intended only for repairing damaged tires.
When using the kit, be sure to follow the instructions and recommendations in this Owner's Manual.
The expiration date of the sealant must be checked regularly, at the intervals in time and mileage specified in the vehicle's Maintenance Schedule*.
*: The maintenance schedule for vehicles intended for European countries is provided in the separate Service Booklet, which is part of the documentation supplied with the vehicle in those countries.
Instructions for using the repair kit are included with the kit. The symbols and
 are intended to remind you to read the instructions for using the repair kit.
Read all information carefully and follow the instructions.
The repair kit can be used to repair small punctures in the tire tread caused by nails or screws.

WARNING
Do not use the repair kit in the following cases. Contact your dealer or roadside assistance service.
1. If the sealant has expired.
2. If the cut in the tyre tread is longer than 4 mm.
3. If the tyre sidewall is punctured.
4. If the tyre has been damaged by driving on a partially or completely deflated tyre.
5. If the tyre has come off the wheel rim.
6. If the wheel rim is damaged.
7. If two or more tyres are damaged.
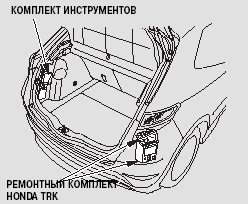
Open the luggage compartment door. Remove the side cover by turning the handle counterclockwise. Take the TRK tyre repair kit out of the rear of the luggage compartment.
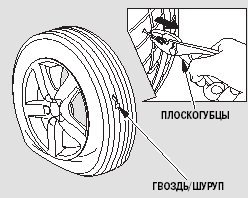
1. Remove the nail or screw from the tyre tread using the pliers included in the tyre repair kit. If the nail (screw) cannot be removed or located, contact your Honda dealer or roadside assistance service.
In an emergency, the tyre repair kit allows you to make a repair without removing the nail or screw.
CAUTION
If the repair is made without removing the nail or screw, air may leak from the tyre, and the tyre may be damaged or ruptured. Therefore, drive with extreme care, especially when turning.
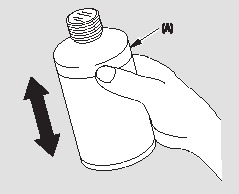
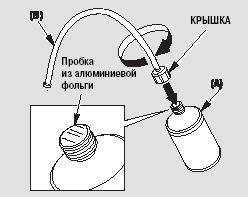
2. Take out the tyre repair kit and shake the container (A). Screw the filler hose (B) onto the container (A), piercing the aluminum foil seal.
CAUTION
Contains ethylene glycol.
•Swallowing may cause poisoning (gastrointestinal tract).
Drink a large amount of water and seek medical attention immediately.
•Contact with the eyes causes irritation. Rinse thoroughly with water and seek medical attention immediately.
•Keep the bottle closed and out of the reach of children.
•Shaking the container after the filler hose is connected may cause the sealant to spill. Shake the container before connecting the hose.
WARNING
Sealant that gets on clothing may not be removable. Be careful not to spill the liquid.
Warning label on the container
To remind you of the rules for using the tyre repair kit, warning labels are attached to the sealant container. Read the warning text carefully. Pictograms , on the tyre repair kit packaging are intended to remind you to read the instructions for using the tyre repair kit.
If you have any questions about using the tyre repair kit, consult your authorized Honda dealer.
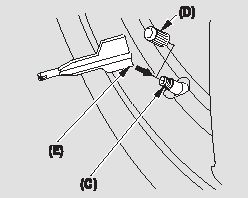
3. Remove the cap (D) from the tyre valve (C).
Release the residual air from the tyre by pressing the valve core with the back end of the valve core removal tool (E).
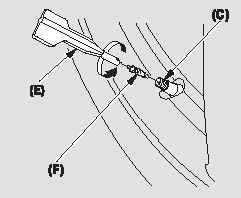
Unscrew the valve core (F) using the valve core removal tool (E). Do not place the valve core (F) on sand or dirt.
CAUTION
If air remains in the tyre, the valve core may be forcefully ejected from the tyre. Be careful when removing the valve core.
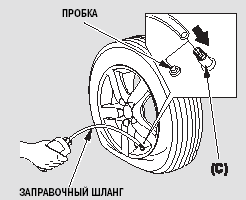
4. Open the cap of the filler hose and insert the hose into the tyre valve (C).
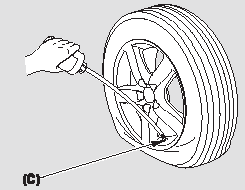
Press the container while holding the hose downward. Completely squeeze the contents of the container into the tyre.
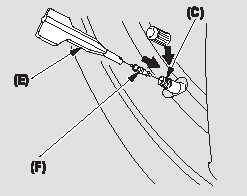
5. Remove the hose from the valve and firmly screw the valve core (F) back into the valve (C), using the valve core removal tool (E).
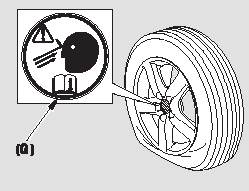
Attach the "Tyre Sealant in the tyre" label (G) to the wheel.
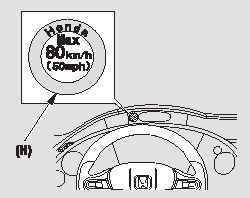
Attach the "Maximum Speed" label (H) to the instrument panel where it is clearly visible to the driver.
CAUTION
Do not attach the label to the steering wheel hub. It may interfere with the operation of the airbag.
Do not attach the label where it may cover the indicators or the speedometer.
6. Screw the pump hose (J) onto the tyre valve (C).
Insert the plug into the cigarette lighter socket (K).
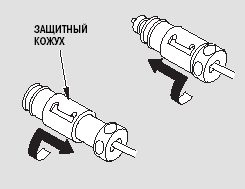
To use the plug, remove the protective cap by turning it clockwise. Slide it down, then turn the cap clockwise again to lock it in place.
If the plug is not used, repeat this procedure to reinstall the protective cap.
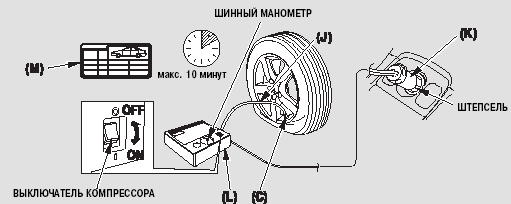
Turn the ignition key to the ACCESSORY (I) position. Switch on the compressor (L). Inflate the tyre to the recommended air pressure (M). Do not inflate the tyre for more than 10 minutes.
If the pressure exceeds the specified value, release the excess air.
WARNING
If the tyre cannot be inflated within 10 minutes, this may indicate serious damage to the tyre.
In this case, the tyre repair kit cannot provide the required level of sealing. Contact your authorized Honda dealer or roadside assistance service.
WARNING
Do not operate the electric compressor continuously for more than 15 minutes. This may cause it to overheat.
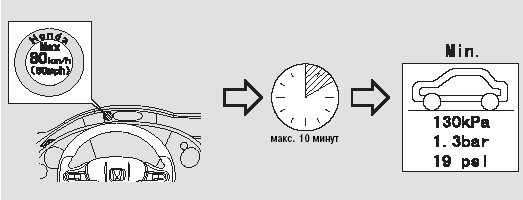
7. Drive off immediately. Drive carefully, keeping your speed below 80 km/h.
WARNING
When driving at speeds above 80 km/h, the vehicle may begin to vibrate, which adversely affects driving safety.
8. After 10 minutes or 5 kilometers, stop and check the tyre air pressure with a pressure gauge. Note that the pressure must be checked with the compressor switched off. If the pressure has not changed, the damage has been sealed. Continue driving with caution to your authorized Honda dealer or roadside assistance service.
9. If the tyre air pressure has dropped, inflate the tyre again and repeat the procedure from step 6.
WARNING
Stop driving in the following cases.
Contact your authorized Honda dealer or roadside assistance service.
•The tyre air pressure drops below 130 kPa.
•After performing steps 6 and 7, the tyre pressure continues to drop.
WARNING
Replace the tyre at the nearest Honda dealership. For repair of the damaged tyre, consult your authorized Honda dealer.
After the sealant is removed, the wheel may be reused; however, the tyre valve must be replaced.
Dispose of the used container at your authorized Honda dealer.
WARNING
A tyre service shop will not be able to repair the tyre if the puncture location cannot be determined. After driving on, check the tyre air pressure regularly. If the pressure drops, contact your authorized Honda dealer to have the tyre repaired.
Warning labels on the air compressor
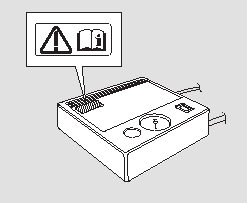
As a reminder of the rules for using the air compressor, warning labels are attached to its body.
The following information explains the contents of the labels.
Pictograms on the labels are intended to remind you to read the instructions for using the repair kit.
CAUTION
Do not run the engine in enclosed areas or when the vehicle is supported by a jack.
CAUTION
Do not touch the compressor without wearing protective gloves. The compressor becomes very hot during operation.
Do not operate the compressor continuously for more than 15 minutes. Before reusing it, make sure the compressor has cooled down.
Do not use the compressor for any purpose other than inflating tires.
NOTE:
The compressor is powered by 12-volt direct current.
Instructions
Before using the compressor, stop in a safe place.
Step 1.
Remove the tire valve cap and securely screw the compressor hose onto the valve.
Step 2.
Insert the compressor plug into the cigarette lighter socket.
Step 3.
Turn the ignition key to the ACCESSORY (I) position. Turn on the compressor and inflate the tire to the recommended pressure. Check the tire pressure with a pressure gauge.
WARNING
Before checking the tire pressure, turn off the compressor.
Step 4.
After the tire pressure reaches the specified value, remove the plug from the cigarette lighter socket. Make sure there is no air leakage from the tire.
Reinstall and securely tighten the tire valve cap.
Removing Sealant (for Honda dealers)
Take care to prevent sealant from leaking out of the tire.
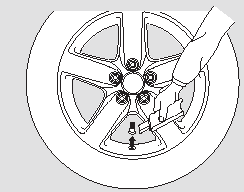
1. Remove the tire and wheel from the vehicle.
Release the air.
2. Cut off the valve with a knife.
WARNING
Take care not to cut your fingers or hand.
WARNING
Take care not to damage the tire or wheel.
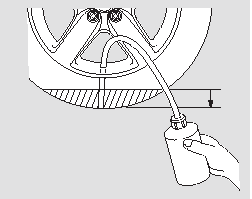
3. Insert the hose into the tire through the valve core opening.
Insert the hose as far as it will go.
4. Squeeze the container and pump out the sealant.
(It is best to place the tire on a table.) 5. If the sealant is not completely removed, repeat step 4.
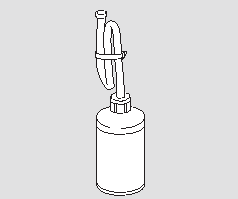
6. Bend the hose and securely tie it off with cord or tape to prevent sealant leakage. Dispose of the used container at an authorized Honda dealer when purchasing a new container.
WARNING
Proper disposal of sealant is important for protecting the environment. We appreciate your understanding and cooperation in disposing of sealant.
Sealant Removal Label
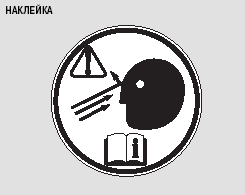
This label is attached to the wheel as a reminder to remove the sealant from the tire. It also indicates that the tire has been repaired using sealant. The following information explains the meaning of the pictograms on the label.
Pictograms ,on the label are intended to remind you to read the instructions for using the repair kit.
CAUTION
The sealant contains ethylene glycol.
Swallowing sealant may be fatal.
If sealant is swallowed, drink large amounts of water.
Seek medical attention immediately.
If sealant gets into your eyes or onto exposed skin, you may suffer severe chemical burns to the mucous membranes or skin. If sealant gets into your eyes or on your skin, flush the affected areas with large amounts of water. Seek medical attention immediately.
Keep out of the reach of children.
Store the sealant in a tightly closed container.
Test yourself
A quick Honda Civic quiz: every answer comes with an explanation and a link to the manual page.