Front cover
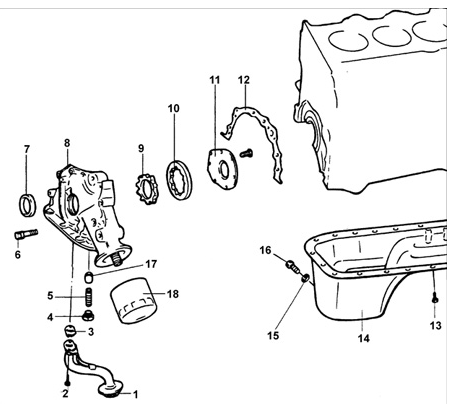
Front cover
1 – oil strainer;
2 – bolt, 15-22 N·m;
3 – gasket;
4 – plug;
5 – spring;
6 – bolt, 20-27 N·m;
7 – front oil seal;
8 – front cover;
9 – oil pump inner rotor;
10 – oil pump outer rotor;
11 – oil pump cover;
12 – gasket;
13 – bolt, 6-8 N·m;
14 – oil pan;
15 – gasket;
16 – plug, 35-45 N·m;
17 – plunger;
18 – oil filter.
Always use a new sealing washer when installing the plug.
Removal
PROCEDURE
1. Remove the timing belt.
2. Remove all oil pan mounting bolts.
3. Remove the oil pan.
4. Remove the oil filter.
5. Remove the front cover from the cylinder block.
6. Remove the oil pump cover.
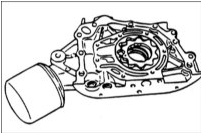
7. Remove the inner and outer oil pump rotors from the front cover, after marking their relative position.
8. Remove the plug, then remove the spring and plunger.
Inspection
PROCEDURE
1. Check the front cover for cracks or damage and replace it if necessary.
2. Check the front oil seal for wear or damage to the sealing lip and replace it if necessary.
3. Check the condition of the oil pan and replace it if necessary.
4. Check the mesh oil strainer for damage and replace it if necessary.
5. Check the front cover for wear or damage at the contact areas with the oil pump gears and replace it if necessary.
6. Check the condition of the relief valve installed in the front cover.
7. Check the shape and condition of the relief valve spring for damage.
Spring free length: 46.6 mm
Length under load: 6.1 kg / 40.1 mm
Installation of Front Cover
PROCEDURE
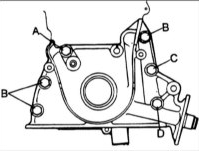
Install the front cover with a new gasket and secure it with bolts, tightening them to the specified torque.
Bolt lengths: A – 22 mm; B – 30 mm; C – 45 mm; D – 60 mm; tightening torque – 12–15 N·m
Front Oil Seal
PROCEDURE
1. Check the front oil seal for wear or damage to the sealing lip and replace it if necessary.
2. Check the condition of the garter spring that holds the seal lip against the shaft.
3. Use a new oil seal when installing.
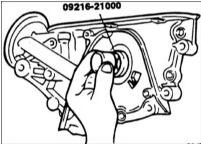
4. Apply engine oil to the outer surface of the new oil seal. Using special tool 09231–22100 or a sleeve of suitable diameter, install the oil seal onto the crankshaft until it contacts the front cover.
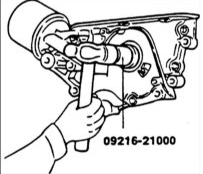
5. Using special tool 09231–22000, install the oil seal fully into the front cover bore.
6. Install the crankshaft pulley, timing belt, and crankshaft pulley.
7. Install the oil filter.
8. Clean all remains of the old gasket from the mating surfaces of the oil pan and the cylinder block.
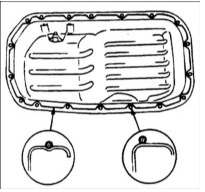
9. Apply a continuous bead of sealant 4 mm in diameter to the mating surface of the oil pan. Apply the sealant on the inside of the bolt holes. Install the oil pan within 15 minutes after applying the sealant.
10. Install the oil pan on the cylinder block and secure it with bolts.
Tightening torque: 6–8 N·m
Test yourself
A quick Hyundai Accent quiz: every answer comes with an explanation and a link to the manual page.