Engine and Transaxle Removal and Installation
Removal
PROCEDURE
1. Remove the battery.
2. Remove the air cleaner.
3. Disconnect the electrical connectors from the back-up light switch and the engine wire harness.
4. On vehicles with a manual 5-speed transaxle, disconnect the electrical connector from the select control valve.
5. Disconnect the electrical connectors from the alternator and the oil pressure sensor.
6. Drain the engine coolant.
7. On vehicles with an automatic transaxle, disconnect the transaxle oil cooler hoses.
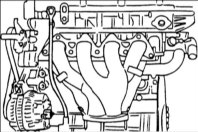
Label the hoses before disconnecting them to avoid mixing them up when reconnecting.
Take care not to spill transmission fluid from the hoses. Cover the hose ends with plugs to prevent dirt from entering.
8. Disconnect the upper and lower radiator hoses and remove the radiator.
9. Disconnect the ground cable from the engine.
10. Disconnect the vacuum hose from the brake booster.
11. Disconnect the fuel supply and return hoses from the engine.
Gasoline is extremely flammable. Do not use open flames, sparking devices, open-flame lights or smoke when working on fuel system components. Avoid creating sparks when handling wires and electrical devices.
12. Disconnect the cooling system hoses leading to the heater.
13. Disconnect the accelerator cable from the engine.
14. On vehicles with a manual 5-speed transaxle, disconnect the clutch cable from the transaxle case.
15. On vehicles with an automatic transaxle, disconnect the transaxle control cable.

16. Disconnect the speedometer cable from the transaxle.

17. Remove the air conditioning compressor from the bracket.
18. Raise the vehicle.
19. Drain the transaxle oil.
20. Disconnect the front exhaust pipe from the exhaust manifold.
Secure the exhaust pipe to the underbody with soft wire.
21. On vehicles with a manual 5-speed transaxle, disconnect the select and shift rods.
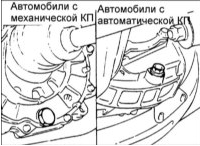
22. Remove the bolts securing the lower arm ball joint and the stabilizer bar to the lower arm.
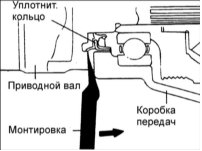
23. Using a pry bar, pull the inner joints of the drive shafts out of the transaxle.
To prevent dirt from entering, cover the openings in the transaxle with plugs.
When reinstalling the drive shafts, install new snap rings.
24. Secure the lower arms and drive shafts to the body with soft wire.
25. Attach the hoist hooks to the engine hangers and lift so that the engine weight is supported by the hoist.
26. Remove the front engine mount.
27. Remove the rear engine mount.
28. On vehicles with a 5-speed manual transmission, remove the transmission mount.
29. Remove the bolts securing the engine mount brackets.
30. Remove the mount brackets from the engine.
31. Slowly raise the engine until it clears the mounts, and temporarily hold it in this position.
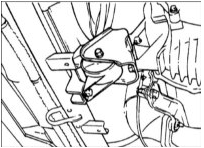
Make sure all electrical connectors, hoses, tubes and wire harnesses are disconnected from the engine.
32. Remove the bolts securing the transmission bracket to the right fender apron.
33. Remove the left mount bolt.

34. Tilt the transaxle downward, then lift and remove the engine together with the transaxle from the vehicle.
Installation
PROCEDURE
1. Install the engine with transaxle into the vehicle. Make sure hoses, wiring harnesses, pipes and electrical connectors are not damaged or pinched.
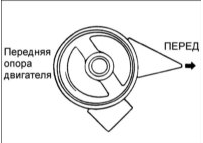
2. After installing the engine, temporarily tighten the front engine mount.
3. After installing the engine with transaxle, tighten all mount bolts to the specified torque.
4. Reconnect all previously disconnected components. Take special care to ensure they are connected correctly and securely.
5. Reconnect all previously disconnected components. Take special care to ensure they are connected correctly and securely.
6. Check fluid levels and top up all fluids as necessary.
7. Check the operation of the shift linkage and the accelerator cable.
8. Check the operation of all gauges.
Test yourself
A quick Hyundai Accent quiz: every answer comes with an explanation and a link to the manual page.