When replacing the ECM on a vehicle equipped with an immobilizer, perform the procedure below. [When installing a used ECM] 1) Perform the "ECM Neutral Mode" procedure using GDS. (Refer to Body Electrical System - "Immobilizer System") 2) After completing "ECM Neutral Mode," perform the "Key Learning" procedure using GDS. (Refer to Body Electrical System - "Immobilizer System") [When installing a new ECM] Perform the "Key Learning" procedure using GDS. (Refer to Body Electrical System - "Immobilizer System")
When replacing the ECM on a vehicle equipped with a Smart Key System (push button start), perform the procedure below. [When installing a used ECM] 1) Perform the "ECM Neutral Mode" procedure using GDS. (Refer to Body Electrical System - "Immobilizer System") 2) After completing "ECM Neutral Mode," insert the key (or press the start button) and turn it to the IGN ON and OFF positions. The ECM then automatically stores the smart key information. [When installing a new ECM] Insert the key (or press the start button) and turn it to the IGN ON and OFF positions. The ECM then automatically stores the smart key information.
Turn the ignition switch OFF and disconnect the negative (-) battery cable.
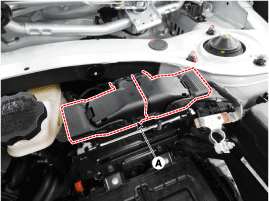
Remove the battery. (Refer to Engine Electrical System - "Battery")
Disconnect the ECM connector (A).
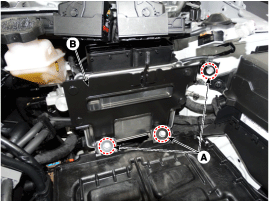
Remove the mounting bolts (A) and remove the ECM (B).
Installation
When replacing the ECM on a vehicle equipped with an immobilizer, perform the procedure below. [When installing a used ECM] 1) Perform the "ECM Neutral Mode" procedure using GDS. (Refer to Body Electrical System - "Immobilizer System") 2) After completing "ECM Neutral Mode," perform the "Key Learning" procedure using GDS. (Refer to Body Electrical System - "Immobilizer System") [When installing a new ECM] Perform the "Key Learning" procedure using GDS. (Refer to Body Electrical System - "Immobilizer System")
When replacing the ECM on a vehicle equipped with a Smart Key System (push button start), perform the procedure below. [When installing a used ECM] 1) Perform the "ECM Neutral Mode" procedure using GDS. (Refer to Body Electrical System - "Immobilizer System") 2) After completing "ECM Neutral Mode," insert the key (or press the start button) and turn it to the IGN ON and OFF positions. The ECM then automatically stores the smart key information. [When installing a new ECM] Insert the key (or press the start button) and turn it to the IGN ON and OFF positions. The ECM then automatically stores the smart key information.
Installation is the reverse of removal. ECM Mounting Bolt: 7.8 ~ 11.8 N·m ECM Bracket Mounting Bolt: 9.8 ~ 11.8 N·m
ECM Circuit Inspection Procedure
ECM GROUND CIRCUIT INSPECTION: Measure the resistance between the ECM and chassis ground using the rear side of the ECM harness connector as the ECM-side checkpoint. If a problem is found, repair it.
Specification: Below 1 Ω
ECM CONNECTOR INSPECTION: Disconnect the ECM connector and visually inspect the ground terminals on the ECM side and harness side for bent pins or poor contact tension. If a problem is found, repair it.
If no problem is found in steps 1 and 2, the ECM may be faulty. If so, before replacing the ECM, make sure there are no DTCs, then recheck the vehicle. If DTCs were detected, inspect them first before replacing the ECM.
RECHECK THE ORIGINAL ECM: Install the original ECM (which may be faulty) into a known good vehicle and inspect the vehicle. If the problem recurs, replace the original ECM with a new one. If the problem does not occur, it is an intermittent problem (refer to the "Inspection Procedure" in the Basic Inspection Procedure section).
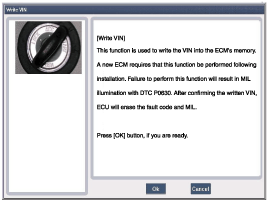
VIN Programming Procedure. The VIN (Vehicle Identification Number) is a number that contains vehicle information (manufacturer, vehicle type, vehicle line/series, body type, engine type, transmission type, model year, plant location, etc.). For details, refer to the "GI" group in this SERVICE MANUAL. When replacing the ECM, the VIN must be programmed into the ECM. If no VIN is stored in the ECM memory, DTC P0630 is displayed.
A programmed VIN cannot be changed. Carefully verify the VIN before writing it.
Select the "VIN Write" function in "Vehicle Software Management."
Select "Write VIN" in "Identification Registration."
Enter the VIN.
Before entering the VIN, verify the VIN again, because a programmed VIN cannot be changed.
Turn the ignition OFF, then turn it back ON.
?
Test yourself
A quick Hyundai Elantra AD quiz: every answer comes with an explanation and a link to the manual page.