Integrated Central Control Unit (ICU)
Components and Component Location
Component Location
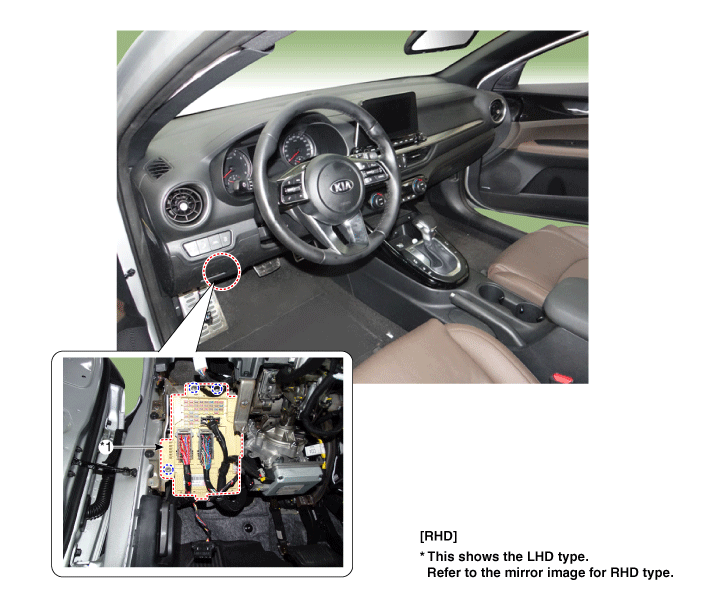
| 1. Integrated Central Control Unit (ICU) |
Description and Operation
Description
Communication Network Diagram
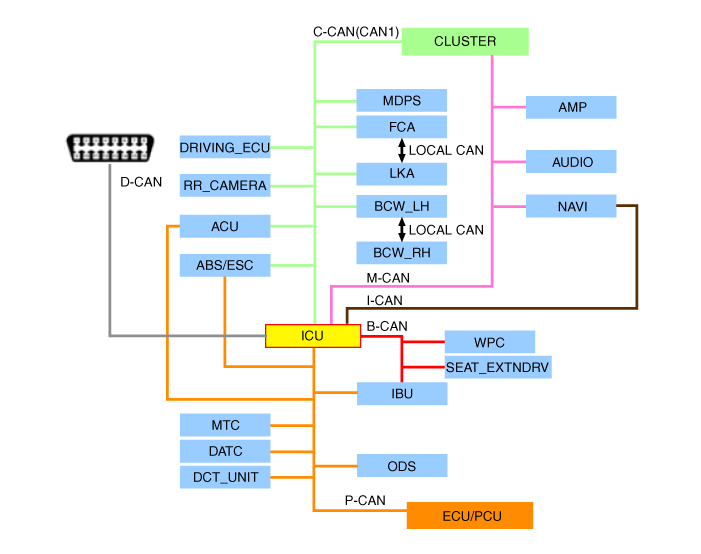
| Abbreviation | Description |
| ACU | Airbag Control Unit |
| MDPS | Motor Driven Power Steering |
| LKA | Lane Keeping System |
| BCW | Blind-Spot Collision Warning |
| IBU | Intelligent Body Control Unit |
| ICU (Intensive Care Unit) | Integrated Central Control Unit |
| MTS | Manual Temperature Control |
| DATC | Dual Automatic Temperature Control |
| ORV | Passenger Sensing System |
| PCM | Powertrain Control Module |
| ABS | Anti-Lock Braking System |
Integrated Central Control Unit (ICU)
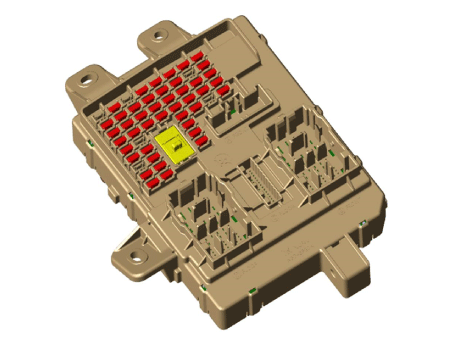
The ICU (Integrated Central Control Unit) is an integrated intelligent junction block and central gateway.
It performs the function of a conventional "Smart Junction Block" and the function of a "Central Gateway" communication device.
Central Gateway (CGW)
The CGW is a controller that provides communication between controllers connected to different networks.
Five CAN networks are connected to the CGW. B-CAN and M-CAN are connected to low-speed CAN, and C-CAN and P-CAN are connected to high-speed CAN. D-CAN is connected for inspection.
CGW Main Specifications
Routing: Exchanges information between different vehicle communication networks.
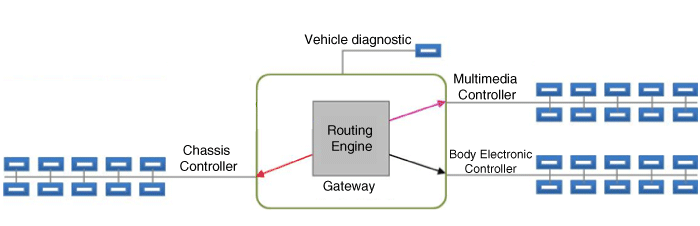
Network Security Control: Allows only inspection communication (D-CAN) to connect to the vehicle network to prevent
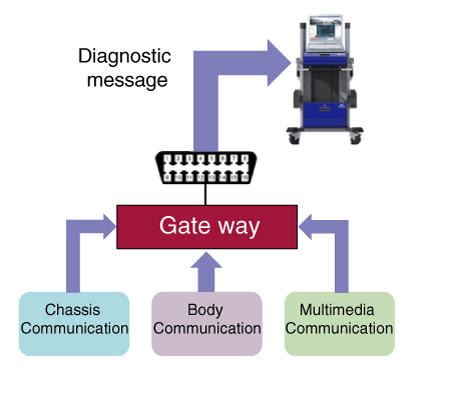
Additional Functions
If the warning lamp is on, perform remote diagnosis of the chassis CAN (C-CAN) system via the I-Box and gateway.
Dark Current Measurement: After sending a forced electronic shutdown message for each network from the diagnostic equipment, the gateway also enters sleep mode.
Current operation check: check the problem while the electronic parts are operating.
Diagnose the malfunction when a CAN communication signal failure occurs in the communication line / control defect.
(CGW records a DTC for the controller with the transmission error.)
How to Check the CGW
Although the record "No CGW CAN signal (TIMEOUT)" appears during inspection, the malfunction code of the faulty electronic component must never be determined as a CGW failure. CGW is the controller that serves as an intermediary between the transmitting and receiving controllers in the vehicle. If one of the following two cases occurs: (1) the transmitting controller cannot send a message to CGW, so CGW cannot send it to the receiving controller; (2) CGW sends a predefined value (Timeout Value), and the receiving controller records a malfunction code for message transmission failure. Therefore, to finally identify the controller that cannot send the CAN signal, the CGW DTC must be checked. CGW records a DTC only when it cannot receive a signal for more than 10 seconds after KEY ON. To determine the cause of the absence of CAN signal transmission, the CGW DTC must be checked after waiting more than 20 seconds with KEY ON.
If the CAN communication control unit is not reinstalled after removal from the vehicle, CGW records the "No CAN signal" malfunction code for the unit.
If the malfunction code remains after replacing the electronic components and the malfunction code is not erased, check whether the connector of the electronic component is damaged and whether it is connected correctly, and whether the CAN bus wiring of the controller is operating normally. If the removed electronic component cannot be reinstalled, the "Erase Expected Network Configuration" service must be performed. Refer to the DTC troubleshooting manual for the execution method of each malfunction code service.
Otherwise, the "No CAN signal" malfunction code on the corresponding controller may not be erased.
IGN2 SJB is turned on when the MCU has failed (inoperative state due to external physical or electrical impact). To ensure driver safety, the low beam headlamps, external and internal rear lamps are forcibly turned on when the low beam headlamp switch is ON.
IGN2 is turned on when data transmission/reception is impossible due to a failure in the CAN communication line (both cables shorted high/low, BAT shorted high/low, GND shorted high/low). In case of a fault in the CAN communication line connected to the SJB module, when the headlamp low beam switch is ON, the low beam headlamps and internal/external rear lamps are forcibly turned on.
Smart Junction Block (SJB)
The Smart Junction Block (SJB) is a module that performs the function of a conventional junction box and some IBU functions.
It controls various components, including lamps, using CAN communication and IPS (which replaces the function of fuses and relays) or ARISU.
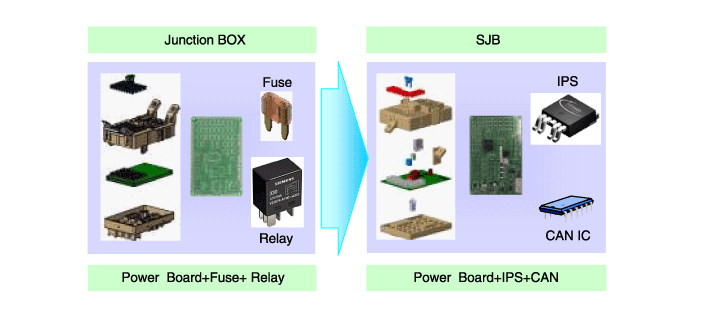
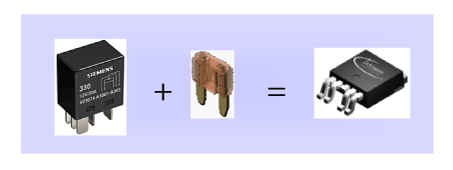
IPS stands for Intelligent Power Switch, which uses semiconductor technology to replace the current role of fuses and relays.
The IPS chip performs two functions:
1) controls high-current components;
2) protects components from overcurrent.
SJB Control Input
Switch Signal Input
Auxiliary Seat Belt Switch
Seat Belt Unfastened Reminder Switch
Door Switch Assist
Driver Seat Belt Switch
Driver Seat Belt Switch
Rear Left Seat Door Switch
Rear Right Seat Door Switch
Rear Left Seat Belt Switch
Rear Right Seat Belt Switch
Rear Center Seat Belt Switch
IGN1 Switch
IGN2 Switch
Brake Fluid Sensor
Trunk Opener Switch
Trunk Lid Handle Switch
HID Headlamp (Option)
ADV HID Headlamp Option
Hazard Warning Switch
Headlamp Low Beam Switch
Hood Switch
Dark Switch
Front/Rear Left Turn Signal Switch
Front/Rear Right Turn Signal Switch
IPS&ARISU
Left Headlamp Low Beam
Right Headlamp Low Beam
Right Headlamp High Beam
Right Headlamp High Beam
Front Left/Right Fog Lamp
License Plate Lamp
Outer Left Rear Lamp
Rear Exterior Lighting Lamp
Left Front/Rear Turn Signal Lamps
Right Front/Rear Turn Signal Lamps
Static Cornering Left Lamp
Static Cornering Right Lamp
Left DRL Lamp
Right DRL Lamp
Trunk Lamp
Body Resistance Cut Control
Front Left Turn Signal Output
Front Right Turn Signal Output
Relay Control
Rear window defrost relay
Anti-Theft Alarm Horn Relay
Trunk Lid Relay
Interior Lamp Relay
Windshield Heater Relay
Rear Fog Lamp Relay
High Beam Headlamp Relay
SJB Protection
PCL (Programmable Current Limiter) Functions
PCL replaces the protective function of the junction box wiring.
How it works: If the lamp current exceeds the standard level, cut off the current to protect the lamp.
Lamp shut-off time: 300 ms or less.
Components used: all lamp components are controlled by the SJB.
Output the DTC according to the fault detection condition.
OCL (Open Current Limit)
OCL detects the open state of the lamp and informs the user of this.
How it works: Detect the lamp current and, if it is below the standard level, change the lamp operating mode.
Components used: 4 turn signal lamps
Output the DTC according to the fault detection condition.
SJB Fail-Safe Function
When the MCU has failed (inoperative due to physical or electrical impact from outside), and the IGN2 and headlamp low beam switch are ON, the SJB turns on the low beam headlamps and external/internal rear lamps to ensure driver safety.
When data transmission/reception fails due to a failure of the CAN communication line connected to the SJB module (both high and low lines open, high/low BAT short, high/low GND short), the low beam headlamps and internal/external rear lamps are forcibly turned on if IGN2 is ON and the headlamp low beam switch is ON.
Battery Saver Auto Shut-Off System
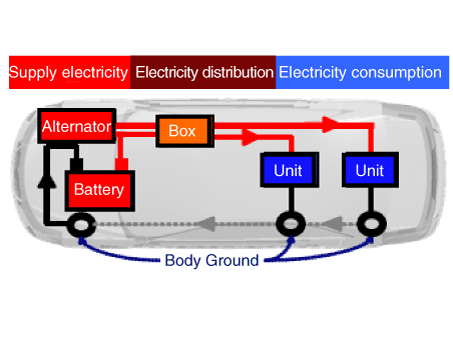
Description: Automatically cuts off power supplied to components to reduce unnecessary dark current depending on the vehicle condition.
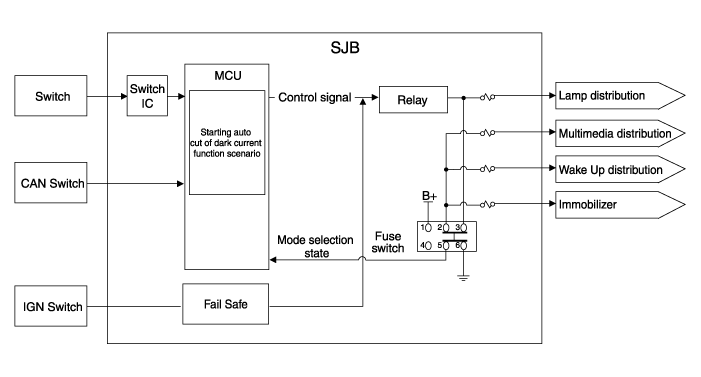
The SJB has 3 modes: "Normal Mode", "Sleep Mode", and "Power Off Mode". The automatic dark current cut-off control is performed in "Sleep Mode".
Sleep state: IG OFF, constant input switch, CAN network is not activated.
Deciding condition "Sleep": any switch input, CAN network activated, KEY ON, IGN ON
"Power Off" condition: timer setting time, which is used by cutting off the load; power expires.
"Normal Mode": The SJB function is normally active.
"Sleep mode": a low power consumption mode that is activated to reduce power consumption of the SJB or IPM. The dark current cut-off function is automatically activated.
"Power-down mode": power to the MCU and the circuit is cut off to minimize power consumption. Operation stops.
Description - Automatic Dark Current Cut-off
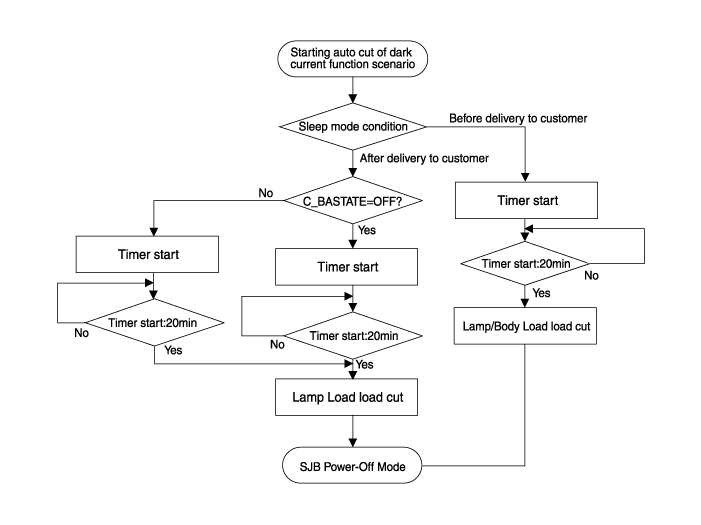
Before Delivery to Customer Fuse switch OFF. All doors closed and door lock RKE or ignition switch status
(Automatic dark current cut-off scenario starts.)
After the "sleep" state, the state lasts 20 min.
SJB power-off (SJB dark current: 200 µA) and lamp load cut-off
/Body load/Wake-up
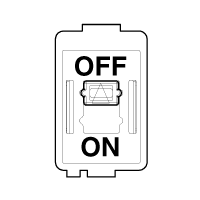
After Delivery to Customer Fuse switch ON. All doors closed and constant switch status: C_BAState=OFF
(Automatic dark current cut-off scenario starts.)
After the "sleep" state, the state lasts 20 min.
SJB power-off (SJB dark current: 200 µA) and lamp load cut-off
For RKE door lock: C_BAState=ON & Trunk Status=CLOSE
(Automatic dark current cut-off scenario starts.)
After "Sleep" state 35 s–65 s (standby time other unit: 30–60 s + SJB
sleep is considered 5 s)
SJB Power-down (SJB dark current: 200 µA) and cut-off
Lamp load
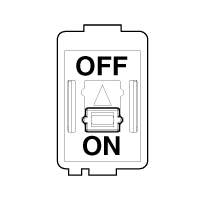
Problem due to incorrect installation of the fuse switch
: If the fuse switch is set to OFF (before delivery to the customer) by the customer or a service technician and the dark current automatic cut-off function is activated, the following problems may occur.
Symptom Related Part Door lock/unlock and trunk opening are not activated by RKE.
(Wake-up of each module is not activated.)
IBU Digital clock is reset. (Memory is reset.)
Digital Clock Sound setting values (volume, frequency setting) are reset.
(Memory is reset.)
Audio
* If the fuse switch is turned OFF (before delivery to the customer), power to the IBU, digital clock and audio is disabled.
Repair Procedures
Fuse Inspection
Make sure the fuse holders are secured firmly and the fuses are securely held in place by the holders.
Make sure that each fuse circuit has the correct fuse rating.
Inspect the fuses for damage.
Diagnosis Using KDS
In the body electrical system, faults can be quickly diagnosed using the Korean Diagnostic System (KDS).
The Diagnostic System (KDS) provides the following information.
Self-diagnosis: check for malfunction and diagnostic trouble code (DTC).
Current Data: Check the system input/output status.
Operation check: Check the operating status of the system.
Special Function: Control of other functions, including parameter setting and zero point adjustment.
Select "Vehicle Model" and "Integrated Central Control Unit (ICU)" to inspect the vehicle using the tester.
Select the "Current Data" menu to view the current input/output data status.
To forcibly activate the input value of the module under test, select the "Activation Test" option.
To change a user setting, select "User Setting".
Removal
Disconnect the negative (-) battery terminal.
Remove the airbag lower panel.
(Refer to Body - "Under Cover Panel")
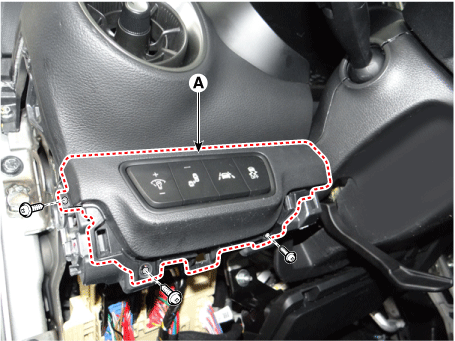
Remove the side switch assembly (A) of the airbag after loosening the mounting screws.
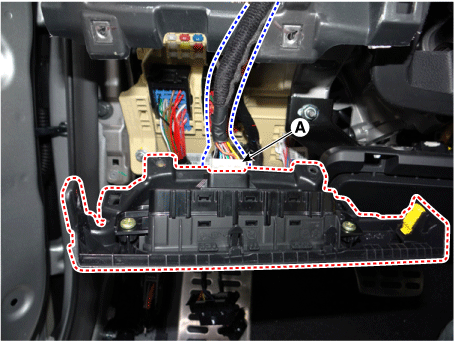
Disconnect the connector of the airbag side switch assembly (A).
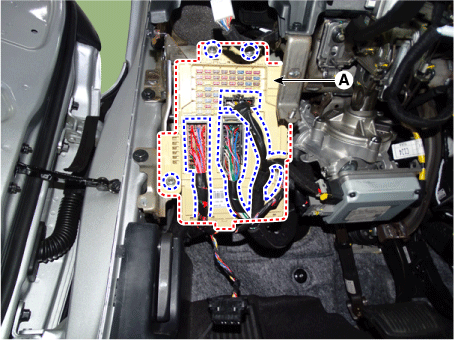
Remove the ICU (A) by loosening the nuts after disconnecting the connector.
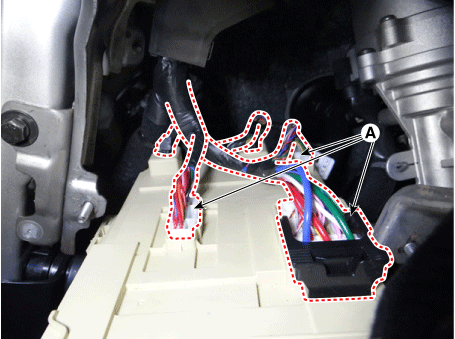
Disconnect the connector (A) from the ICU.
Installation
Install in the reverse order of removal.
Test yourself
A quick Kia Forte BD quiz: every answer comes with an explanation and a link to the manual page.