Single-Use Parts
AWD Control System
In this manual: Single-Use Parts
12steps
~72min
3/5difficulty
Done 0 of 12
Contents:
Adjustment
Adjustment
Description The friction material (clutch pack) within the coupling of each vehicle varies from vehicle to vehicle, so after replacing the AWD ECU a procedure must be performed to enter calibration values, vehicle model information. Conditions and Calibration Procedures- Replacing only Direct Electro Hydraulic Actuator Coupling Clutch Learning Reset (S/W Management → 4WD Control → Clutch Learning Reset)
Refer to the KDS screen for operating conditions and details
- Replacing only AWD ECU Adaptive Value BackUp & Input (ECU replacement) (S/W Management → 4WD Control → Adaptive Value BackUp & Input (ECU replacement))
Refer to the KDS screen for operating conditions and details - Replacing transfer case assembly and AWD ECU Adaptive Value BackUp & Input (ECU & Transfer Assy replacement at once) (S/W Management → 4WD Control → Adaptive Value BackUp & Input (ECU & Transfer Assy replacement at once))
Refer to the KDS screen for operating conditions and details - If a DTC about fault torque or bleeding pressure occurs, bleed the air inside the oil. Air Bleeding Mode (S/W Management → 4WD Control → Air Bleeding Mode)
Refer to the KDS screen for operating conditions and details - If the used 4WD ECU is installed. Initialize 4WD ECU (S/W Management → 4WD Control → Initialize 4WD ECU)
Refer to the KDS screen for operating conditions and details
AWD ECU Description and Operation
Description
The AWD ECU accurately adjusts the tightening force of the AWD-coupled multi-plate clutch by determining the road conditions and driving conditions through various sensor signals inputted, thus controlling the magnitude of the drive transmitted to the rear wheels.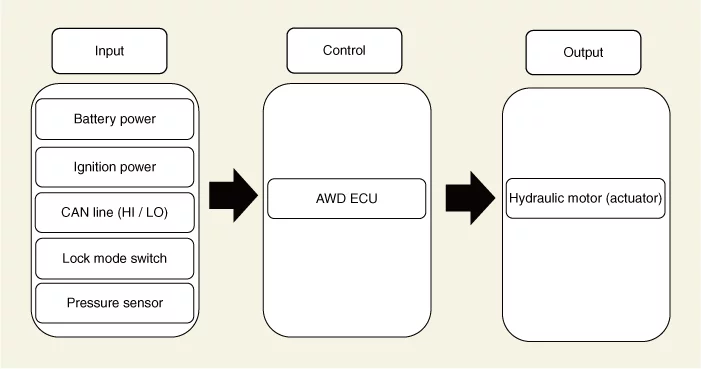
AWD ECU Flow Chart
Flow Chart
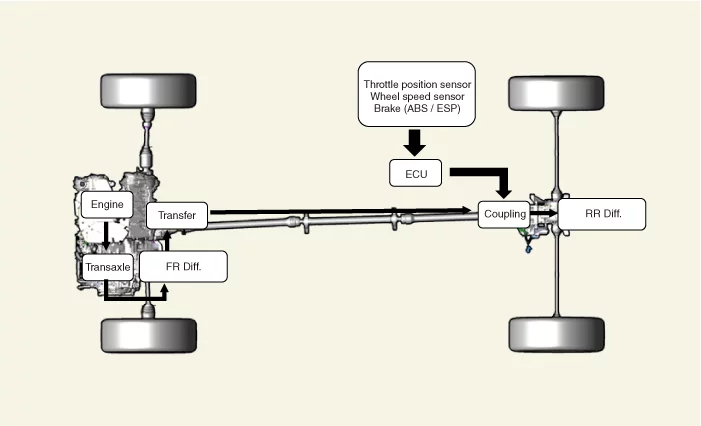
AWD ECU Input-Output Diagram
AWD ECU Removal and Installation
Removal
- Perform the adaptive value back up & input procedures after replacing AWD ECU. (Refer to AWD Control System - "Adjustment")
- Disconnect the battery negative ( - ) terminal.
- Remove the front seat assembly. (Refer to Body - "Front Seat Assembly")
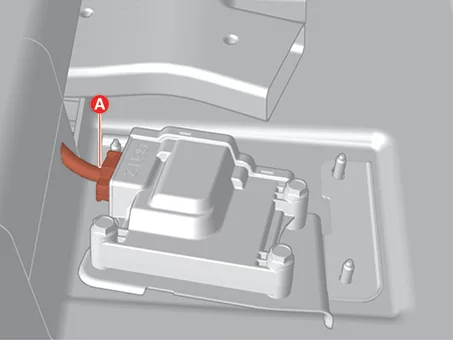
- Disconnect the AWD ECU connector (A).
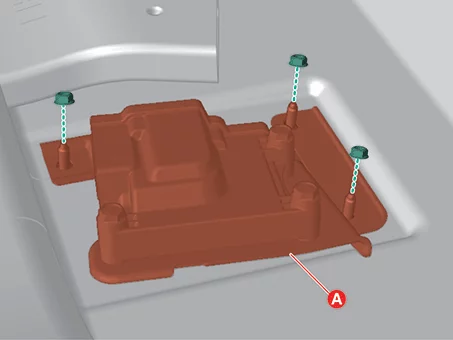
- Remove the nuts, and then remove the AWD ECU(A).
Tightening torque : 9.8 - 11,8 N·m
Installation
- Install in reverse order of removal.
- Write the ECU backup data using the KDS.
(Refer to AWD Control System - "Adjustment")
If the used ECU is installed, perform 'Initialize 4WD ECU' using KDS.
Was this page helpful?