Temperature Actuator
Beschreibung und bedienung
Beschreibung
The mode actuator and temperature actuator are installed in the heater unit.
The temperature actuator is located on the heater unit. The temperature control works as follows: a signal from the control unit operates the temperature door via the corresponding actuation of the temperature switch. The temperature is then regulated by the ratio of cold and warm air, which is determined by the position of the temperature door.
Repair Procedures
INSPECTION
Zündung ausschalten.
Stecker des Temperatur-Stellantriebs abziehen.
Check whether the temperature actuator moves to the "WARM" position (left-hand drive) or the "COLD" position (right-hand drive) when 12 V is applied to terminal 3 and ground terminal 4.
Check whether the temperature actuator moves to the "COLD" position (left-hand drive) or the "WARM" position (right-hand drive) when the terminals are reversed.

1. -
2. -
3. Cold position
4. Warm position5. Sensor (+5 V)
6. Actuator feedback signal
7. Sensor groundStecker des Temperatur-Stellantriebs anschließen.
Die Zündung einschalten:
To do this, measure the voltage between terminals 6 and 5 (left-hand drive) or 7 (right-hand drive).
SPECIFICATIONS
Klappenstellung VOLTAGE (V) Fault detection MAX. COOL 0,4 Niederspannung: 0,1 V oder Weniger MAX. HEAT 4-6 Hochspannung: 4,9 V oder mehr
Die aktuelle Stellung wird zur Steuerung an den Stellantrieb rückgemeldet.
If the measured voltage does not meet the specification, replace the temperature actuator with a known good actuator and check for proper operation.
Wenn das Problem behoben ist, den Temperatur-Stellantrieb ersetzen.
REMOVAL AND INSTALLATION
Battery
Handschuhfachgehäuse ausbauen.
(Siehe Karosserie - "Handschuhfachgehäuse")
Loosen the screw and remove the driver-side footwell air duct (A).

Steckverbinder (A) abklemmen und dann den Temperatur-Stellantrieb (B) nach dem Lösen der Befestigungsschrauben ausbauen.
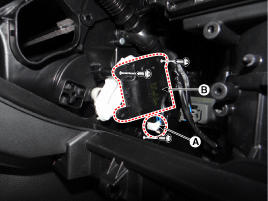
Der Einbau erfolgt in der umgekehrten Reihenfolge des Ausbaus.
Test yourself
A quick Kia Stonic quiz: every answer comes with an explanation and a link to the manual page.