AM/FM Radio with CD Player (if equipped)
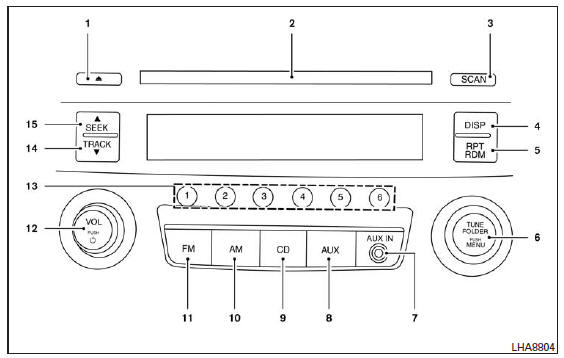
- CD Eject Button

- CD Loading Slot
- SCAN button
- DISP button
- RPT/RDM button (repeat/random)
- TUNE/FOLDER button / MENU button
- AUX IN jack
- AUX button
- CD button
- AM button
- FM button
- VOL (volume) and power control knob
- Station preset buttons (1 to 6)
- TRACK button

 SEEK button
See the "Audio System Precautions" section in this chapter for precautions to observe when using the system.
Basic audio system operation
VOL (volume) and power control knob
Turn the ignition switch to ACC (accessory) or ON, then press the VOL (volume) and power control knob. To listen to the radio with the engine off, turn the ignition switch to ACC (accessory). The audio system resumes in the mode that was selected previously.
If no CD is in the player, the radio turns on. To turn off the audio system, press the VOL (volume) and power control knob again.
Turn the VOL (volume) and power control knob clockwise to increase the volume and counterclockwise to decrease it.
MENU button (Bass, Treble, Balance [left-right], Fade [front-rear], Speed Sensitive Volume and Clock):
Press the MENU button to change the mode in the following order: Bass → Treble → Balance (left-right) → Fade (front-rear) → Speed Sensitive Volume → AUX IN volume → Clock → Clock adjustment. To adjust bass, treble, left-right balance and front-rear fade, press MENU until the desired mode appears on the display. Press the SEEK or TRACK button to set the level (-5 to +5). Left-right balance adjusts the sound level between the right and left speakers. Fade adjusts the sound level between the front and rear speakers.
Once the sound quality is set as desired, press MENU several times until the radio or CD player display appears again. Otherwise, the radio or CD display returns automatically after about 10 seconds.
The speed sensitive volume control adjusts the audio system volume according to changes in vehicle speed.
It can be set as follows: OFF → LOW → MID → HIGH
DISP (display) button:
Press the DISP button during CD playback to change the text shown on the audio display as follows: For CDs: Running Time → Album Title: → Artist Name: → Song Title
For MP3: Running Time → Folder Title: → Album Title: → Artist Name: → Song Title. When text information cannot be fully displayed on the screen, press and hold the DISP button for more than one and a half seconds to scroll the rest of the text.
Press the DISP button while the radio is playing to toggle the audio display between the station number and RDS information.
Clock operation
To show or hide the clock, press the MENU button repeatedly until the "Clock" display appears. Turn the TUNE/SCROLL knob to turn the clock setting on or off.
Clock setting
- Press the MENU button repeatedly until the "Adjust Clock" mode appears.
- Press the ENTER button.
- "Change Hour" will appear on the display. Turn the TUNE/FOLDER knob to set the hours, then press ENTER.
- "Change Minute" will appear on the display. Turn the TUNE/FOLDER knob to set the minutes, then press ENTER.
If no further adjustment is made, the display returns to the normal clock display after 10 seconds.
AM/FM radio operation
AM and FM buttons:
Press the AM button to switch to the AM frequency band.
If another audio source is playing when the AM button is pressed, the current audio source is automatically turned off and the last station received is tuned.
Press the FM button to change the frequency band as follows:
FM1 → FM2 → FM1
If another audio source is playing when the FM button is pressed, the current audio source is automatically turned off and the last station received is tuned.
The stereo FM indicator (ST) lights up during FM stereo reception. When the stereo broadcast signal weakens, the radio automatically switches from stereo to monaural reception.
 SEEK
and TRACK buttons:
Press the SEEK button
to tune from low to high frequencies and stop at the next station.
Press the TRACK button
to tune from high to low frequencies and stop at the next station.
Press and hold either button for faster seeking.
SCAN button:
Press the SCAN button. The "SCAN" indicator appears. Station scanning starts from the lowest frequencies. It stops for five seconds at each station with a strong enough signal. The "SCAN" indicator remains displayed throughout scanning. Press the SCAN button again during this five-second period to stop scan tuning. The radio will remain tuned to the current station.
Preset station buttons (1 to 6) operation:
You can preset 12 stations for the FM band (6 for FM1, 6 for FM2) and 6 stations for the AM band.
- Select the AM, FM1 or FM2 band using the AM or FM button.
- Select the desired station using manual tuning, seek or scan. Press and hold one of the preset buttons (1 to 6) until a beep sounds.
- The band indicator then lights up and the sound is restored. Programming is complete.
- Other stations can be stored (assigned to other preset buttons) by following the same procedure.
If the battery cable is disconnected, or the radio fuse is blown, the radio memory will be erased. If this happens, repeat the steps to preset the desired stations.
CD player operation
Turn the ignition switch to ACC (accessory) or ON, then carefully insert the CD into the slot, label side up. The CD is loaded automatically and playback starts.
If the radio is already on, it turns off automatically to allow CD playback.
CD button:
When the CD button is pressed while a CD is loaded and the radio is on, the radio turns off and CD playback starts.
 SEEK
and TRACK (fast forward, reverse) buttons:
When the SEEK
(seek) or TRACK (track or file) is
pressed during CD playback, playback moves forward or backward at high speed. When the button is released, playback resumes at normal speed.
 SEEK
and TRACK buttons:
When the SEEK (seek)
is pressed during CD playback, the player skips to the beginning of the next track on the disc. Press the SEEK
(seek) several times to skip multiple tracks. Playback moves to the next track each time the button is pressed. The track number is displayed. (When the last track on the CD is skipped, playback resumes at the first track.) When the TRACK (track or
file) is pressed, the track currently playing restarts from the beginning. Press the TRACK (track or file)
several times to go back several tracks. Each time the button is pressed, playback moves to the previous track.
RPT RDM (repeat, random) button:
Press the RPT/RDM button during CD playback to change the playback order as follows: CD: TRACK REPEAT → DISC RANDOM → DISC REPEAT. CD MP3-WMA: FOLDER REPEAT → TRACK REPEAT → DISC RANDOM → FOLDER RANDOM → DISC REPEAT. TRACK REPEAT: The track currently playing is repeated.
DISC RANDOM: The playback order of the tracks is shuffled.
DISC REPEAT: The disc currently playing is repeated.
FOLDER REPEAT: The tracks in the current folder are repeated.
FOLDER RANDOM: The playback order of the tracks in the folder is shuffled.
SCAN button (CD):
Press the SCAN button for less than one and a half seconds to scan all tracks on the disc, at 10 seconds per track. The SCAN indicator flashes while scan mode is active.
Scan mode ends when all tracks on the disc have been scanned, or if the SCAN button is pressed during scan mode.
 CD eject button:
When the button is pressed and
a CD is loaded, the CD is ejected.
When the button is pressed
during CD playback, the CD is ejected and the audio system turns off.
AUX (auxiliary) button:
The AUX IN (auxiliary input) jack is located on the CD player. The AUX IN jack accepts any standard analog audio source, such as a cassette player, MP3 player, CD player or laptop computer.
Press the AUX button to play a compatible device connected to the AUX IN jack.
Press the MENU button repeatedly until "AUX IN Volume" appears on the display to adjust the input level from the auxiliary device. Turn the TUNE/FOLDER knob to set the level between 0 and +3.
Additional features
For more information about the Bluetooth® audio interface available with this system, refer to the "Bluetooth® Audio Streaming without Navigation System (Type A)" section in this chapter.
Test yourself
A quick Nissan Altima quiz: every answer comes with an explanation and a link to the manual page.