Disassembly
1. REMOVE DIFFERENTIAL CARRIER COVER
(a) Remove the 9 bolts and nut from the carrier cover. (b) Using a brass bar and hammer, separate the cover from carrier. (c) Remove the breather plug from the differential carrier cover.(d) Remove the 2 bolts and oil deflector from the differential carrier cover.
2. SET DIFFERENTIAL CARRIER TO OVERHAUL STAND, ETC.
3. CHECK RUNOUT OF COMPANION FLANGE
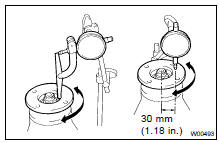
Using a dial indicator, measure the vertical and lateral runout of the companion flange.
Maximum: 0.09 mm (0.0035 in.)
If the runout is greater than the maximum, replace the companion flange.
4. CHECK RING GEAR RUNOUT

Using a dial indicator, measure the ring gear runout.
Maximum runout: 0.07 mm (0.0028 in.)
If the runout is greater than the maximum, replace the ring gear and drive pinion as a set.
5. CHECK RING GEAR BACKLASH
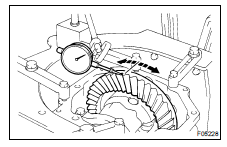
Using a dial indicator, while holding the drive pinion flange measure the ring gear backlash.
Backlash: 0.13 - 0.18 mm (0.0051 - 0.0071 in.)
HINT: Measure at 3 or more places on the circumference of the ring gear.
If the backlash is not within the specification, adjust the backlash.
6. MEASURE DRIVE PINION PRELOAD
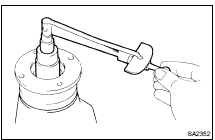
Using a torque wrench, measure the drive pinion preload using the backlash of the drive pinion and ring gear.
Preload (at starting): 0.5 - 0,8 N·m
7. CHECK TOTAL PRELOAD
Using a torque wrench, measure the total preload.
Total preload (at starting): Drive pinion preload plus
0.4 - 0,6 N·m
If necessary, disassemble and inspect the differential.
8. INSPECT TOOTH CONTACT BETWEEN RING GEAR AND DRIVE PINION ( SA-47 )
9. REMOVE SIDE GEAR SHAFT OIL SEALS
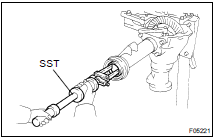
Using SST, remove the 2 side gear shaft oil seals.
SST 09308-00010
10. REMOVE DIFFERENTIAL TUBE ASSEMBLY

(a) Using SST, remove the snap ring.
SST 09350-30020 (09350-07060)
(b) Using a snap ring expander, remove the snap ring. (c) Remove the 4 bolts and differential tube with side gear shaft from the differential carrier.(d) Remove the side gear shaft from the differential tube.
11. REMOVE SIDE GEAR BEARING
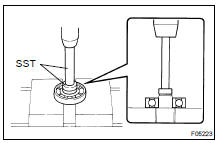
Using SST and a press, remove the bearing from side gear shaft.
SST 09950-60010 (09951-00410), 09950-70010 (09951-07100)
12. REMOVE COMPANION FLANGE
(a) Using a chisel and hammer, unstake the nut.
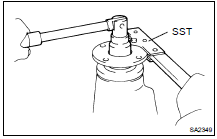
(b) Using SST to hold the flange, remove the nut.
SST 09330-00021
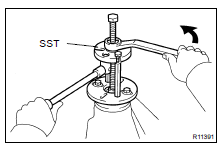
(c) Using SST, remove the companion flange.
SST 09950- 30012 (09951- 03010, 09953- 03010, 09954-03010, 09955-03030, 09956-03020)
13. REMOVE OIL SEAL AND OIL SLINGER
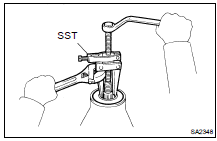
(a) Using SST, remove the oil seal from the differential carrier.
SST 09308-10010
(b) Remove the oil slinger.
14. REMOVE REAR BEARING
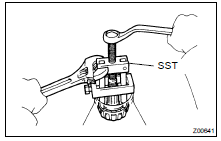
Using SST, remove the rear bearing from the drive pinion.
SST 09556-22010
If the rear bearing is damaged or worn, replace the rear bearing.
15. REMOVE DIFFERENTIAL CASE ASSEMBLY
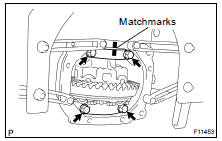
(b) Remove the 4 bolts and 2 bearing caps.
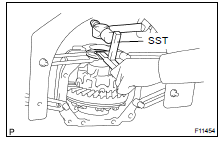
(c) Using SST and a hammer, remove the 2 side bearing plate washers.
SST 09504-22012
HINT: Measure the plate washer and note down the thickness.
(d) Remove the differential case with the bearing outer races from the differential carrier.
HINT: Tag the bearing outer races to show the location for reassembling.
16. REMOVE DRIVE PINION AND BEARING SPACER FROM DIFFERENTIAL CARRIER
17. REMOVE DRIVE PINION FRONT BEARING

(a) Using SST and a press, remove the front bearing from the drive pinion.
SST 09950-00020
HINT: If the drive pinion or ring gear is damaged, replace them as a set.
(b) Remove the washer.
18. REMOVE DRIVE PINION FRONT AND REAR BEARING OUTER RACES AND OIL STORAGE RING
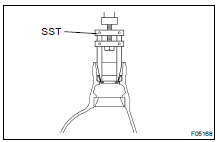
(a) Using SST, remove the rear bearing outer race.
SST 09308-00010
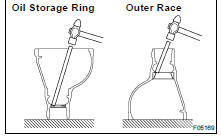
(b) Using a brass bar and hammer, remove the oil storage ring and front bearing outer race.
19. REMOVE RING GEAR
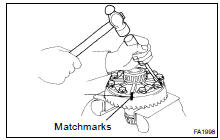
(d) Using a plastic hammer, tap on the ring gear to separate it from the differential case.
20. CHECK DIFFERENTIAL CASE RUNOUT
(a) Place the bearing outer races on their respective bearings.
Check that the left and right outer races are not interchanged. (b) Install the assembled plate washers onto the side bearing.(c) Install the differential case in the differential carrier.
HINT: If it is difficult to install the differential case into the carrier, replace the plate washer with a thinner one.
However, select a plate washer that allows no clearance between it and the carrier.
(d) Align matchmarks on the bearing cap and differential carrier.(e) Install and uniformly tighten the 4 bolts a little at a time.
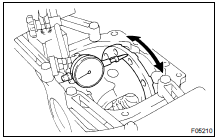
(f) Using a dial indicator, measure the differential case runout.
Maximum case runout: 0.07 mm (0.0028 in.)
If the runout is greater than the maximum, replace the differential case and side bearings as a set.
(g) Remove the differential case.
21. REMOVE SIDE BEARINGS

Using SST, remove the 2 side bearings from the differential case.
SST 09950- 40011 (09951- 04020, 09952- 04010, 09953- 04030, 09954- 04010, 09955- 04061, 09957- 04010, 09958- 04011), 09950- 60010 (09951-00480)
HINT: Fix the claws of SST to the notches in the differential case.
22. DISASSEMBLE DIFFERENTIAL CASE

(d) Remove the spider, 2 side gears, side gear thrust washers, 4 pinion gears and pinion gear thrust washers from the RH differential case.
INSTALLATION
Installation is in the reverse order of removal ( SA-39 ).
HINT: After installation, fill the differential with hypoid gear oil ( SA-35 ).
Test yourself
A quick Toyota Land Cruiser quiz: every answer comes with an explanation and a link to the manual page.